Joining the Quilted Piece and Ring Shank
Lesson 6 from: Beginning Stamping for Jewelry MakingRaissa Bump
Joining the Quilted Piece and Ring Shank
Lesson 6 from: Beginning Stamping for Jewelry MakingRaissa Bump
Lesson Info
6. Joining the Quilted Piece and Ring Shank
Lessons
Lesson Info
Joining the Quilted Piece and Ring Shank
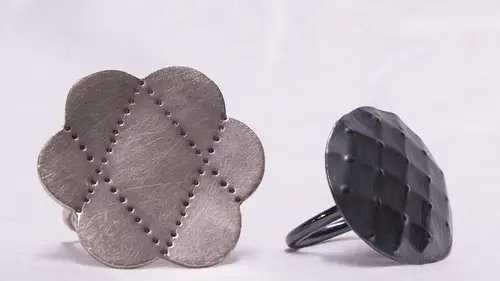
I want to get it round to your liking and it's not much of a difference if you want to sandpaper this, you can get put texture on it if you'd like, sand it up and you get your round ring and you want to file just a little flat spot, so we're going to be placing this and saw during it here, right? You want a good connection? And so saw dory sees me filing a little flat spot on the top of the range is good, so I've got one here that's got just a little flat spot. I don't know if you can see that here a little bit of a flat spot he was taking your file and I like to you want to put it? Also, the seam is on one end file on the opposite and keeping the seam away from where you're going to saturday at this time, if you need to size that's helpful and also helps to not reopen and flow that just taking the file and running it across a few strokes to get that flat spot right? That also cleans the medal. All right, more surface area to it here. Yeah, you can imagine that around the round metal o...
f this spring connecting with this has the tiniest little spot where they're connecting, so does give more surface area to sauder and just business. I mean a good slaughtering joint is a strong joint, but it gives more surface area that's a little bit it's a it's a better solution for this so flexing up on the flex bull sides he's a third arm here place this down so I can use the third arm you can also use trees there's like this which rest up and can hold so this might work in this case not going to work in this case is too high but works for some things really great all right, you haven't kneeled any of the metal decisions something it's a personal preference for you so this is very work hardened from all that stamping but there's no reason why it can't stay like that actually when I heat it up it's gonna neil it by saw during it, but I don't need to keep working it it's done at this stage if you're finding you're not having the results as you're stamping that you want if you want the stamping to be more dramatic, you can come in and neil the piece I found that I get the results that I want without but you couldn't heal and then go back and stamps and more and go back and forth if you need it to for for if you're finding extremely difficulty just for our viewers, is there a particular type of flux thatyou prefers or any difference, there are lots of different kinds of flux somewhere specifically, more liquid, somewhere more for gold. Some are different. It's a preference thing, some of them get waxy, I find and I don't really like I've been enjoying this this out of flux there's different compositions for different materials. And some of it is just preference. Thank you. So ok, so setting it up there is they are connected already. You want to make sure lines up so I'd like to look down from top to bottom it's leaning over a little bit here. So I'm just gonna just this so it's more straight up and down and then meeting up with the flat spot. So keep looking from the side and from top to top so that the placement, the setting up and sala ringing, I want to spend the time to set it up correctly will make the suffering happen way easier than when you're fussing around with the torch on and sauder so set it up so it's exactly how you want it and then go and sadder. And in this, we've got this sheet down here and then the wire that's, the ring and that she is you're going to want those both the heat up to the same temperature to teo, get the water to flow but one is smaller than the other, so I want to focus a little bit more on the base on that textured quoted peace than on the ring shank itself. Okay, so I'm going to heat it up once it stops bubbling. Once there's no more less water and the flux I'm going to place my sah'tar and that's so that it doesn't move around and stays right where I wanted a number two little pieces of soccer, okay? And then I want to focus. If the satyr moves, you can use your pick here and you typically if you're right handed, hold the torch in your left hand so your decks tears although the dexterity in your right hand khun b for placing the sadder and doing the more fine tuning things. So you want to keep the flame moving it's about to flow and there it did flow and sometimes flowing boobs lowe's athletes get more sauder place it on if I heat from behind if I bring the torch to the back side, it's nice and the cider wants to flow where that he is, so it will suck it back. You ever use the soldering iron? Is that something that you just don't the reason for that, you know it doesn't heat up so sodding iron. It doesn't heat up the metal in the same way, and you're using very, very low melting mean it's, not the same kind of sauder, so that's, good for different, um, applications that you're talking about the suffering iron like when you use in electron ickes and things like that. It won't heat the metal up to the temperature that you need it to be. So let it just take a moment to cool down. Then you can use tongs in water, place it into the pickle you want his cover tongues, place into the pickle and once it's cleaned, bring it out, put it into the baking soda and water to neutralize it. That's what's happening with this water, and then you can finish it how you want. You can just use a brass brush wrasse, brush it, you can stick it into the tumbler and tumble it with to get a shiny finish or if you wanted to, you could always polish it, too. If that was, if you want a high polish the question here, why is it important to use copper tongues? So the reason, actually, and with the citrix pickle it's, a habit of mine that I've always used when you, the citrus pickles less of an issue, but it's a chemical reaction that happens with the steel and the pickle itself. So essentially what's happening in this pickle is it's taking the copper, the copper oxides. When you heat it up, come to the surface, it's good, sturdy and oxidizes copper oxide coming to the surface, and then there's the flux and that copper that is taking off when it's in the pickle to clean the surface. Actually, I mean, it stays in there all like floating in the water, essentially. And if you the steel causes a reaction. So if the steel touches the water and there's things in there, you will essentially plate yourself so some people when the pickles exhausted when it's ready to change and they want to plate something on perfect purpose. It's a simple thing you could do is on purpose. Stick some steel in there and it will. The copper that's in the floating around in the the pickle solution will plate the piece that's in there, we'll turn it. You know, if you had silver, you'd all of a sudden have copper plating and have to clean that off. If you didn't want it. So that's, why not going like electric? You're doing it. You know, anything strange like that. But it will have a result on your your piece that you don't want.
Class Materials
bonus material with purchase
Ratings and Reviews
gbarbphoto
I don't even make jewelry and I enjoyed this class so much. There is something relaxing about watching Raissa make jewelry. She explains everything very clearly!