Lesson Info
1. Preparing & Sanding the Metal
Lessons
Lesson Info
Preparing & Sanding the Metal
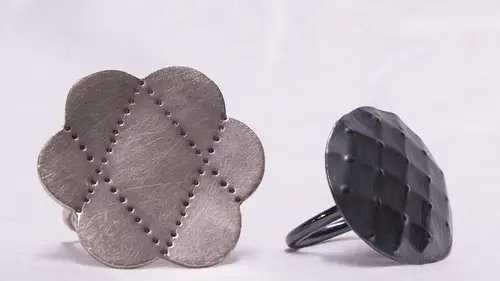
So the next project I thought I would share if you are some basic stamping of the medal and making a ring with that so is going to be more like a quilted feel thing and you have a lot of options here to this is what I'm going to show today is a ring that looks like this taking sheet metal using a couple of tools to stamp some texture and pattern into it and then make a ring shank and sauder on here's another sample of something that you could do is what we're working with different options so it's a big ring in visual sense but it's pretty lightweight it's not super obtrusive and lightweight and easy to wear so on and some templates pull this out here okay, so I like to work with a graph paper that's also a tracing papers really nice. Both of those are in one so graph that long you can get it, you know, get it at a craft store or find it online and it's really nice to use that because you can see through it, you know transparent and you can also got your graph on there. So what I have ...
here is a few different samples here. This a lips that I drew out, I took a stencil and drew it out on here used a pen he use a pencil sharpie what? What not? And draw out and create your patterns. You can play with different textures and designs that you want. You know, I would suggest just making a whole bunch of these shapes onto your graph paper, and then you know, penn and pence pen or pencil and ruler and come up with some pattern that interests you. I would keep it on the simpler side, nothing where there's too many, too much textures, super tight together, you won't get the effect that you want with this technique anyway, that I'm going to show, but and you can play with smaller or maybe a little bit bigger, I wouldn't go huge, but you can. You can get bigger material here to there bigger ellipses too. So that's just an example. You've got stencils in all different shapes it's too. You could have square, you can have round, you can have rectangular playing around with the option that you like the best. So I've got some samples here. All right? So some of these to the side now, as far as the materials you use, I like to use sterling silver for the ring shank the part that's going around your finger, copper, brass or other materials will oxidize your finger turning a different color. Most people are not allergic to that necessarily, but it doesn't look so nice, so I would say sick to sterling silver for the ring shank and for this top piece you could use copper if you wanted to or sterling or if you wanted to use brass. Each material has this own well, the colors of the biggest difference, but they are different textures and feel a little bit different when you're working them but can all be worked in a similar way. All right, so let's, move this to this. All right? So you're taking a piece of sheet metal, and when you're doing this, you want to get the texture that you want first, so the finish I'm going to start to sand this a tiny bit it's best to do that before you start stamping and all of that you want the texture there because once you start stamping, you have this texture if you go to stand that you're standing away some of the texture that you put into it, so taking sandpaper always start with the course are first and then move up to the through the desired look that you're looking for the more the higher the sandpaper, the less grit that's happening, so I'm gonna start with two twenty and just go in circular motions is what I like and I actually I love texture on material, so I often he's the tumbler to give things a little bit of a polish machine. But I'm not using a policy wheel too often in my studio, and I love. I love to see the texture of sandpaper, so going in circular motions, and I'm going to keep it at this with the two twenty. If you wanted it to be a little smoother, you'd work from the two twenty up to three, twenty two, four hundred to six hundred. You can stop at any point, it's, all preference here, just getting it to be even.
Class Materials
bonus material with purchase
Ratings and Reviews
gbarbphoto
I don't even make jewelry and I enjoyed this class so much. There is something relaxing about watching Raissa make jewelry. She explains everything very clearly!