Lessons
Lesson Info
Annealing the Metal
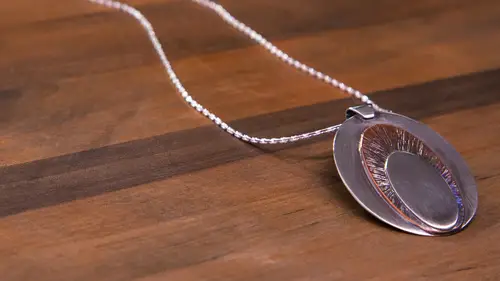
I have these pre cut pieces here now as I mentioned before and since it was answer us before the copper is the same slightly easier tio saw but the motion is the same just to show you really quick I won't cut the whole thing but just to show you same ocean a little softer some people may ask is your metal have to be so soft saw that's a question that comes up a lot does it matter it's actually better that it's not because the rigidity of it prevents it from bending and warping while you're sighing so if it kind of buckles a little bit then it is going to push against your blade differently kind of against the where the tension issuing a break more blades if the metal is soft and if it's on a curve or not plan so as you can see sawing the copper is exactly the same kind of process, right? So with me so I have all these pieces pre cut ouch. Now you may notice that we have a little fun texture going on on our copper here in our design, so to be able to add that texture we need to a neil a...
re metal so I'm gonna come over here to my sauntering station and a neil my medal so we're kneeling copper now process is similar tio brass but um the color changes a little different and then I will mention what silver is and I can actually show you well that's not important for this for this particular project but so we're using an oxygen propane set up so a time you're approaching a torch this is the same for anything the red line is always your gas and the green line is your oxygen okay goes you always turn your gas on first then you're adding your air or your oxygen so just my torches sensitive so barely a turn toe open it sometimes half a turn is appropriate just a flick of that noticed the spark from the igniter when you use an igniter hand igniter you want to make sure there's a spark so when you're sliding it you're pushing down and you're sliding into the side. If you're having trouble getting a spark, make sure that you're pushing down while you're sliding it going to add oxygen slowly so you don't see any orange that's a bushy flame that's not hot enough when you see orange um and so you want tio close that up by adding oxygen so lefty loosey righty tighty is the situation we have here now I'm coming here directly on top don't want to be too far way usually about an inch away from the metal itself is good the blue cone is the coldest part of the flames you don't want that to be touching like this always about an inch away so copper goes through few colors, you may notice, does the rainbow it goes to a black we're looking for a dull red that's going to tell us that it's reached a kneeling point, which we have right there. We see that once again, we don't need to go to orange that's too hot doesn't need to go that far. Now this particular torch set up won't actually melt copper brass, so this is, um you're safe in that regard that you're not going to melt your medal, but silver different story, and we'll talk about that or slaughtering. So I'm turning my torch off it's important that it's in the right order opposite of what you started so air first to the right and then gas to the right right now any time you approach dishonoring station it's important, tio always hover your hand over anything, so I didn't mention this when I started the bricks do retain heat, so you don't want to just jump in and, you know, start touching the bricks, moving them around or what? Not unless you kind of did that hovering check make sure that it's not re any heat, but the sit here for a second I'm moving over the side of my sada right break here. Grab a pair of copper tongs now I'm gonna talk about different tools here when we saw her, but you want to be using copper tongs anytime you're putting into acid um I have steal tweezers sitting here that I can use to pick up my medal, shift things around and then quench it but the steel actually reacts with the acid creating copper plating that like a film cop the fill the copper oxides can rise to the surface and create a film this happens more on brass where you see a little bit turned pink and not yellow anymore copper it's copper it's listen it's not going to affect it but that's something to keep in mind when you are working with silver or in brass because that can create a film that you'll have the sand off matches extra clean up later so that's why copper tongs air always fine to go into the acid so I'm taking this and I'm dropping it into my pickle over here to get the oxidation off now the pickle is a mild acid and so it's eating away at the surface of the metal getting away that black oxidation so you don't have to worry about that dirt getting onto any of your tools depending on how new the solution isn't how hot it is will determine if you how long it needs to be in there on average I would say I'm one to two minutes is always a good rule of thumb if you go toe wipe any of the film off any of that black residue if it looks a little chalky and color and it's not coming off when you just wipe it after you dip it in the water, that means that you just need to leave it in there longer so our solution here is fairly warm so we don't have to worry about it put this where I could grab it a little bit better gonna put it in a neutralizing bath here and then just take a towel and wipe notice how that just kind of wipes off then you know it's clean now our next step now that it's nice and soft using a scotch, bright pads just a pad that even the same kind of pad use let's attached to a normal sponge in your kitchen kind of scrub off you can you see a piece of sandpaper too? Any of the sand papers two twenty three twenty two clean this whatever you have laying around now we're ready to hammer on it now we're going to have a nice small pieces silver that's going to be sitting here on top of our metal piece and so what I like to do is draw guide for myself before I start hammering since I don't need to go into that area because I'm to be saw during their and actually is important, that isn't quite hammered because it will change how we, how the sawyer sits. So all, uh, mention that more when we get to slaughtering point, so I'm gonna take this piece, but I know it's going to be eventually saw heard there, and I'm gonna use it as a template going drawn outline of it on there, just as a guide, or will san this off later? Nowhere to come over here? No question coming in online thing when you're hammering, does that facilitate the work? Hardening was no, yes, it does, so when you're adding texture, it condenses those molecules when you heat it up because of loose and relaxed or not is like fine ties if you're is if they're you're standing in a crowd and all these people are saying right up against you and can't move, can you? And so when you heat it up that temperature, you and neil, your metal all of a sudden, as if the crowd dissipated and you have room to move and stretch your hands out think of it that way, but if I'm hammering of I'm pushing again against the metal condensing those molecules, the room becomes crowded again in the medalist stiff, and it won't move.
Class Materials
bonus material with purchase
Ratings and Reviews
Kendra Kiser
I can't wait to take the c)ass again-