Transfering the Design & Sawing the Metal
Lesson 1 from: Beginning Soldering for Jewelry MakingBonnie Heras
Transfering the Design & Sawing the Metal
Lesson 1 from: Beginning Soldering for Jewelry MakingBonnie Heras
Lessons
Lesson Info
Transfering the Design & Sawing the Metal
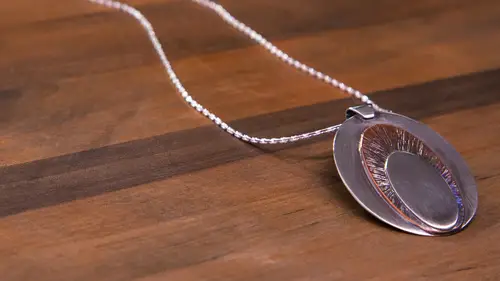
So right here on the front of our desk here is our next project, assad a ring is a really good way to attach your materials together. It's very permanent we're going to start by actually showing you how to do two different types of slaughtering joints, which would be sweat sauder, which is the the saga of the peace is being sought directly on top of the other one as well as a tea joint, which is the bail here that's going to actually be attached? They're a little hammer texture, so we're gonna kind of what's again but get back to doing a little kneeling and we'll be using the torch quite a bit in this and once again this is all sought out by hand to so I'll go over some of those details again for you, so we're using two different types of metal this time silver sterling silver to be exact a cz well as copper so mr off a small piece of copper we're using twenty gauge metal sterling, so both the sterling silver as well as the copper are brass are our twenty gauge, so we'll show you sawin...
g starting with our bigger piece here once again, this template is available with when you sign up for this class, you can actually trace this on by using tracing the template and then gluing it on with rubber cement as I referenced before, if you don't happen to know if you happen to have a drawing template, you can easily use this to draw directly on the medal so and you're the temple that's available to you should reference this size that of the shape we're using so here I believe we're using its a inch and a half, so let me show you that, so to draw it on here, I'm just kind of letting it up where I have a nice lip on the edge here, what makes you wasn't a lip when you are I saw and don't put this right up against the edge, you could do that to conserve metal, but honestly once again you want to have something to grip onto, all right? So I'm just going to sharpie and I was going to draw my shape on there. If you don't have that template, you could take a piece of tracing paper let's say I have the temple in front of me trace the shape by hand, so assume I have a piece of paper template my print out from the computer in front of me, trace that and then cut this out fairly close to the shame and then glue it down with your rubber cement by painting the rubber cement onto the medal and then on to the back of the paper and then placed the two together since my templates already drawn on here, I'm going to saw this out for you. Now we have that for all the shapes to so we're gonna have a shape in copper here, another smaller silver one and the bail that we're going to shape later we're going tio saw so here's our jeweller saw frame that we're going to be using, we're going to be using these three ott saw blades again, so we're song twenty gauge to load your soft rain now you can do this sitting down by impressing it, using your shoulder to precedent you can use your hip and stand up and do it whatever makes you comfortable the ideas that you're using your own body weight to push this forward so checking to see that my t they're facing down and out once again to its facing the handle as well as out loading it with the saw blade alway here at the bottom hand tight make sure the distance here is good you don't want this to be three quarters of the way up after you've loaded it. If it's that's the case and I think enough attention on the blade and that's, why there's an adjustment back here? If that's the case, then you can undo this and slide this to make that adjustment so I'm going to push forward here until my election won't stand up for this also, make sure this is kind of straight, not angle, because you can actually put your blade in where it's angled and that's not going to get you proper tension or it's kind of getting out. So you see that straight up and down here sometimes if you put it in like this blade will be going out that way, so we're pushing forward here. We're dropping it in holing attention until this is nice and tight. Federales so that's a little flat there we here that's. A little flat is not the noise you want so I'm thinking maybe let's switch soft rains here now if it's flat like that, that means there's none of tension means your clothes but not quite where you want to be so I put this in a different saw frame where these bolts are a stripped it can happen over time is used the tool what's again pushing forward three quarters the way up can we see that three quarters the way dropping in tightening. There we go. There we go. That's the kind of music we want. So I need my lubrication again. Any time you saw it's always a good idea to use lubrication are stay sharp here um, these wax is another option. If you would like tio try something different andi even actually like cutting waxes like three in one oil that you might be able to find your hardware store are a good option as well just a matter of preference some people will say once amazing some people say the other one's fine is totally up to you I'm a fan of this um so tryem out figure out what works for you to start by pulling down now to change directions from a jog in place not putting pressure down she's shifting until I'm cutting forward always kind of blow on your metal make sure that you can see the line that you're working on and then you just cut forward moving the medal and the play at the same time well silver dust coming up here some jewelers keep that use it to a refiner see the catching a little bit remember tap it against the bench pin if it's catching a little bit helps loosen from the blade if it's catching two just out of the lubrication make sure your metal supported on both sides so it's hitting this side of the bench pin and this side fifteen alittle lubrication again he a little dust on your figures sometimes going to prevent you from gripping so kind of blow that off shake him off your fingers wanted makes you have a good grip on the medal coming all the way around to the end now that's gonna jump forward when you come to the end of the cut, so put it near the woods so it doesn't jump forward towards your fingers, then we can lift that out in the middle back and we have our nice clean shape you've been doing this a long time. You also have a very steady hand. I certainly don't I have shaking hands, is it? Does it take you a while to practice and really get it to make a clean cut like that is something? Thanks. Yes, it takes quite a bit of practice, I definitely, uh you have to kind of get in a zen moment. Sometimes I mentioned this fact that you can't it's not always your data saw sometimes you'll break a lot of blades because essentially you have to be moving in this perfect upward down motion and if you shift it all away from where the tension on the blade is, so this gets pushed in that angle it all not straight up and down it's going to break, and so if you're not physically sitting right that's, why also it's important to sit low? We're not leaning over your bench pin that way your shoulders are flat here straight so you can do an easy upward and down motion um and that all having all those things lined up helps you you know, do that also not a death grip everybody wants like gil tension and they're like holding and they're trying to push down and they try to battle with it have this like physical fight with the metal like why aren't you cutting and it's honestly, I could hold this with two fingers and once you get it in the right rhythm and you'll be able to cut, I'm going to show you it sounds like sounds like not possible, but nice fluid motion I don't even have to look and I know I'm going straight you're holding the metal in your interest in your fingers? Would you recommend for somebody starting out may be holding the metal in advice or does that no health? A very good question, so can you clap the meltdown? Yes, is it really a good idea most time? No, because you're shifting the metal on the regular now if you's have trouble, your hands aren't quite strong enough to hold it then by all means, but new know that you're going to clamp it. Put in a position where you can get a fair amount done before you move on to the next turn or shape otherwise you're just going to spend so much time on clapping, clapping and you could plant song by then in the bigger scheme of things it's better to really train yourself to be able to hold it and it's definitely like you got to teach your fingers to bend in certain ways that it's not like mr lee comfortable do it's all about muscle memory. So much of this is all about muscle memory like you need to tell your body this is how we're going to move and eventually it will cooperate with you instantly. I think some metals easier to cut the numbers do you recommend that beginners perhaps start with a certain metal type copper, which is naturally more dense? So I'm going to be a kneeling again in a little bit eso basically it's less dense medals mean there general inherently not as hard naturally, whether there and kneeled or not many lean being softening the metal heated up, so it softened um, so sterling silver and brass are on par with each other and then coppers a little softer steel is significantly harder, but we're not working with any of that in our class is here, so mainly we're working with metals that are kind of in the middle. Silver has other attributes about it that make it a little difficult. Um, I'll talk about that when we're suffering, it has a lower melting point than other medals, so it's sze you're a little bit more susceptible to melting it then let's say copper brass but um other than that sawing and filing and polishing and sanding and all of those steps are totally the same dependent doesn't matter what metal it is sandra glover is actually joining us online I believe she's in canada and she actually uses canadian pennies because they have a very high copper content so she's wondering do they actually lend themselves as well teo getting the conclave shape by hammering does that not a materially abused um when it comes to certain always it's tricky because any time you're doing you're gonna want to any letter basically heated up where he gets softened so you can kind of create a shape and with some of the things even if I took a american nickel that's actually not made of completely nickel it's an alloy and so um you could get a rough shape a rough dome ing without kneeling you won't get as a dramatic shape as you can get if it was softened and with those sometimes they're even plated so if you heat it up and neil it or sauder it it actually might react funny where the plating will come off in chip or you'll notice uh it's like the sauder won't flow on it meaning won't attach to materials together and so it's it's one of those things if you're feeling adventurous I would say you could experiment but I know that you mean I get the exact results you want let's get going great. So I have priests on out all these pieces so once you have sought out your peace, you may once again notice that there are kind of some edges here that might be a little rough. We're gonna take a file flat file large flat file has teeth on both sides to kind of smooth this over now sawing remember now it's it's on the downward stroke files cut in one direction's very important everybody always wants them to cut in multiple directions on one direction on the upward stroke it's always pick up your file, start the tip and move over. You can see how that's really starting to smooth out all that shatter in a little bit of a shine and we're getting a smooth shape now if you want, you can kind of take the sharp edge off by angling or file so I was flat here on top I'm angling it slightly to just slightly bubble that edge. Now if you want to a strong bevel, you could really angle it. So I was just slight angle initially just to get that edge off if you really want to angle it a credit bubble edge this's a way of kind of personalizing your design design that we have finished here today doesn't have this was a way of personalizing it snows that has kind of a shelf now we see that nice little edge and that could be a nice, easy, simple way of adding a decorative edge chew your medal once again with minimal tools we see that great. So yes, we have a question type of gauge for your file. I mean, like fine or rough, very good questions. So we are using very different a particular saw blade, which there are different teeth or different size saw blades there the teeth on the file itself do come in different cuts when you purchase a file look on here, you can notice that there's a number here on the handle. This is a one cut. So a lot of things you may notice in the metal sniffing world jewelers world that are kind of opposite than what you think. Like eighteen gauge medals, thickness is thicker or I'm sorry. Yes thicker than twenty gauge is one cut is actually a lot coarser than a fourth four cut on a file. When you look at saw blades, you'll see it'll it'll be listed as being three ought there we keeps hearing you say hot it's three with a slash and zero all right and but there are saw blades that are just a three, just the number three and those air to thier mohr course the teeth itself are larger, significantly larger than what I've been working with here today um and also the wit, the actual thickness of the blade is different. Mean, your lose more material when you're sighing. So, yes, and depending on what type of middle files also have different, um, course levels or teeth. Coarseness. So and you can, when you're purchasing a little list that if it's an option.
Class Materials
bonus material with purchase
Ratings and Reviews
Kendra Kiser
I can't wait to take the c)ass again-