Gear on Location: Rock Climbing
Lesson 14 from: Advanced Lighting for Adventure PhotographyMichael Clark
Gear on Location: Rock Climbing
Lesson 14 from: Advanced Lighting for Adventure PhotographyMichael Clark
Lessons
Class Introduction
03:25 2Evolution with Lighting
04:44 3Why Use Artificial Lighting?
06:43 4Pre-Production and Pre-Visualizing
07:16 5Equipment: Overview of the Gear
25:28 6Equipment: Selecting the Right Gear
24:05 7Strobes vs. Speedlights
08:01 8Lighting 101: Flash Sync Speeds
14:35Lighting 101: Flash Basics
24:46 10High-Speed Sync (HSS) vs. Hi-Sync (HS) vs. HyperSync vs. Leaf Shutter
14:50 11Gear Requirements for Hi-Sync (HS)
12:29 12Flash Exposure
21:39 13Pre-production and Location Scouting for Rock Climbing
06:02 14Gear on Location: Rock Climbing
07:04 15Rock Climbing Photography 101
11:37 16Rock Climber: Environmental Portrait
24:22 17Finding the Shot
13:48 18Capturing the Action: Rock Climbing
07:09 19Shooting at High Angle: Rock Climber
21:15 20Digital Workflow: Overview
16:09 21Editing and Post-Processing of Rock Climbing images
30:17 22Cyclocross Photography 101
11:32 23Location Scouting for Cyclocross
05:36 24Gear on Location: Cyclocross
11:42 25Intro to the Cyclocross Rider
16:29 26Capturing Action: Motion Blur
43:13 27Communication with Athletes
18:55 28Variations of the Shot
23:21 29Cyclocross & Trail Runner Portraits
40:40 30Location Scouting & Planning the Shot
09:20 31Capturing the Action: Lighting Set Up for Trail Running
37:01 32Editing and Post-Processing of Cyclocross Images
21:34 33Editing and Post-Processing of Trail Running Images
07:52 34The Business of Adventure Photography
17:42 35Image Critique with Chase Jarvis
48:41Lesson Info
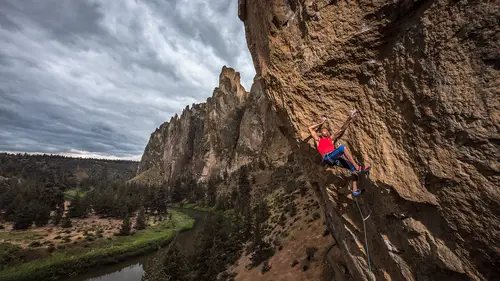
Gear on Location: Rock Climbing
There's a video that shows us getting to the location, setting up the lighting, going through some of the gear, and then we'll jump into portraiture after that, but let's go ahead and roll the video. Whenever you're shooting rock climbing, you always have huge packs, because you not only have camera gear, but then you also have climbing gear, and in this case, on top of that, we also have lighting gear and light modifiers. We have my assistant, Tom, who is an excellent photographer in his own right. As you can see, in front of us, we have an insane amount of gear for our rock climbing. We hiked in for a mile. Honestly, this is about as casual an approach as you can get going to a rock climbing area. I don't know. What do you think? Did we bring 160 pounds of gear, somewhere like that? Yeah, somewhere around there. 160, 150 pounds, something like that. These two packs alone are probably 65 or 70, and then Tom carried a pretty massive 80-pound pack, I think, in here. In terms of the ...
camera gear, I have more than I would normally take on a shoot. Typically, I would just take one camera setup, but because we have extra hands here, I brought both a medium format setup an a DSLR setup. For the DSLR side of things, I have a Nikon D810, which is one of my go-to cameras. For climbing specifically, I don't need my D4 or D5 that's 11 or 12 frames a second, because it's a much slower sport, so I'm not necessarily blasting away when I'm shooting climbing, and in this case, I would rather have the resolution of the D than the frame rate. Standard lenses: 24 to 70, 14 to 24, 70 to 200. I also have the brand new Hasselblad X1D, which is a sweet little rig. It's lighter than my Nikon D810. The image quality is amazing. This is a medium format camera with leaf shutters, so we can shoot with that today. It's a little bit of a slower focusing, slower camera overall, but for rock climbing, you can get away with it, and it works great. Also, the leaf shutters really allow us to put more light on our subjects and use all of the light that the strobe creates, instead of with the HS systems that we're using, where we're only using a slice of the light. In the other bag... There's two of the cameras and lenses. In the other bag. I have the H5D Hasselblad, and then three lenses for that kit. So we have a ton of camera gear with us. Also, climbing gear, including ropes, jumars, ascenders, a bunch of carabiners and stuff, and lighting gear, what do we have for lighting gear Tom? Well, we brought two Elinchrom 1200 packs, ELB's. So we have two of these, we brought four hens, two of the action hens, and then we also have two of the high speed, high synch hens. Two just general stands, we also brought some RoadRags which are basically portable flags that you can set up anywhere, you don't have to carry these giant flags. A couple long throw reflectors. And those are key for this stuff. These are incredible, you can set those 50 to 100 feet away, really throws the light. And then we brought the Deep Octa, it's our main portrait light modifier. I also brought a couple different camera bags, so when I get up on the cliff, I put my camera in this little low pro bag just to protect it while I'm ascending the rope, so it doesn't bounce around and hit the rock, and it just makes it easy to work out of when you're up there on the climb. Also, we brought a laptop so that we can tether for the shoot today so the students can see what we're doing. And a tripod, so generally also when I shoot on the Hasselblad, the bigger one, I'm almost always on a tripod just for the best possible image quality. And we have water, which is key, we've got a bunch of these, these are actually great, these little platypus water things you know, they're very moldable and fit into the packs in good ways so you don't have to jam a hard shell bottle in there. They also don't leak. You're looking at this pile of gear and thinking, maybe how do I get all this stuff out to a climb on my own? Well, that's why I have Tom here as an assistant. If I'm using lighting, then I'm definitely bringing somebody else out to help me carry it. Or I'm choosing an area where I can, it's close to the car, and I can go back and forth to the car to get more gear and do a couple laps. But you need to know, your own limitations, what you can handle, how much you can carry. Typically the standard is a third of your body weight, is the heaviest pack that you really wanna carry. I've blown that rule lots of times and carried like a 120 pound backpacks up the backside of El Capitan in Yosemite and my knees are paying for it now. Anybody that's looking to shoot rock climbing, I would say, go to the rock climbing gym, go to the cliff, get somebody to train you or to teach you how to rock climb. Learn how to rock climb, then start worrying about taking photographs of rock climbing. So since this is our first day, we have a relatively small amount of gear for what we're actually doing, but tomorrow we'll be shooting cycle la crosse, and trail running, and we'll be able to get a lot closer than, I think it's only 100 feet away from where we'll actually be shooting we can pull the car up to you so we'll have a carload full of gear that we may or may not use all of it, it's just the accessibility allows us to take everything. First thing up here at Smith Rock, we're going to be climbing this route later in the day that's right above us, but we're going to work with Kai in shooting some portraits over here along the base of the cliff with a really nice background. And get those out of the way first, and then move on to the action this afternoon. The reason we're doing that is that, we're waiting for the sun to rotate around so that it's behind this climb, even though we have a cloudy day, it's gonna make it a little easier for us to light it, if the sun's on the opposite of the climb. Excellent, so that kind of gives you an idea of what we took out there and I will just say, we took a ridiculous amount of gear. (audience laughing) I mean, four cameras, two different camera systems. The reason we had HS heads and Action heads, is because, if I'm shooting with the Hasselblad, I'm using the Action heads 'cause I need the fast flash duration. If I'm shooting with the DSLR's, and I'm shooting in HS mode, I need the HS heads. So that' the entire reason for taking two different flash heads out. If I knew I was just shooting an action shot, and only shooting in HS, then I would have left the Hasselblads at home and taken the DSLR's. The reason I took the Hasselblads is because, up on a cliff, he's not really moving around that much so auto focus is not an issue. And I might as well get 50 megapixels worth of images, if I can use it, so we'll see more of that shoot here in a bit.
Class Materials
Bonus Materials with Purchase
Ratings and Reviews
a Creativelive Student
Great course that combines the technical aspects of shooting with light in different situations, with the art of making a great image of athletes. Michael is a great teacher and I'm sure his lessons will continue to help guide over and over again!
norah levine
This is a course that I could watch repeatedly and be able to learn something new each time. Michael is a truly an expert in his field and is so generous with his knowledge. This course really breaks down the process of adventure photography, but it's more than that. I don't think you need to even be an adventure sports photographer to get tons out of this course. Michael is really good at breaking down some very complicated technology. Thank you!
Jeph DeLorme
Great class with dozens of tips, ideas and lighting strategies for tough outdoor lighting challenges. Advanced class taught in a way that allows even a beginner to get a handle on lighting tough situations. The location videos provide real life examples that make this class a definite must have for my Creative Live collection. Thank you Michael Clark and Creative Live! Jeph DeLorme