Capturing Action: Motion Blur
Lesson 26 from: Advanced Lighting for Adventure PhotographyMichael Clark
Capturing Action: Motion Blur
Lesson 26 from: Advanced Lighting for Adventure PhotographyMichael Clark
Lessons
Class Introduction
03:25 2Evolution with Lighting
04:44 3Why Use Artificial Lighting?
06:43 4Pre-Production and Pre-Visualizing
07:16 5Equipment: Overview of the Gear
25:28 6Equipment: Selecting the Right Gear
24:05 7Strobes vs. Speedlights
08:01 8Lighting 101: Flash Sync Speeds
14:35Lighting 101: Flash Basics
24:46 10High-Speed Sync (HSS) vs. Hi-Sync (HS) vs. HyperSync vs. Leaf Shutter
14:50 11Gear Requirements for Hi-Sync (HS)
12:29 12Flash Exposure
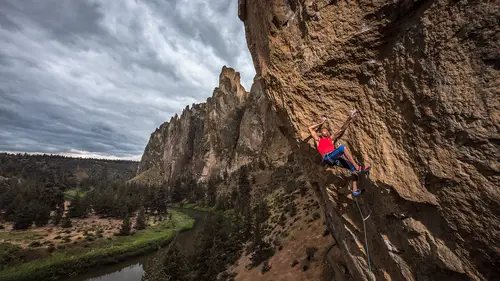
21:39 13Pre-production and Location Scouting for Rock Climbing
06:02 14Gear on Location: Rock Climbing
07:04 15Rock Climbing Photography 101
11:37 16Rock Climber: Environmental Portrait
24:22 17Finding the Shot
13:48 18Capturing the Action: Rock Climbing
07:09 19Shooting at High Angle: Rock Climber
21:15 20Digital Workflow: Overview
16:09 21Editing and Post-Processing of Rock Climbing images
30:17 22Cyclocross Photography 101
11:32 23Location Scouting for Cyclocross
05:36 24Gear on Location: Cyclocross
11:42 25Intro to the Cyclocross Rider
16:29 26Capturing Action: Motion Blur
43:13 27Communication with Athletes
18:55 28Variations of the Shot
23:21 29Cyclocross & Trail Runner Portraits
40:40 30Location Scouting & Planning the Shot
09:20 31Capturing the Action: Lighting Set Up for Trail Running
37:01 32Editing and Post-Processing of Cyclocross Images
21:34 33Editing and Post-Processing of Trail Running Images
07:52 34The Business of Adventure Photography
17:42 35Image Critique with Chase Jarvis
48:41Lesson Info
Capturing Action: Motion Blur
Next, we have a lengthier video where we actually do start shooting. And the first thing up is we're gonna shoot a motion blur image first. And they're very fun to create. They're kind of experimental because you just have to keep shooting it over and over and over and see what you get. It's kinda like Christmas morning. Every time you take a shot you're like oh, that's great but it didn't work quite perfectly, let's do it again. And then you do it again and you're like oh, that's perfect but using the wrong place. Okay then. Oh, we're gonna take another one. And so you just keep shooting this stuff. I remember, just as a story, when I did the Adobe Lightroom shoot 10 years ago I was really into this motion blur stuff and we went out the night before the shoot and we shot for four hours. Nothing but motion blurs. And the Art Director from Adobe was there, good friend of mine, and I was wondering what he was thinking because I was running with the cyclists, mountain biking like behind t...
hem and I had an assistant running with a strobe through the bushes, you know. And we're like running 50 foot sections of the trail and just pop, pop, pop. And then, you know, getting all these wacky, wild blurred images with a little bit of frozen mountain biker in there. And after about 20, 30 minutes of this I stopped and started showing him the images and he could see what I was trying to get and he was just like wow, okay, yeah, keep doing this. And out of that period, we got like two or three maybe four images that were what I was really going for. So it took maybe three, four hundred shots to get what I wanted. And I was being super hyper-critical with those images but you get all these crazy, it's a full on experiment. You're not even looking through the camera a lot of times. Here we are, in this scenario but when you're doing this you can do it in so many different ways and you just gotta keep working it to get the image you want. So let's go ahead and jump in to the motion blur video. The reason I've sheened the Hasselblad is that I can shoot this exact same shot with my DSLR. I don't necessarily have to use the Hasselblad for this. But since I won't be using the Hasselblad as much I just thought I would use it for this shot. Gives us something a little different. The Hasselblad does have a leaf shutter so the shutter is built into the lens, not into the camera. And like I said, you can do this with a DSLR, you can do this with a mirrorless camera. For this motion blur shot, it doesn't matter what the camera is. It also tethers really well to our laptop and allows us to see what we're doing for the students here and for you really quickly. So now that I know where Tim's at, what I've done down here is I have placed a pine cone, and let's do something even more natural that looks real, I'm gonna place that right there. So I know that's the point of focus. I'm in manual focus right now with the camera and it doesn't matter if I was on the Hasselblad or a DSLR I would be in manual focus at this point. Because it's one shot per flash. So that's where my subject is. And thank you, Tim, for doing this. Of course. Now that I know where he's gonna be, now I can set up the lighting. We're gonna be shooting with him going back and forth so I'm gonna put a light trap up so it's two lights, basically the lights are pointing at each other. So we're gonna have one back here, you know, maybe 20, 30 feet away? And then we'll have another one on the opposite side over there so it's cross-lighting him, which is gonna create like a rim light on both sides and then a shadow down the middle which creates a really dramatic light. And also, with these trees and the forest here, it's gonna light up some of the trees as well. And the trick with this lighting technique is that we just need to keep our lights far enough away that they're not in our shot and since I'm shooting fairly wide, with that lens I'm at about a 32, 35 degree angle on that lens compares to the equivalent in DSLR world. And for this shot, it's a motion blur, so we're gonna shoot at like a 30th of a second to start. With motion blur, it typically depends on how fast the subject is moving. It could be a 60th of a second, could be better because it freezes his motion a little bit. We don't want motion blur like him starting here with the blur and then blurring all the way out to here with the flashes because we'll get this crazy streak that might be a little too much so I want motion blur that stretches maybe a foot or two to show the motion of him and then the flash pops and freezes his motion so you can actually see Tim and see all the detail and see what's going on. Otherwise, with just a motion blur, you wouldn't even necessarily recognize what that was. It could be a trail runner, it could be a cyclist, it could be anything with a lot of bright colors flying by. So I'll start at a 30th of a second, see how that goes. And then I'll move my shutter speed up or down depending on what seems to work best. Typically for cycling I found, you know, starting at a 30th, sometimes going down to a 15th or a 10th of a second can give you a little bit more motion blur. And for this, it's critical that we're in rear sync mode for the cameras. And I just remembered that the Hasselblad doesn't have a rear sync mode so we'll have to see how that works. I might actually be switching to my DSLRs because it doesn't have a rear sync mode on the camera. So the blur actually might be in front of him but with a leaf shutter, it's a little different. It might actually be in the center. So we'll just see how it works and go from there. Any questions from you guys? Go ahead, Aaron. Depending on the aperture of the true shooting, like if you're doing a pan and he's moving closer to the lens are you worried about him being out of focus? Like how do you account for- So I'm not gonna pan the camera for this shot. The camera's gonna stay fixed and he's just gonna flow through the frame because I want the background sharp and I wanna show him moving through a landscape. And so because I focused here on that little pine, and I'm gonna make sure I use an aperture that will have all of him in focus. You know, I'll shoot on this guy maybe F8, F11, something like that. And that's because we're doing normal flash. This is not the fancy high speed sync or any of that, this is just normal flash 'cause we're below our flash sync speed of our typical cameras. One other question is do the little head units have rear curtain sync built into it? For a canon, they do. Okay, 'cause it's not on our cameras. It's not on the Canon cameras. It may not be on the Sonys, I'm not sure. With Nikon, it's actually on the camera. So actually, I probably could do it here with the Hasselblad. I think it's called delay mode on lincrome triggers. Though I haven't used that because on the Nikon it's a little different so let's see how that works. Alright, so let's get the lighting set up and we'll figure it out. Yeah, Tom, let's go ahead and take it over there and then I'll kind of look through the trees. One of the other issues we have here is that, you know, with the trees, we don't wanna light up the trees too much and have like some glowing tree over there on the side so we wanna put the lights far enough away that we have kind of even, consistent light coming through the trees when we don't have the sun right there off our frame. Let's move it a little bit over. Let's keep going. Keep going, keep going, keep going, keep going. Okay, now you're out of frame. Let me see what that looks like. I think let's put it right between these two trees. Point it straight at us. Little bit more, little bit more. There you go, perfect. Now just feather it up. So, you know, we have these pretty harsh reflectors that throw the light a really long distance. The other thing we gotta think about here is we don't wanna light up the ground like a Christmas tree. We wanna light our subject and mostly his upper body and his face so that you look at his face. And so we'll feather the lights up a bit. We could also use some flags and block light from hitting the ground quite as much depending on how it looks but they're so far away, it's gonna hopefully be fairly evenly illuminated and that won't necessarily be an issue. For this light, we'll actually lower that light so that it's just at the lowest possible height. Because it's up on a higher hillside, we want the light to kind of streak across closer to head level. So go ahead and lower that guy down. And we'll just see how it goes, you know? It's all a big experiment. And let's turn that light a little bit towards this way. There you go, perfect. And maybe bring the flash head up. Because if we just point it straight at him what's gonna happen is, you know... Right there, that's probably good. If we just point it straight at him, what's gonna happen is the lights are going to completely illuminate the ground and this will be super bright and maybe even brighter than he would be and that would attract our attention to the ground instead of to him which is not what we want. We want you to be the focus of the image. So in terms of figuring out the exposure for this, the way I typically do flash exposure, balancing it with the ambient light we have here, is I go ahead and use the camera or a light mirror, either way it would work fine, and I just figure out the exposure and what I'm gonna get so let me go ahead and do that. That looks pretty good there. And you can chill out, Tim, if you want. You don't have to be in the frame. So if you wanna grab a drink or relax, whatever. It's tough, yeah. So I am at ISO100 so since we're doing a motion blur with flash to stop the motion of the rider I typically, for this situation, wanna be at the lowest ISO setting. Also, why are we doing a motion blur now as the first shot? That's a good question. The reason we're doing it now is because we have dense cloud cover, we can actually get down to slow shutter speeds right now to actually do the motion blur and if, for some reason, later on today or in the next hour all these clouds vaporize and disappear then we couldn't do the shot. So we're gonna get the shot that we didn't know we could get today because we can actually do it now and then we'll move on to the high sync after this. So, I'm at ISO and I want the background to be let's just say one stop under. I'll take a picture. We'll look at our image here on the monitor. And it's about one stop under exposed which is perfect. I may need to underexpose it just a little bit more. We'll see how it works with the flash. So let's go ahead and turn on the flashes and let's start at full power, Tom. And we'll have to, everybody, clear the runways here so we can actually see how the flashes go. Just so everybody knows, when you turn these on you just have the blinking number. You have to select the head that you're using. A, B, or AB. So once you do that, the A shows up, 100%. And the other thing to note about these flashes is they do go in tenths of a stop so you can very accurately adjust the output. So now we have our base exposure. We're at ISO100, 25th of a second, and F11. So I've set my camera so it's one stop underexposed. So the image is dark on the screen. Now we're gonna add the light into that. So I've set the light meter, this is a Sekonic Lightmaster Pro, I've set the light meter to the shutter speed we're using and to the ISO. And then I'm gonna make sure there's not a rider coming in. And I'm gonna pop this guy right here. Right now, we're looking at a little over F4. So we might need to pull that light in a little bit more 'cause we need to get to F11. So actually, just grab that light and bring it to us like maybe half the distance. Like right in there. Still at F4. Trying not to look at the light 'cause I'm blinding myself. Did that one go off? There we go. Alright, can I have you, Tom, just stand where the rider would be? (laughs) (camera shutters) Alright, so we can see Tom is pretty well lit. Maybe even a little too bright. So let's turn the power down, I don't know, 7.0 or? And we're seeing also there's a lot of light hitting the ground and it's mostly from this strobe. Let's pull that up a bit. We might even need to flag it. Let's do one more go real quick. And Tom, you'll notice, is right where... (camera shutters) That is. Alright, that's much better. So in the picture here, you can see that his face is lit but the ground is not. Yes? There's not a lot of rim on this. Do you wanna bring that a little bit? Yeah, so the gap is just super small. I think I was stepping right behind. So I'll bring it in and then I'll bring it through the gap of that tree so it adds a little bit of like a bigger range because right now it's pretty narrow, so. Okay. So what Tom just observed looking at the image on the screen here is that our rim lights, the opposite side of this light trap, wasn't really having an effect on the image. So what we did is just move that light in a little closer and still outer frame it in the shot so that we get a little more pop on that. And let's take another test shot. (camera shutters) Let's just see what that looks like. Okay, so now our rim light's a little too powerful. It's moving back out. Can't move it out. How about turn it down? Turn it down? Alright, but it's also slightly in the frame so can you angle it? The problem is that this gap is super narrow between these trees. Another little thing here is what you're seeing is lighting is really slow. It forces you to slow down. It really forces you to think about your composition. It forces you to see what you're doing with your lights. And in my view, that's a good thing. Because it really makes you think about the image. You don't get as many images as if we were shooting available light. You know, we'd be getting, blasting away 11 frames a second getting a bunch of images but we'll craft a much more dramatic, amazing image I think by slowing down and really looking at the light that's hitting our subject. So let's give that another pop, Tom. And you notice I'm not even looking through the camera for these test shots. I'm just taking a picture so I can see what the lighting's doing with our subject. Cool. Alright, so the other thing I would say, let's go ahead and take a picture and this isn't gonna be refined to the degree that I really wanna get it to because the other thing I'm seeing is you know, Tom's really frontally lit here and I probably wanna put a flag on this guy to kind of block some of the light so it's not blasting him quite as hard as it is right now. So let's go ahead and get Tim going. Go a little farther forward. Little more, little more. Right there, perfect. Alright so, and I'm gonna take a shot just with him there since we got it. (camera shutters) Alright, off we go. So yeah, just roll through normally going that way. We'll have you do it both ways. So, you know, go up to the top of the hill and just straight back on in. So I'm not even gonna look through the camera. Everything's set up, I've pre-focused. I know exactly... And also, Tim, are you gonna be, you're not standing up on the bike? You're gonna be sitting down on it? I'll be neutral. Okay, neutral, and even the lower you go the better off, 'cause it's a little bit tight on the frame. So, alright, so I know his spot is right there so I'm just gonna watch. And go for it, Tim. (camera shutters) Alright, and this is where having a camera that reacts really quickly when you push the trigger is critical. How does that look? Is that... That's pretty cool. He's glowing with that bike. So what I'm seeing, at a 30th of a second it's almost too much motion blur. And you also see he's definitely sharp with the flash. The flash is stopping his motion. But we do have front curtain effect so the motion blurs in front of him. So to solve that problem, I'm gonna switch cameras. And while we're doing that, I'll have Tom set up a flag just so we can block some of the light coming out of this. We could've set up the Hasselblad shoot with recurring sync, it just was more painful than I wanted it to be so we just switched to Nikon, simplified things a little bit. We're still tethered to Lightroom and we've already done a test exposure. We're at pretty much the same settings we were on the Hasselblad though on a Nikon I can go down to ISO32 instead of so that allows me to even get more motion if I want it because I'm at a much lower, I'm like a stop and a half lower than I was on the ISO. And so now, instead of being at F11 on the Hasselblad I'm at a F8 because of the difference in the ISO settings. One thing you'll notice on the test shot that we've set up is the background is not that dark and typically when you do a motion blur you kind of want the background to be dark. I can change the shutter speed and darken the background down pretty easily. When I'm doing these kind of shots, I typically like to err on the side of having the background a little brighter rather than a little darker because then when I go into post-processing if I move the exposure slider down or the shadow slider down I can make the background darker really easily and posed. And I don't add any noise to the image. If I make the background really dark and then I want it lighter, you know, I decide I want it brighter than it is in the image that I'm working on, I'll have to move that shadow slider up and I'll actually be adding noise to the image. Does that make sense, how I try to cheat? Without everything in digital photography, it's good to know how you're gonna process the image to know how you're gonna shoot it when you're in the field if you wanna get the best image quality. So let's go for it and let me focus on my spot again. (footsteps) Sweet, thanks Tom. I'm there. Let me recompose. I am in single shot mode. I am in manual focus. I'm in manual exposure mode. I'm gonna take a test shot, just make sure the flashes are firing. They're firing. Alright Tim, we're ready when you guys are. I'm actually gonna look through the camera this time. I do keep both eyes open so I can see him coming in. Go for it. (camera shutters) We do have significant motion blur. We're at 1/25th of a second. What I'm also seeing is we might wanna get closer to him just so he's bigger in the frame. The orange shirt is glowing a bit. It's not necessarily the end of the world but let me get a little bit closer to him. Can somebody grab the table and we'll just move? Go for it. (camera shutter) Alright, we got some nice dirt kicking up there so that's good. So he's coming in right in the frame. Oh, that's way cooler. So I think actually having seen this I prefer him coming back this way so we can see his face. Obviously the other direction we were getting a butt shot which isn't necessarily the end of the world but with that glowing orange shirt and it's orange on most of the back of the shirt, I think with him coming this way it's a little better color wise on the shirt. So let's have you come back and we'll have you start up there, Tim. How about we both go up and sweep the camera about an inch this way 'cause you're getting that light of that strobe? Is there a shadow of me? This strobe right here. Oh, thank you. This is why you have an assistant. So Tom's not just, you know, he's a photographer. He does great portraits. But he's watching out for me. He's watching my strobe clipping the edge of the frame. He's seeing stuff. Like, I'm looking at the rider and the action but he's also looking at everything else. Let's see, let me just pop one real quick just to make sure that it's... You guys see that flash in the frame? No, I took care of it. It's okay? So whenever you're ready Tim, let's go for it. (camera shutters) So this all comes down to my timing. Can I nail it right when he comes by in the perfect spot? That worked pretty well. The only issue I'm seeing with this shot is he's coming towards us and he is on the far left side of the frame. So typically, whenever I'm shooting a moving subject if they're moving one direction I want more room in front of them than I do behind them because it looks a little weird. Because I set this shot up for him going the other direction now I'm gonna have to switch my positioning just a little bit to change the framing so that he's more in this right side of the frame instead of the left side of the frame. So the other thing we have is we have Aaron, a second mountain biker, with us who can actually ride it with him and we'll do a little test shot with him. And we can do a test shot with Tim. (biking) Alright, nice look. So now we've got things dialed in. The flag is helping me a little bit just to control the spill of the light on the background. You know, if it was a little darker out here, I could make it darker by cranking the shutter speed up, but then we have the issue of the motion blur. I would have to play with the ISO and the shutter speed to adjust the background and keep the same amount of motion blur that we currently have. I think that's fine. Let's see if we can zoom into his face. So you can actually see through his face to some degree with that motion blur. What are we at? We're at a 20th of a second. I'm gonna actually raise my shutter speed a little bit to maybe a 30th of a second? So we'll have less motion blur but it might make him a little crisper even though the lights are technically stopping the motion. And my histogram I think looks good, decent. We're not clipping the highlights. We're not, you know, clipping the blacks on this so everything's in there. Now it's more focusing on the athlete and what he's doing. In this last pass, you'll notice he has a really serious stare which gives us a sense that the trail is maybe technical or intense which is good. So now it's when I'm gonna start working with the athlete. So let's go for it one more time. (biking) I might've hit that just before he came into the perfect spot for the light. I did, which creates actually a very dramatic thing. So Tim, this time like really, you were nice and intense that last time. Really run into it with full gusto. Yeah, just blast through here. Do you want any dirt? Yeah, if you can actually kick up some dirt just before you get to this position so just back here somewhere that'd be great. Or whatever works. And I'm actually gonna put the tripod down lower. Alright, so, and this way I'm not even gonna look through it. Okay, go for it. (biking) Woohoo! So getting down lower also makes your athlete look more heroic, so. I think we still have a little bit of my shadow in there though there's also stuff coming through those trees so it's a little hard. You know, I can dodge and burn that out no problem I think it'd post. I do want to try the camera on a tripod because we are shooting a 30th of a second because I do want those trees sharp. We're getting there. And he's got a great look on his face. Let's just make sure it's sharp. It is sharp. I mean, I love this stuff because as you see his helmet's like bleeding into the tree behind him. You get these wild images. You wanna come check this out real quick just to see what we're doing? The other thing is show your athlete what you're doing. So the camera's shooting in a very neutral thing so it'll be more dramatic in this one so it's worked out, but, you know just so you can get a sense of- Okay, I can hit the burn more. Okay, yeah, and I'll get a little closer too actually if that's okay with you. (adjusting camera) I'll just let him get a little closer. So go for it. Go with gusto. (biking) Oh yeah, nice. So I could feel him come by. So, and we're definitely zoomed in really close. We do have a little thing going straight between his head there so maybe then we'll raise the camera up just a little bit. That was sweet. We got this going through your head but we'll do one more if that's okay. This is my famous line. One more, like 30 more times. So... (adjusting camera) (biking) That layer, it reveals the trail in the back a little bit better as well. Definitely, yeah. 'Cause I'm showing that trail swooping in. Ready? Go for it. (biking) (camera shutter) The other nice thing about a hefty tripod in front of you is I have something protecting me in case, you know, God forbid he like spins out and nails me. Hold on. So you moved and- That light is in the shot now? Hold up, hold up. Hold up. Thank you. So you're catching that light just a little bit. Oh man, just like a little sliver. Okay, let me move back then just to block that out. Get a test shot? Yup. (camera shutters) There should be no light. Alright, ready when you are, Tim. Sorry for the delay. (biking) (camera shutters) Oh, that's pretty cool actually. 'Cause he's really, I think we're done. That's the shot. You know, one of the beauties with this stuff is that I'm shooting with a 36 megapixel camera. That was great, man. Nice work. We can work that up and make that super intense, you know, so you've got motion blur and you're coming into the camera. You look like you're really gunning for it too there. So that's good. You know, I always show the athlete the image because you never know. They'll look at the image and be like oh, you think that's great? I can do it like this. You know, I can do a back flip off the bike right there and then whatever. Well, I can do more with stuff close to the ground. We could do skidding. We could do something like that. 'Cause that's really in focus there so if you wanted something later in the shot I could do more of a skid 'cause it's crazy how that type shot makes it look so much like there's a lot more [Unintelligible 00:28:47] in there than there actually is. Exactly, that's the wide angle lens, yeah. Let's actually do this. Let's pull the flag off 'cause I think maybe that flag's actually creating the shadow. And yeah, you just do it right in front of the camera. You know, don't worry, I'm fine with you getting dust everywhere. The camera is. (laughter) No, that's okay, these things have been through the ringer. (laughing) So kick up as much dust as you want. Don't worry about the camera. We've got stuff to clean it off. And it's totally sealed and it's fine. (biking) Tom, if I could just have you stand here for a second I'm gonna get even closer. Alright, thanks Tom. Alright, go for it. (biking) (camera shutters) Woohoo! Alright. Well, I triggered it just before the dirt. It's okay. I think we got this shot. The last one I'm happy with. We've got other shots that I think will be better for this than this one. I nailed it just before the dirt, Tim. So it's okay. We'll move on. 'Cause I think we'll get better shots shooting in the more advanced modes, the high sync mode, that is what we're really here for. We got a couple cool motion blur shots and really, when you're shooting motion blur literally we could do like 300 passes and there might be like four or five shots that are, if we're being hypercritical, are the ones, you know? And I think that's one of the things that most amateur photographs necessarily don't get is that how far you push it and how hard you push to get that image takes a lot of impetus and a lot of like just keep trying, keep going, keep going. 'Cause we're getting one shot every time you pass so it's a little hard on the athlete to do that but, you know, you have endurance out the wazoo. This is a cakewalk for you. So indeed, that was a cakewalk for Tim 'cause, I mean, he was riding 50 feet and just doing it over and over and over, no big deal. But it really allowed us to get a bunch of really cool images. Before we dive into the worked up images, I know we have a few questions. Do we have one here, in studio? Alright, so I actually have two questions that kind of both relate to each other. One, I've kind of, I've shot a lot of cycling and running and I've heard a lot of theories on entering the frame versus leaving the frame with both of those sports. So I was gonna get your thoughts on that. And also, when you're looking at positioning with the trees, are you looking at trees coming through the head like trying to position your lights so that you're gonna hit in between these two trees or is that something you're really concerned with? 'Cause I mean, watching the video obviously you're hitting at the time that you're trying to hit but I wasn't sure if there's a certain spot in between the trees so you're looking at head placement and body placement within all of that. Definitely. So, as you can see in some of these images, and let me maybe forward to one. Let's see the next one. We'll go back and start talking. From my composition, you'll see the reason I picked this spot is because of the S curve. And it's not some extreme S curve. You know, if it was a little dense or forced that would've been better for this location but you'll notice I'm trying to put that trail into the corner and then trying to show this S curve and then also using the rule of thirds trying to catch him over here on this side of the frame so he's not right in the center of the frame. As you see in some of the other images, I was a little late on the timing for a few of them, so I'm thinking about what you're talking about in terms of where his head's at. I'm also thinking about how high the camera is off the ground because you'll notice the sky up here, and it happened a few times, I raised the camera just a little bit, you saw me raise the legs and then I lowered the legs, and when I lowered the legs I put his head up into this area with the sky which is why we started having these jaggy knife things coming through the motion blur and then I raised the camera back up. So I'm thinking about it but then I try different shots and then I realize it after the fact is that I might be concentrating more on his motion. And you see in the video, Tom is watching out for me. He's like, Mike, you've got the light in the shot over there. And I'm really concentrated on the rider and his body positioning and all that stuff so that's why it's good to have Tom. Tom Behr, he's a great photographer. Look him up. He shoots a lot of MMA stuff, a lot of sports and fitness. It's amazing. Tom doesn't normally assist me on all my shoots. He's assisted me a couple times this year. But since he's a working pro he's not an assistant he's just a good friend of mine that came out and helped me out on this one. And it's great to have a photographer like that of that caliber 'cause they can really look out for you. But did that answer some of your question a little bit? And you had a second part to that as well, or? Yeah, I was asking about entering versus exiting the frame and where are you putting them? I heard with cycling you wanna have them exiting the frame, with running you want them entering the frame. I tend to break barriers but I wasn't sure what your thoughts were on it. Either way, I mean, it just depends on the situation where it would work. You know, like there were some mountain biking images I showed you earlier where they were leaving the frame and some where they're coming back. I think typically what feels best to me is that you need more room in front of them than behind them so either way it's going. You know, if he's entering the frame I'm gonna want him over here. If he's coming into the frame towards the camera I want him farther away so there's more room in front of him and in both of those scenarios, there's more room in front of them because naturally, as humans, we wanna see where this person's going. That helps tell the story. Like oh, I see the trail winds down there. That looks fun, he's gonna be doing that or, you know, the reason I was setting it up this way is I want a strong diagonal in the image. And, you know, you have this, you have the trees, you have him here. It makes you feel. With adventure sports, I'm trying to have the viewer feel what it's like to be that athlete. That's my overriding, you know, I want a dramatic image. But if a base jumper's leaping off a cliff, I want them to feel in the gut what that feels like. Like with the climbing yesterday. I showed some of the pictures of Devil's Tower with that elevator shaft. That used to be the last picture I'd put in my portfolio and I'd go to ad agencies and, you know, they're not climbers necessarily, the art buyers looking at my portfolio, but they would see that picture of Devil's Tower and they would have an emotional reaction to the image. Usually terror, but, you know. But that is what I'm going for. I'm going for an emotional reaction. And here, it's not quite as intense as, you know, a base jumper or a rock climber but it's still, you can see the emotion in his face. And I think being able to see his face, that was the first thing I saw when I had him ride one way and the other way, besides the giant glowing orange shirt. Being able to see his face helps us connect with him a whole lot more. And he had a lot of, you know, when we were looking at the images, he was looking at his body positioning as well. So you notice in the video he comes back, he's looking in, it's like okay, I'm doing this. I can change his body positioning. 'Cause he knows what perfect form looks like and I don't necessarily for a cyclocross rider, but. Any other questions? Go ahead. Yeah, well I had a question online from Just Bob who asked, "Why did Michael move the camera closer "to the rider instead of just using the zoom on his lens? "Or is it a fixed focal length "or did you just wanna maintain that wide angle?" Yeah, so, excellent question 'cause I don't think I called that out in the video. I was shooting with a 14 to 24 Nikon lens which, you know, at 14, that's a super wide lens. And if I zoom in, I lose that pretty amazing 14 millimeter perspective. So I was moving in just to change perspective and stay at 14. And I think, you know, that's what I talked about in the other video starting a little farther away and then move in slowly as I get to see exactly where his line is and see that he's running it over and over and you noticed at one point the tripod leg was only a few inches away from where he was coming by. And because I was shooting long exposures I had to have it on a tripod to have everything in the background sharp. Looking at this now, I'm like why didn't I start running with the camera or at least panning with the camera to get something completely different that might've been really interesting? So that's why. I mean, it would've been easy to zoom in but I think moving your body you can get different perspectives. Since I was locked down on a tripod here one of the things since I've started shooting more video in the last seven, eight years, I've learned, like, when you're moving a video camera it's smooth and steady and when I'm shooting not on a tripod often I'll move like I'm moving a video camera to find the exact perspective. You know, and it looks a little strange, but it actually helps you really see a whole bunch of different perspectives. You know, moving around like that. And then find the shot and then put the camera on the tripod if I need to. But, as you can see. Were there any other questions online? I think that this has pretty much been covered but just to re-clarify again for Darren Francis who asked, "Could you use a burst of shots? "Would the flash keep up?" Excellent question, and we tried it. But it wasn't quite dark enough for that and our lights were maybe a little too far away so I've tested out these ELB 1200s at home and realized that if we put the light in the B channel and then we're at 3.7 or 3.8 power level on the pack, I can shoot up to like eight frames a second. So we could do that. But what happens when you rely on the eight frames per second is you may not have it in the perfect place you want. And if you dial in your timing you might only get one shot per go but you'll get the shot you really wanted. So, you know, quantity over quality doesn't always add up to a better picture. I think we have another question here? Go ahead. So as I'm still kinda like learning what each lighting will do, I know you have the one there right at the camera here, what's that backlighting that you have hidden behind the tree really bringing to the shot? Excellent, 'cause it gets right into the images here. You'll see in this image, you don't see it much. There's just a tiny little rim light because he's passed the lights already but if we go to the next image you'll see the rim lights a little more apparent there. Reality is, he needs to be just another foot or two back for that to really hit and I think even this next image we don't see it quite as much here because of the motion blur but it's just helping separate him from the background a little bit. So it's not doing a ton. It's much harder lights as well you can see in all these images. Like, this is kind of, it feels softer on this side. It's more frontally lit. And that back one's just edging him out or at least on his upper torso there for a little bit. You know, we could've shot this with just one light. If there had been full sun, the sun would've been on that side of him. So this light set up over there is kind of mimicking the sun to a small degree but it allows me to control it much more precisely. So let's jump in to the images if there's no questions left. And, if I'm being honest, let me just be hypercritical of my own work, I wasn't super excited about any of these images. I didn't go far enough, I didn't do anything that I felt was super magical. The location was good, but, you know, look at this. We've got these logs over here which is typical for a forest of this type. I would've preferred tighter trees. Maybe, you know, like those Aspen shots. That was just a whole more magical location. It's still kind of a cool shot. It's not like it's a horrible image. But somehow, it just doesn't have that little extra 10% that I wish it did have. And I'll show you how I processed it 'cause I did process some of these as black and whites. That's really cool 'cause you see the intensity on his face there and he's coming into frame. Oh, this looks like the tires are bending here with the motion blur. So we did definitely get some cool, intense looks from him. Let's keep going. So then I turned it into black and white. And somehow, by removing the color and amping up the contrast a little bit it makes our figure in the landscape more graphic and more graphically pleasing to me. That's just my opinion on this one. I mean, the typical thing when you're shooting a sport like this, find that epic background, you know? If we had Everest in the background and he's riding down a ridge and we lit him up on the ridge your spectacular background and him with it would be a pretty spectacular shot. We don't have Everest in the background. There was no place we could find where we had like [Unintelligible 00:42:15] Some of the mountains around the bend in the background. I think, for me, coming from New Mexico, this looks a lot like New Mexico and maybe that's why for me it's not as exciting because this is almost identical. The bend is very similar in altitude and look to New Mexico where I live so maybe I see this all the time. If we could've been in the rainforest, that's why I really wanted the rainforest which Oregon is known for their rainforest mountain biking but it was still under snow, that would've been really exotic for me and different. We would've had ferns lit up on the side of the trail. You know, that's just my own perspective and stuff but still, that's kind of a cool image and I'm really in love with the motion blur because it really imparts some of the motion.
Class Materials
Bonus Materials with Purchase
Ratings and Reviews
a Creativelive Student
Great course that combines the technical aspects of shooting with light in different situations, with the art of making a great image of athletes. Michael is a great teacher and I'm sure his lessons will continue to help guide over and over again!
norah levine
This is a course that I could watch repeatedly and be able to learn something new each time. Michael is a truly an expert in his field and is so generous with his knowledge. This course really breaks down the process of adventure photography, but it's more than that. I don't think you need to even be an adventure sports photographer to get tons out of this course. Michael is really good at breaking down some very complicated technology. Thank you!
Jeph DeLorme
Great class with dozens of tips, ideas and lighting strategies for tough outdoor lighting challenges. Advanced class taught in a way that allows even a beginner to get a handle on lighting tough situations. The location videos provide real life examples that make this class a definite must have for my Creative Live collection. Thank you Michael Clark and Creative Live! Jeph DeLorme