Painting with Gradients in Adobe Illustrator
Lesson 13 from: Adobe Illustrator CC for BeginnersBrian Wood
Painting with Gradients in Adobe Illustrator
Lesson 13 from: Adobe Illustrator CC for BeginnersBrian Wood
Lesson Info
13. Painting with Gradients in Adobe Illustrator
Lessons
What is Adobe Illustrator?
06:22 2Explore the Adobe Illustrator Interface
11:44 3Create and Save New Documents
07:03 4Zoom and Navigate in Adobe Illustrator
07:24 5Working with Artboards in Adobe Illustrator
18:09 6Introduction to Layers in Adobe Illustrator
18:52 7Rulers and Guides in Adobe Illustrator
09:04 8Shapes and Drawing in Adobe Illustrator
45:26Aligning and Combining Shapes in Adobe Illustrator
15:31 10Pen Tool in Adobe Illustrator
30:59 11Manipulating Stroke and Fill in Adobe Illustrator
14:38 12Creating and Editing with Color in Adobe Illustrator
17:35 13Painting with Gradients in Adobe Illustrator
10:35 14Getting Started with Patterns in Adobe Illustrator
08:10 15Adding Text To Your Document in Adobe Illustrator
08:44 16Formatting Text in Adobe Illustrator
11:34 17Strokes and Variable Strokes in Adobe Illustrator
16:56 18Rotating Objects in Adobe Illustrator
08:41 19Effects and the Appearance Panel in Adobe Illustrator
10:57 20Adding Photo Images in Adobe Illustrator
12:39 21Working with Linked Content in Adobe Illustrator
10:13 22Packaging your Project for Handoff in Adobe Illustrator
04:27 23Best Formats to Save Your Files
14:34Lesson Info
Painting with Gradients in Adobe Illustrator
We've got a few color done, color things done out there. We've got some swatch, a swatch we created rather that we can work with. What I want to do now is I want to start to work a little bit with gradients and talk to you guys about that cause these are really important. There's some things we're going to do with these. What I'd like to do is I'd like to move over to the robot over here on the right. So we're going to the hand tool again. A short cut to get to the hand tool if you're on another tool, you can hold the space bar down. You'll learn that later but let me move over here and what I would like you to do is I would like you to select the robot body down here. So use the selection tool and click on the robot body and now what we're gonna do is we're gonna apply a gradient. I think this guy should be a silvery something with a little bit of color change, et cetera. Gradients in Illustrator are super important and they also, there's a lot of great things we can do with them. The...
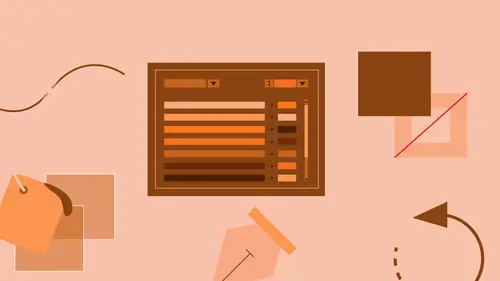
y're not that bad to make. What I want you to do is come up to the control panel and what we're gonna do is we're gonna fill it by default with a white and black gradient. So a gradient is a blend from one color to another and that's the simplest gradient. We can make gradients with 50,000 colors that blend to each other and do whatever you want and get nuts but Illustrator comes with a white to black gradient that you can just simply apply. Now I think the awesome thing about gradients is that you can apply them to a fill and a stroke. So you can do some really cool things with the stroke but we've got that applied. Now what I'd like to do is I'd like to go in and I'd like to start editing the gradient itself. So why don't you come over here to the right. You're gonna see a panel called gradient. Go ahead and click on that. You might have to click twice to close the other panel. The gradient panel is a place for us to go in and start to affect what we just applied basically. Okay, now in here it's the same exact thing and everybody trips up on this. You're gonna see we, first of all, have to pick the stroke or the fill and make sure we've got the gradient fill up front. Okay, that one's selected and then we can do what we want. There's two kinds of gradients you can create in here. We can create a radial gradient or like a circular gradient. Why don't you come to type here and click on the menu and you can choose radial if you want. You can try that. Let's take a look at it. It's pretty, I mean it's simple. It's coming from the center, that's kind of neat. I'm going to go back to linear and why don't you do that. And you'll see that we can, I'm gonna skip some of this stuff cause we don't really need it, the bulk of our work in a gradient, if you want to edit the colors and how it works and looks, is gonna be right down here. This is called the gradient slider or the gradient ramp, if you want to call it that. You're gonna see the two colors that are in the gradient by default aren't, are on either end of the gradient ramp, okay. You guys think of these as little paint buckets, okay. It's filled with color and it's mixing from one to the next. If you want to edit that color, you can double click on that little stop. It's called a color stop. So if you do this, watch me up here for a second. First of all, you can actually drag these around and if you look at my gradient out there, you can change how it looks out there, okay. You can shorten it, lengthen it, whatever you want to do. If you want to change a color, why don't you come to one of these stops like the white one and just double click right on it. Okay, this is gonna allow us to open up two different panels. It's gonna open up the color panel and the swatches panel at the same time. If you want to, you can look right here to the left, that's the color and there's the swatches. Why don't you click on swatches. And you can see, there's our swatch. There's all the swatches that we have available. So all this stuff ties together. Once you start making color, you're gonna see it everywhere you use color which is pretty cool. So we can apply, let's say, the purple color or we can apply a gray color or do something like that. Why don't you try something a little different. It's just obviously it's just affecting the one color on the left there instead of white. So you can try a lot of different things if you want to. This is a really simple gradient. I mean, it's just two colors, right. If we decide we want to do something a little different on here, why don't you click in the gradient panel again somewhere where there's nothing to close up that other panel. You can see that. And if you want to, you can come to the black gradient to double click and change that color. Okay, so we can change any color we want through here, either color rather. Now to make things interesting with a gradient, we can go in and add as many colors as we want. If you come below this gradient ramp with the pointer, you're gonna see a little plus show up. Just click somewhere. Just click somewhere underneath the ramp there. What that does is it says let's add another little color stop, another little paint bucket, okay and this is where we can add another color. So you can go crazy. We can add a whole bunch if we want to. It really depends. I've actually made, in the book, I went in and we created a, what was it? A mirror, I think and we had a border, a wood border on it and we made a wood grain border by applying a gradient with like six different brown colors. It was actually pretty cool. It came out really well. I was kind of surprised but so we can apply as many colors as we want. So I could come to that little color stop right there, double click, and then pick another color and kind of keep working, if we want to. Okay, yeah this looks horrendous but anyway. That's fine. I'm gonna put white in there, there we go. And you can also, you can then you know click within the gradient panel to close the color so you don't have to worry about that. You're gonna go in and sometimes mess up. You're gonna actually create a stop, color stop where you do not want it. We can remove these if we want to. If you want to remove one of these little stops, you just drag it off the ramp and let go. So watch. Pretend I add one here, I messed up. I just click, drag it off, and let go. Kind of an easy way to do it. That's one way. There's also a little teeny trashcan to the right. If you click on a stop, you can click the trashcan and get rid of it, too. Either way. Now, I think the phenomenal thing about gradients too is that you can have a color in here that's transparent or translucent. Everyone of these little color stops, if you click on it you're gonna see an opacity option, which you can change. So that's kind of neat. So you can make it to where you have, you know, gradients that are overlapping other objects to give it some kind of look or feel. This is really pretty neat. I've done that with an ocean. We did it in the book and we had an ocean and I had three different, like a blue and a green and I kind of faded them differently between different greens and blues with opacity and it worked, I think it worked pretty well, so. So anyway, gradients are a great thing for us to be able to do. This is where we can edit them or we can change them. If we have a gradient we really like, we can go out now. We can actually save that in the swatches panel, okay. Why don't you come to the swatches panel. Once again, we're just switching all the time, just looking at different things and if you look down here, you will see that we have the new swatch. I have now, I have the fill selected, okay. Click on new swatch to create a new swatch. And it's gonna say what do you want to call it? I'll just call it robot or you know whatever is gonna be good for you. And I can click okay and it will save that as a swatch now in the actual panel. Excuse me. So now we can save our solid colors, any colors we make with the inks, the CNYK or RGB, we can save gradients like this. One last thing with gradients. A lot of times when you make it, you look at it and you're like it's not quite right. Maybe I don't want the gradient to go this way. I want it to go this way or diagonal or do something different. Once you create a gradient, there's other things we can do. You can actually use what's called a gradient tool to then change the direction and the duration of the gradient and that's what we're gonna do. So with that shape still selected, if you come over here to the left, you're gonna see the gradient tool right there. Click on the gradient tool and why don't you just watch up here for one second. This, it can get a little deep but. If you notice there's that bar out there right? If I hover over that bar right there, you can see that we actually have the color stops right there. You can edit the colors and everything right here. You don't have to do it in the panel if you don't want so I could come to one of these little stops and if I double click on it, I get the color thing again. So you can keep editing it, which is really great, okay. So you're doing it visually. I'm gonna press the escape key to hide that. You can do it visually, you can do it right here. Now the thing that is happening though is that the direction of the gradient is going from left to right. I can tell because that zero, that O is just usually the first color and the box is usually the last color. If you want to change it, we can just draw in a different direction. So if I come up to the top, for instance. You want to try this, you can just click and drag and say we want to go that way and it's gonna make the direction of the gradient change. So you can change it to go that way. Now, like we saw earlier, if you want it to go perfectly straight up and down, vertical - horizontal, as you draw you can hold the shift key. So I can start up here, maybe. Click and drag. If I hold that shift key down while I'm drawing, it'll make it straight. I let go of the mouse and the key and I've got my direction, okay. Can you see how the black right there gets really intense towards the end? I might not want that. The great thing about the gradient tool is you can actually draw outside the shape and go further if you want. And it basically makes it so that the blackest black won't be there. So, it's just extending the colors beyond the edges of the shape which is kind of neat so, yeah. Excuse me. Alright, I'm gonna go back to horizontal. You can do whatever you'd like. I'm going to use my shift key, let go of the mouse, let go of the shift key and I've got that. Tell you what, why don't you apply, we're gonna apply the gradient fill to the jaw and to the head. So you can do it all at once. If you want to select both objects, we could do that. So if I go to the selection tool, I can actually drag across, carefully touching just those two shapes. You can also shift click to select them. In the swatches panel, I can apply the gradient if I want to. There we go, looking a little better. That's always going to apply it in the same direction, the same uniform, you know size, et cetera so if we wanted to, we could click on each object independently, go to that gradient tool, and start dragging across and changing direction and how it works and how it looks.
Class Materials
Bonus Materials with Purchase
Ratings and Reviews
Colleen
I've been trying to learn Illustrator on and off for years. This is the best instruction I've had! Brian is a great instructor. Finally feeling comfortable with it. It does use an older version but I just adapt.
Bill Neill
Great content and a good instructor. Not his fault the world marches on and doesn't stay in 2015. Any reasonably intelligent person will be able to figure out the changes since 2015 and how they relate to this course. It is early 2019, and I'm not having any trouble, but then I am reasonably intelligent and not to lazy to do some thinking.
MikeD
This is a great beginner course. Of course, it is older and still uses Illustrator CC (2015.3), but it's real easy to figure out the differences. However, anyone who has Creative Cloud can still install the older version (located in the "Other Versions" tab and take the class using that version and then delete it when done. The knowledge transfers easily. Brian is an incredibly knowledgeable instructor, teaches in detail and doesn't patronize his audience.
Student Work
Related Classes
Adobe Illustrator