Set Tour and Lighting Set Up
Lesson 30 from: Portrait Photography: Creating and Styling your EnvironmentJohn Keatley
Set Tour and Lighting Set Up
Lesson 30 from: Portrait Photography: Creating and Styling your EnvironmentJohn Keatley
Lesson Info
30. Set Tour and Lighting Set Up
Lessons
Class Introduction
20:10 2Creative Photography Path
22:57 3Importance of Personal Work
15:25 4Concepts and Inspiration
12:04 5Choosing Your Environment
05:03 6Research and Mood Boards
06:58 7Finding Your Style
09:34 8Establishing a Team
10:44Jobs on Set
28:38 10Production Hurdles
13:45 11Working with an Art Director
07:01 12Pooling Resources
03:43 13Casting
17:26 14Wardrobe
11:24 15Set Design and Props: Interview with John Lavin
35:06 16Gear
09:59 17Lighting
29:10 18Technical vs. Flexible Lighting
07:56 19Creating Environment
07:59 20Gear Essentials vs. DIY Solutions
07:02 21Lighting for Your Subject
04:10 22Lighting for Your Environment
05:17 23Q&A
08:36 24Directing Your Subject
34:03 25Tips for Directing Talent
09:58 26Pre-Lighting and Test Shoots
05:08 27Shoot: Stylized Portrait - Close Up Part 1
49:55 28Shoot: Stylized Portrait - Close Up Part 2
20:19 29Shoot: Stylized Portrait - Close Up Part 3
17:19 30Set Tour and Lighting Set Up
05:41 31Shoot: Building Environment & Lighting Adjustments
33:13 32Shoot: Building Environment Part 1
18:45 33Shoot: Building Environment Part 2
18:39 34Photo Critique
26:06 35Shoot: Row Boat in Fog Set Tour
03:54 36Shoot: Row Boat in Fog Part 1
42:19 37Shoot: Row Boat in Fog Part 2
28:34 38Shoot: Row Boat in Fog Part 3
24:34 39Shoot: Row Boat in Fog Part 4
04:10 40Shoot: Scuba in the Hull Part 1
44:27 41Shoot: Scuba in the Hull Part 2
21:50 42Shoot: Scuba in the Hull Part 3
16:40 43Image Selection: Stylized Portrait
30:53 44Image Selection: Building Environment
10:52 45Image Selection: Row Boat in Fog
11:53 46Image Selection: Scuba in the Hull
06:38 47Next Steps: Create New Work
05:44 48Next Steps: Share Your Work
12:03 49Next Steps: Marketing and Branding Consistency
12:52 50Final Image Reveal - Concept and Casting
13:20 51Final Image Reveal - Retouching: Communication and Direction
14:13 52Final Image Reveal - Final Q&A
34:52Lesson Info
Set Tour and Lighting Set Up
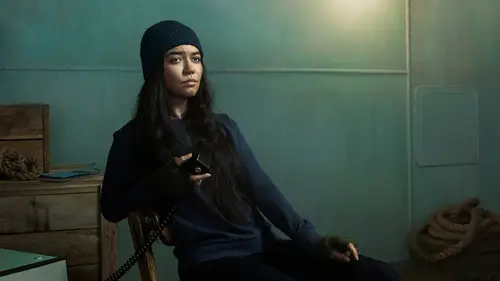
So we are still in the world of this kind of nautical theme, possibly on a ship and it's an all female crew and so we did our first portrait and wanted kinda to set the tone of who these people are, they're like a little rougher on the edges. I kind of, I like to reference like, Indiana Jones of the Sea kinda thing as we've been talking about this. So now we are pulling back a little bit more, we're gonna see a little bit more environment as opposed to just a wall and so right now the plan is to have our subject, when she comes out, sit here and it's gonna be a horizontal image. So we're gonna cover the wall and probably a little bit off the wall which we'll have to handle in post if we do go that route. But basically, John Laven talked about props and art direction and how to kind of fake reality and how to make people see something that maybe isn't really there and so one of the things he talked about was kind of extending props off of the edge and so that's exactly what we're doing ...
here. And it's not just to follow the rules, it's because we tried everything we could yesterday in setting this up and the more we kind of pushed things to the edge, the better it felt. I think originally we had lots of boxes kind of piled up in here and it just felt too, too forced. It just didn't have this feeling of reality. So really it's just kind of moving things around and finessing the environment until something clicks and it starts to feel exciting. Maybe first it feels interesting and then it starts to feel exciting and that's the place you want to be. And then it just becomes moving all these little things that start to kind of bring life and you know make the environment a little more rich. So we've got these boxes here, there's this little rope, you probably won't see the rope but it's just kind of like the idea of the rope coming in that will help give you a sense of placement. The idea right now is to have her kind of leaning back in this chair and talking into this radio. And in the background, we have just another crate and if you just kind of see it, this stuff here like this, it just looks like you kinda drop some things in but it all works in a certain frame. And then this is the kind of stuff I love. We were doing tests last night on just a flat wall and it just, it really boring. It felt like a ton was missing. But what I've learned over the years working with John and art directors is that just the tiniest little details can be what make a room really seen like whether it's just a little bit of conduit that leads to an electrical plug or something like that or a little bit of molding at the bottom. So once we brought that in, that really started to give the room a lot more life and even things like this welded panel here that makes it feel like something's been done, this is a place that's been used and has some history. And then finally, we wanted to add a little bit more depth and drama and so when shooting kind of at an angle, if you just kind of have, for me at least, if this wall just kind of stays flat and it's just this long piece of repetitive texture, it loses a little bit of interest for me. So we added this light fixture up here which adds a lot in of itself and then moving on into lighting, we've got this seven inch reflector with a little bit of orange gel on it and that's basically firing right into the camera to kind of create a lens flare which you guys will see in a little bit. Moving on, starting with the key I guess I should say. So our key is actually the same light that we were using, actually we have switched to, we switched to white? Yeah so we switched, it's the same, pretty much the same key that we used last time except for this is the white beauty dish with a grid in it and last time, for the first shoot, we used a silver beauty dish which just has a little bit more punch to it. And then right behind that, we have a 2x3 soft box to just help us with a little bit more wrap. And then I mentioned already this light is not, it's not doing anything to the set itself. All that it's doing is it's providing, it's providing a flare into the camera and that will really read when we start putting haze into the set which we're also gonna do. We're gonna kinda make it smoky and give you a sense that you're like, kind of on a ship that's moving through the fog. And then finally we have a seven foot Octabank which is gonna sit right behind me. I think last, for the last portrait, we had a five foot Octabank right behind me for Phil. This set is quite a bit bigger. So we still need the same thing, we need something that's gonna fill in the shadows but we just need something bigger to accommodate the larger set. I think that pretty much covers all of it. We also have this wood flooring here which is actually just laminate, or vinyl sorry, and it just came in a big roll and we just rolled it out and like John said, it looks just as good as wood on camera. You know, nobody is gonna be able to, no one's gonna be able to tell the difference. So, I think that's covering it. You may be wondering why we have the seamless here. Basically, we may need to move it over a little bit, it's kind of, we're losing about like half an inch if we can, we've got the seamless here because the wall isn't quite long enough to fill our frame. So I just wanted something with structure and texture that I can reference in post 'cause we're probably gonna have to digitally extend this wall a little bit, maybe even on both sides.
Class Materials
Bonus Materials
Ratings and Reviews
a Creativelive Student
What an amazing show. I'm so happy that I could be a part of it. It was so great to see John at work and in his element. I learned so much from watching his process from beginning to ending. So many questions have been answered. I feel more confident, to get myself out there and create and make work that comes out from my imagination. I will definitely be keeping a journal/notebook with me at all times. I would also like to suggest that we have another course for John Cornicello, home studio. I'm curious to see what John is working on in his studio.
Doppio Studio
It's amazing to watch and understand how this great creative professional work. There's a lot to learn about with his production process. For me, that lives in Brazil, is a major opportunity to enjoy this class.
Vitamin Dee
Wow! There's just so much great information in this class. If you've ever wondered what it takes to produce an environmental portrait, this is the class for you! John did a superb job of taking us step-by-step through his process. From model casting to set building, lighting setups to culling; it's all here. He even wraps up the class with next steps and how to put it all together. He gives the knowledge so you can take it to a place you can create your own magic!
Student Work
Related Classes
Portrait Photography