Lighting for Your Environment
Lesson 22 from: Portrait Photography: Creating and Styling your EnvironmentJohn Keatley
Lighting for Your Environment
Lesson 22 from: Portrait Photography: Creating and Styling your EnvironmentJohn Keatley
Lessons
Class Introduction
20:10 2Creative Photography Path
22:57 3Importance of Personal Work
15:25 4Concepts and Inspiration
12:04 5Choosing Your Environment
05:03 6Research and Mood Boards
06:58 7Finding Your Style
09:34 8Establishing a Team
10:44Jobs on Set
28:38 10Production Hurdles
13:45 11Working with an Art Director
07:01 12Pooling Resources
03:43 13Casting
17:26 14Wardrobe
11:24 15Set Design and Props: Interview with John Lavin
35:06 16Gear
09:59 17Lighting
29:10 18Technical vs. Flexible Lighting
07:56 19Creating Environment
07:59 20Gear Essentials vs. DIY Solutions
07:02 21Lighting for Your Subject
04:10 22Lighting for Your Environment
05:17 23Q&A
08:36 24Directing Your Subject
34:03 25Tips for Directing Talent
09:58 26Pre-Lighting and Test Shoots
05:08 27Shoot: Stylized Portrait - Close Up Part 1
49:55 28Shoot: Stylized Portrait - Close Up Part 2
20:19 29Shoot: Stylized Portrait - Close Up Part 3
17:19 30Set Tour and Lighting Set Up
05:41 31Shoot: Building Environment & Lighting Adjustments
33:13 32Shoot: Building Environment Part 1
18:45 33Shoot: Building Environment Part 2
18:39 34Photo Critique
26:06 35Shoot: Row Boat in Fog Set Tour
03:54 36Shoot: Row Boat in Fog Part 1
42:19 37Shoot: Row Boat in Fog Part 2
28:34 38Shoot: Row Boat in Fog Part 3
24:34 39Shoot: Row Boat in Fog Part 4
04:10 40Shoot: Scuba in the Hull Part 1
44:27 41Shoot: Scuba in the Hull Part 2
21:50 42Shoot: Scuba in the Hull Part 3
16:40 43Image Selection: Stylized Portrait
30:53 44Image Selection: Building Environment
10:52 45Image Selection: Row Boat in Fog
11:53 46Image Selection: Scuba in the Hull
06:38 47Next Steps: Create New Work
05:44 48Next Steps: Share Your Work
12:03 49Next Steps: Marketing and Branding Consistency
12:52 50Final Image Reveal - Concept and Casting
13:20 51Final Image Reveal - Retouching: Communication and Direction
14:13 52Final Image Reveal - Final Q&A
34:52Lesson Info
Lighting for Your Environment
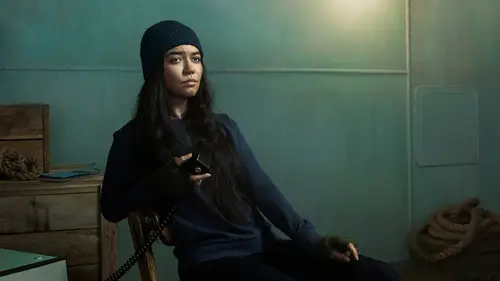
So now, we've talked about lighting. Lighting your subject and in a general sense, and we will see a lot of this too when we do the photo shoots. But, I wanna talk a little bit about lighting your environment, because we are gonna be, all these shoots are gonna be environmental. How do we handle the environment, either in conjunction with the subject, or separate from the subject. This is a shoot that I did, again I mentioned for another tutorial I did a few years ago. This was a set that I was referencing when John Lavin came out. I just did this, I had some help from a couple friends, but we didn't have John Lavin. We didn't have a set builder or anything like that. Again, as you can see, I've used this paneling many times in some of my personal images. I think we have, I think it's three panels this time, so probably 60 bucks for background. And we just clamped them on to poles and things and whatever was available in the studio. We got the file cabinet for free on Craigslist. We go...
t the desk for free on Craigslist. We got the lamp from a Goodwill store. The phone we bought from an antique store and on, and on, and on. I think we probably paid, all told, 100 dollars for this whole set. It just took a lot of time, and coordinating, and researching, and online, and stuff like that. But, talking about lighting for your environment. For this shot I knew I wanted some depth, and a lot of my light is very similar. Again, I'm not trying to reinvent some new lighting pattern every time. As long as the image feels dynamic and the desired idea comes across. I'm not gonna try to do something new just for the sake of doing something new. But I knew I did want some depth on the shot of her face, I wanted her to feel like depth is really important to me, I'm always looking for that in terms of contrast, and the light, and things like that. I wanted the light to come across her face. The first thing we did is we set up a key light. I think there's probably a fill light happening in here as well, 'cause the shadows are totally black. But, I was really not feeling this first shot on the left, it just felt really flat. And one thing I realized, after lighting this, is there's actually a corner, as you can see over here, there's actually a corner in here. But this back wall feels completely flat. It just feels really stale, like there's no depth at all to the room. The whole point of building this room with a corner was to give you a sense of depth. Basically, what was happening is this key light is coming right down into here, it's hitting these walls evenly. It's giving the same amount of power to this wall and this wall, so that's why you get this very even look. Now, as far as she's concerned, I'm happy. I like that light pattern on her face. But, I don't like the environment. Now you have to start making some concessions. Your key light on your subject is affecting your background in a negative way. So, what do we do? Do we change the light? Do we change the direction of the light? In this particular case, thankfully, there's really no reason for me that I need the key light to come from this side. I'm perfectly happy if it comes from the other side. So, all we did from here to here was just take the key light from here and move it over here, and then we swapped the fill also. What that does is the key light's now facing this way and it's basically bypassing this wall. Without the fill light, this wall becomes dark, and then I can control it independently with the fill light. I can also control the light with her with another fill light. So, now the other example of showing you this particular image too, is I set up really large lights and I used fewer of them. Rather than really technical lighting, and getting in and lighting her hair, and doing all this crazy stuff on the walls. I wanted to explore this space. She's an actress, and she is someone, she's a friend of mine, and she can create these really amazing characters. I wanted to be able to let her improv basically. And if I'm being super precious and technical with the lighting, I'm really limiting her in what she can do. Like, "Hey, that's great Sarah." And yes, that is a girl actually wearing a fake mustache. But, you know, I don't wanna be like, "Hey, that's great Sarah, but you can't do that 'cause the light's missing you," kind of thing. I just want let her loose and see what happens. So, as you can see here, she can stretch, she can stand up, move around. Even come to the front of the desk, which we did in some, and the light really doesn't change. It still has the same effect and quality. Those are kind of things that you need to consider. You have to kind of, then the light on your subject's very important, but the light in your environment's also very important too. So, how do we find a way to balance the two? Where, sometimes you do have to make compromises, but those are the kind of things that can come up. That's an example of how we problem solved here. The other thing too as I mentioned, was this final image is all brown, but we didn't get super picky about it. I got a free file cabinet. I could've spent another week trying to find a brown cabinet, maybe it would've cost money, it would've taken more time. But I knew that's something in post we can change, so what's the benefit here? Do I want to spend more time and get it perfect? Or, do I want to spend less time and less money possibly, and just doing it in post? Again, thinking through that whole process and what the tools are available to you.
Class Materials
Bonus Materials
Ratings and Reviews
a Creativelive Student
What an amazing show. I'm so happy that I could be a part of it. It was so great to see John at work and in his element. I learned so much from watching his process from beginning to ending. So many questions have been answered. I feel more confident, to get myself out there and create and make work that comes out from my imagination. I will definitely be keeping a journal/notebook with me at all times. I would also like to suggest that we have another course for John Cornicello, home studio. I'm curious to see what John is working on in his studio.
Doppio Studio
It's amazing to watch and understand how this great creative professional work. There's a lot to learn about with his production process. For me, that lives in Brazil, is a major opportunity to enjoy this class.
Vitamin Dee
Wow! There's just so much great information in this class. If you've ever wondered what it takes to produce an environmental portrait, this is the class for you! John did a superb job of taking us step-by-step through his process. From model casting to set building, lighting setups to culling; it's all here. He even wraps up the class with next steps and how to put it all together. He gives the knowledge so you can take it to a place you can create your own magic!
Student Work
Related Classes
Portrait Photography