Replacing the Sky and Focus Stacking
Lesson 3 from: Basic Post Processing for Landscape PhotographersMatt Kloskowski
Replacing the Sky and Focus Stacking
Lesson 3 from: Basic Post Processing for Landscape PhotographersMatt Kloskowski
Lesson Info
3. Replacing the Sky and Focus Stacking
Lessons
Lesson Info
Replacing the Sky and Focus Stacking
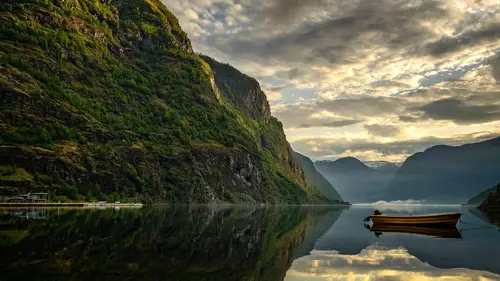
So let's talk about sky replacement so here we are way got image that's guy um how many people in here are morally opposed to replacing skies you have to sign a waiver you are but you have to sign a waiver that it's not for everybody some people just refuse to do and that's fine but if you want to replace the sky there is there some quick ways to do it the first thing that I can tell you is that it's going to be it's going to be really tough to replace a sky on a photo that don't have similar color and what I mean is let's take let's take let's say I have this beach photo and this guy there's no photos of trick in the world I can give you to make it work because it's not it's you know the colors are different they're the tones different mean everything this was overcast there's mohr there's more to a scene than just the sky there is the light that the sky casts on things and all those things so you have to set yourself up with the right expectations to make it work so in this example h...
ere what what what struck me was one this was the first time this is the big sir and the coastline in california what struck me is that the first time I was there where it wasn't fucking seriously for like five years whenever I went to san francisco I go get a rental car I drive the two and a half hours down to big sur and guess what I was met with like fog to the point you can't see your hand here I've never even picked my camera out of the bag you couldn't see anything it be sunny and then fog so this was the first time but what struck me was you know of course the mother nature being what she is she wasn't going to give me no fog and a beautiful sky so I got just orange I knew I had I went looking through my sky library and I knew I had this photo so what we're looking at is is you're looking for a sky with a son or a sunset that's in relatively the same place ace okay I wouldn't want if the sun was going down over here I wouldn't want to take that photo unless I flipped it to put it over there so you want the sun in the relatively the same place so what we'll do as we're going to select both photos go photo edit in this this point is this one of those times where we need photo shop all right um if you go down here to the bottom if you select two photos you can edit them as layers and photo shop so it is layers by the one any uh by the way any on one users out there so they have a layers layers component there you could jump into layers and do the same thing as well so now we get into a photo shop and we've got two layers on top of each other I'm gonna flip flop um so that my skies on top and that my regular scene is on the bottom and then now we need to make a selection so let's go to the bottom one let's hide the top one I want to take our quick selection tool and just make a really quick dirty selection you guys solace in the last class you didn't see this in the last class the best selection technology and photo shop it's hidden under this little refine edge but right here at the top so click refined edge and then you can choose to see on black on white you could see it on black and white I'll go on white we have a little brush tool the way the brush tool works is you just paint and it's haphazard I mean I just paint I have no idea and I'll even paint right along the edge all right so let's zoom into that just because I think you got to see the selection that's before that's after that's good for just a swipe of a brush and this were black and white help sometimes too you can see it all right so let's go ahead and make our selection click okay and now we have our sky back from the basics class if you remember if I have a selection active and I click the layer mask icon whatever selected stays so if I click the layer mask icon that selection stays it hides everything else okay now we got some work to do because our sky is not in the right place so easy fix I can move it what's gonna happen if I move it I'll show you so that's not quite what we want right cause I know that there's a better part of the sky but it's moving the whole thing why is it doing that it's doing that because the image is linked to the mask so that little lock means image is linked to the mask so if I turned that off just click on it now I can move it around. Okay it's a little bit too small too. You can see some of the edge over there so just go to edit free transform a little bit bigger all right? And uh pretty darn good I'm going to zoom in there's one little fix we can do but that's before that's after and if you want to reduce the opacity he helped lend it in a little bit but the reason why this works guys is because there's some similar color tones in there and that's that's the only way that you're going to get one sky into another not going to work any other way there is ah, little little bit of a fringe happening over here in the basics class I showed you a quick, easy way to get rid of it I believe you had asked about when I was in the refined edge dialog box you'd asked about some of the sliders in there and the other class so let's say if you go in here you're going to see I go to my window properties the property's dialog box will let me go adjust my selection okay, so if I open up mask hedge it opens up that same refined edge dialog box. This is probably one of the few times where some of these sliders can come in, but that shift edge one is one of the ones that can work here so I can shift the edge. Say it here I'll go the other way and can see the halo but if I shift it, get rid of it that's before that's after so that'll help just kind of shift it inward a little bit to get rid of some of those edges but that is that's your sky replacement again it's one of those things it's not gonna work on every photo you need the right photos for okay let's jump into you clouds to me to me like when I go on a landscape shoot it's about clouds clouds are like that's what I want hence the sky replacement you too I mean seriously like if I if I get there I mean don't get me wrong I love to take pictures if it's a beautiful place but I'm always looking for clouds that's that's what gets me one of the things that we could do is clarity and detail kind of enhanced our clouds so a good example and we we alluded to this before is we could take our grad filter and I could crank up the clarity and I could add some some depth in contrast to these claws they almost take on a three d type of equality all right? Um uh if I add if I click knew I'd do it again see what's starting to happen do you see the splotchy nous in the sky and it's like some of the clouds almost take on a little bit of a drop shadow tomb if you look really close you'll start to see edges and shadows around them so that's why stacking on clouds like this don't really work so what we can do is there's a little trick that I have using perfect effects which I showed you earlier when I go into perfect effects they have what probably is my favorite way to add this is this is every single photo that goes in my portfolio that I that I processed that I care about gets this following filter it's called dynamic contrast, you know that all the total contrast plug ins that we see these days, they add that detail almost the three d equality type of look to it so this is this is just the one that I used, but if you go on your dynamic contrast, they use the natural one zoom in here over on the clouds and you'll see a lot of the same thing's gonna happen right on that kind of boosted up a little bit too, so if I turn it off, number one clouds get black and that happened back in light room too you don't want black clouds, the clouds weren't black don't make him black, so the clouds start to get black, but they also take on that edge. So what we can do here is perfect effects is the only one that has this it allows me to apply it to just the highlights. So now look before after so now I'm just applying it to the highlights and now if I duplicate that effect, I'll add another layer in here I'll add another effect again see it makes the club's dark and it starts to give me shadows by go down here and I apply to just the shadows I avoid the dark because the mid tones member are gray is what's mid tone the mid tones is what when you stack all those clarity adjustments that's, what makes that stuff black it's mid tones so this by doing just the highlights and just the shadows, I avoid that and I avoid the halo glow and shadows around all the clouds and that blocked penis so that's pretty much before after that's pretty much what I do on all of my photos not just for clouds will show you the second that I do a lot of it on details as well, but to me, when it comes to a landscape photographer clouds are a big part of photo that's how I enhanced mine I go in there and I just I do it just especially for the clouds, but the other place that you'll see is hazy when we get out there and there's just a little bit of haze I do this one quite a bit to meet. The dynamic contrast is like the haze killer, so we'll add it on and then what's cool about it, all right? What's cool about it is it lets me work on the details so small details in here or large details, which will be probably mohr of the stuff that we'd see down here in the trees see there's small, medium, large but the large details don't affect the little rocks, everything as much. So, guys I used this is like this is my bread and butter for my landscape photos is dynamic contrast, everything sees it, but we talked about the haze you'll see see how it kind of cuts through the haze a little bit it's just brings an overall edge, everything in there, especially in mountains, because that's where we see it a lot because typically we're not very close to the mountains and you get all that atmosphere. That's what the hayes comes from. All right, let's, see here, focus stacking. All right, so for the live audience, you guys, you guys saw the manual way that I do focused backing for the non live audience. I kind of showed this a little bit last time, but there's an automatic way that does it that's pretty darn cool. So let's, go take these photos. These are the same two photos I've got one that's got a sharp foreground and the mountain back not so sharp. I've got another one or the mountain in the background. That's where I focused is sharper and everything in the foreground is going to be a little bit more blurry, so we're going to use that same trick we used before we go photo edit in open as layers and photo shop and so what is going to do is gonna bring us in a photo shop stack the two images on top of each other okay, so we're back in photo shop and if I turn off my layers of just gonna rename him just double click to rename and we'll call this one foreground and then I'll go to the top layer and I'll double click to rename we'll call it background so let me do that easy way first the easy way is what I try first actually and that is if you shift click to select both layers you come up here to the image or to the edit menu and you go down to auto blend layers and choose stack images what it does is it those focus stacking you know focus that if you haven't tried it focused acting is we're focusing in different parts of the photo to try to get the sharpest photo possible a lot of macro photographers use it because you're using a macro lens you're getting way close up and even if you shoot it f twenty two you can't you're still gonna have a lot of depth of field so that if they have got a flower they want all the planes of the flower so they'll focus a different points stack them together but you can use it as a landscape photographer focus up close focus in the background choose stack images here click okay and watch the magic happen hopefully that's before I can even show you before because I mean if you look at the complex masking that it's doing here but it's doing it on automatically but just to show you the level of detail we've got the detail all the way through so it didn't force try that first, okay? If that doesn't work then you can undo and go to plan b which is what I showed in my basics class and that is I've got my foreground here I've got my background I add a layer mask all right? We know the only way to affect this layer mask because it's white is the paint on it with black the opposite color so I grabbed my brush tool set the foreground color to black alright the foreground the bottom layer that this is what's blurry so I just paint this away and now I've got the good foreground in the good background. So that's plan b plan a try to do the automatic way if it doesn't work, you'll know it doesn't work because you'll see splotches all over the place and sometimes it doesn't work on everything but a lot of times it does if plan a doesn't work, just go to plan b ing and do it manually okay uh let's see any questions let's take a look ah, a lot of folks are asking about noise reduction and whether you do noise reduction for some of your lance, can I get that question a lot? I don't I don't personally have a problem with noise direct noise, direction noise reduction because I'm usually shooting on a tripod and I don't care I generally don't care what the shutter speed is, so I keep my one hundred because I'm on a tripod the only time I would crank up mine if I were shooting a sports game or something where I had the freeze, the action but generally with landscapes, we don't necessarily usually have to freeze the action the on ly time that I've ever cranked up my my s o for landscapes is when I'm out somewhere and maybe there's some flowers or something in the foreground and there's some winds and it's blowing those flowers and it can't be a highway that's gotta be a dull win, but there's a little bit of movement, maybe I'll crank up my eyes so to get a faster shutter speed to try to reduce some of that movement in there. But generally, if amano tripod there's really no reason I should be above one hundred s o, which means I don't really have any noise to remove yes going back a little bit uh you're you're shooting multiple brackets, why wouldn't you use hdr uh, so the question from shooting multiple brackets, why not use hdr? Because I'm not I don't have a reason to you guys saw from my photo like I'm able to pull all the shadows and highlights that I need from one photo. So why clog up my work flow by merging into an hdr? The brackets remember, the brackets are just they're so that I placed my tripod down click pick up my tripod, walk to the next spot never have to look at the lcd did to make sure that I got the shot I know one of those three or five photos is going to do it so that's the only reason why the brackets are there, they're not there, so it could merge later because I don't really have to. Once in a while, you'll come up on a photo maybe it's too bright and you converge layers but and now I'm going to have your reiterate a little bit is that perfect effects? It's sort of it's own stand alone plugin correct? Yeah! It's yeah it's a plug in from on one I work for on one so but it's unplugging from on when I use perfect effects long before I worked for on one but it is yet but it's the stylization everybody's got a style I think that's. The question that comes up a lot, is, well, doesn't this do what light room does, and doesn't this do a photo shop to me, to me, it's about finishing and everybody's got a certain stylization and that's, where a lot of the plug ins get used to a light room. Light room integrates with it under the file menu. Plug in extras. You'll see it there, too.
Class Materials
bonus material with purchase
Ratings and Reviews
Scott H
The course description led me to buy into the class. Like a lot of people I had some reservation as to how it would be presented. I've taken other types of online course before. And I have say the presenter may have knew his material. But it was delivered in such a manor I retained far to little to be of any real benefit. But in this case. I can't tell you how impressed I am with CreativeLive and Matt Kloskowski. Matt breaks this information down into basic functions. And gives you real world scenarios as to how to best utilize the techniques. All the while reaffirming the notion that these rules and techniques can be varied for each users individual style and needs. The fact I can go back online and review this material from time to time, big bonus. As a result I've signed up for two more classes. Matt's personable and engaging personality makes this a winning combo for novice photographers like myself. I couldn't be happier with CreativeLive and Matt !
Steve61861
Terrific Class! One of the best I have taken from Matt. Mostly good, basic material, but there are some real gems that Matt shares here. Highly recommended.
Tracy Layton Peterson
Loved it!!! Great information that was very USEABLE to me. Matt was is a great instructor, throwing in some humor as well as bits of information that may not be dead on point but really helpful just the same. I was able to bring the quality of my editing up considerable just from this class alone. Thank you
Student Work
Related Classes
Outdoor