Lessons
SPECIAL: Evening Light Painting Session
48:10 2Introduction to Light Painting
17:34 3Shoot: Objects on a Tabletop
22:43 4Shoot: Using Gels
14:55 5Editing: Objects on a Table
25:37 6Morning Q&A and Timing for Light Painting
23:22 7Students Shoot: Vase of Flowers
25:02 8Editing: Student Images and Composites
21:28Review of the Special Evening Shoot
08:25 10Shoot: Scooter Composite
27:07 11Compositing the Scooter
19:39 12Shoot: Light Painting a Person
18:19 13Student Shoot: Iris
05:46 14Light Graffiti
14:10 15Light Painting Example Review
20:09 16Fun and Unique Light Sources
27:42 17Sparkler Painting
10:20Lesson Info
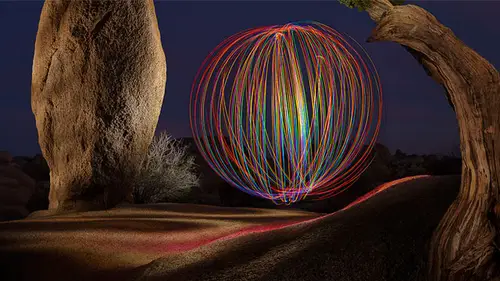
Light Painting Example Review
So what I'd like to do right now is look at some of the light pains I've done in the past and tell you what was special about each one of these chutes was there a special challenge in this shoot was a special light source used or anything else and then we can look at some of the layered files that were used to create them so you get a sense for what does each exposure look like because here we have the pressures of live you know broadcasting and everything else usually I could spend all day on a single image if I wanted to whereas here it's more important that we cover ah large number of topics to make sure you get what you need to and so these were made in a more leisurely casual uh set up so anyway let's take a look so in no particular order I'm just going to look through some images and give you some comments about what made them unique in this particular image uh the thing that made this unique was having two things one was the fire that was there in the second was the light inside...
the camper and so I could access the interior of the camper and therefore I could do an exposure before the fire was lit I can go in the camper turn on light I can experiment with my exposure until I know the exposure for the interior looks good I also backlit the window on the right side, using my flashlight just to make sure the drape on the right side have some light behind it. So after I got that interior lit and I knew it was bright enough, then the next thing I did was I did an exposure just for the sky, and that way everything else it was in here was silhouetted because all the lights were turned off on everything that we had the control of knowing that I have the nice blue sky, knowing that I have the interior done. And then I had him light the fire, and then I positioned the subject there that's pinky, by the way. And he wasn't there when I was lighting those other piece. And after lighting this little, having this go with the fire a little bit, I did walk around in light areas like under the camper that's. There I lit these poles that are here, I live underneath the awning that is here in all sorts of other areas, just in case the flames of the fire did not light it enough. I also experimented with my exposure to see if I wanted to be able to see the orange flames or not, so I took a bunch of exposure is just so I have that as an option and by using part of the light painting I was able to get more detail in some areas like the shadow behind his head would usually be more solid black but I used one of my exposures that had some detail in it and put it in that area this is a rather complex one in general I did an exposure for the sky and everything in the scene was in silhouette those little party lights that are around the awning didn't work and so I'm back lighting each one with my flashlight I'm just walking up to each one put my flashlight right up against it behind it in lighten it up just like I did the tail light on the scooter and I'm doing one at a time I might do a few and exposure kind of thing but I let him all up to make him look like they were lit I also do the same thing with the pink flamingo that it's just to the right of the trailer and that's why it's lit up his I'm back leading it otherwise that's a lot of the same things that we did as faras lighting various areas in different exposures and then compositing them being careful with the strings that were coming down because I wanted those two stand out another of the same variety this one the lights did work and I just followed the cord for the light so I could unplug them when I was doing other lighting s so do one exposure for the sky, one exposure for the lights, and then started like painting all over in composited same thing here. This is the one that where we had the extra light and the main thing I did here was I looked for an area that was in the shade in this side of the truck wasn't catching the light, and so that was an area where I could paint with light I had to keep my exposure is very short, though, so the light in the background would not make the building or other areas overly bright. So I did a whole bunch of really short exposures. I think we already talked about that one, this one I had to do something unique in, and I'll see if I have the layered file. But in general, if you look at this area here where I have the quote unquote lava coming out, that when I composited this together because that was a separate exposure just pretty much disappeared because of how bright the sky was behind it when you're enlightened mode, which is what I used to composite, these it's going to look at which layer is lighter. Layer that's underneath of the layer you're working on and in this case the sky behind it was lighter which made it largely disappear and so I had to do something special there in photo shop we'll see if I have that file to show you in general when it comes to shooting outdoors at night you find that ifyou're exposures are thirty seconds or less the stars will look relatively chris like points if you're exposures are longer than thirty seconds you get up to a minute two minutes the stars will start becoming dashes instead of points of light. So if that's important to your shot you've got to consider how long is your exposure? And so here you can tell that this is more than thirty seconds because of how long those star trails are he's going to flip through small okay here in order to get something like the milky way the milky way's extremely dim in the sky and so we need to do something to really make your camera sensitive of that. Ideally, you would have the lens that is known as a fast lens its lens where the aperture settings and go to two point eight and I would shoot it f two point eight which allows a lot of light into the camera on my camera I would focus at infinity a little infinity mark if there's a little line before the infinity mark oftentimes it's the beginning of that line, we need to focus, and so I'm at I have two point eight. I'll bring my iso setting to the highest that is practical for my camera depends on how new year cameras, but if you're at something like I so thirty two hundred, that kind of thing and then I'll experiment with my exposure's. I don't want the many longer than thirty seconds because if there longer than thirty seconds the stars, they're going to be streaks instead of points of light. So that's one thing to consider here if your cameras set up that way and you decide to paint some light as well, your camera is going to be mega sensitive to light, so you have to use a dim light source and paint very quickly. Otherwise, if you're going to do a composite, just change your camera settings in between, similar to what I did on the scooter remember how I up the iso setting before I went behind it with all the different colored lights for the background so you could just bring your eyes so sitting back down to let your foreground in this one, I'd walk over all over the scene, climb a hill to light one side and all that, so I had to do that as composites. And the main thing had to look out for here and I ran into some issues with is any time you're getting a blue sky and your scene if you're walking through that scene, you need to keep moving because otherwise you're going to show up as a shadowy figure because you're blocking the camera's view of the sky. Here is what you get if you have clouds that are moving if you look at this area of the clouds you noticed they have a kind of, um or soft feeling and they have a bit of a direction to them and that's if you get a nice windy night when the clouds were going to be moving quite a bit, do a long exposure there and you can get some really interesting clouds toe like things like this, I'll just roll down the window and open the door on the opposite side of the car and then I'm able to stick my hand in with my flashlight in this case, using a yellow gel on top of the flashlight to light it here again is longer exposure where the clouds are moving in and carry it's an interesting streak of light I showed you how to do the headlights that's a little bitty flashlight tracing around the edge just try to keep your hand out of it try to keep your hand on the outside of where that headlight iss I can see that my flashlight actually was in the shot a little bit and I could see little streaks over here that I failed to retouch out if you're shooting with the moon in it if you want an interesting effect with the moon you can set your f stop f twenty two if you set it to have twenty two when the moon is in your shot your moon khun show up like a starburst and here I'm just getting the slightest hint of starburst feeling tells me I wasn't quite enough twenty two but if you get all the way to have twenty two you can get it to look like a starburst this one I believe was done in a single exposure and that's fine as long as it's dark enough where you can do those extended exposures and here you see inside the grill that's not an easy place to light and that's where I used the flashlight that has a flexible stock on it so that I can bend it up into the grill and uh light within here I did something unique I put a flashlight in both tail lights the tail lights were missing the glad the plastic lenses and so I put the flash lights pointing out and usually can't see like just going through the air unless you see it going through smoke or steam or dust or something else that's when you can see it so what I'm doing here is with the flashlight pointing out of the tail light I'm grabbing some of the gravel from the ground and I'm throwing it at the tail lights during the exposure because I'm throwing it at the tail lights that created dust and the dust allowed the light of the flashlight to show up and it looks to me at least like a little jet you know, plume coming out of the back and so that was kind of fun and here the main thing is if you look at the different colors of light, you'll notice the green does not hit a lot of other things seems the blue does on lee hit certain areas and that's like what I talked about with the scooter where you walk until you can't see certain things within your image so to get the green in here I might move up or down until I can't see the interior and then I know if I like it it's not going to hit the interior and then too like the blue eyed move until I can't see the other side of the vehicle but these air on junk yard there again I have the flashlights in the tail lights point out throwing some dust adam and here's where I let the tail lights that was using that same flexible stock flashlight and I simply traced around the bottom and then traced around the top having the flashlight physically touching the tail light, same thing here for the tail lights to light him up. So let's, look at a few of these images so you can see the layers you get an idea for how's things were done, so in this case, it looks like I end up actually using four exposures, and so I'll turn off all except for one exposure there's a fifth exposure that was turned off in there. So here's one exposure, this one, I'm letting the full moon light the surroundings, and that means my exposure was most likely at least two, two and a half minutes long, if not a little longer to allow the moonlight to like that. And I'm just not patient sitting for two and a half, three minutes waiting that's a long time, it doesn't sound like it, but it is, and so I couldn't help but walk into the scene in light the headlights. I also lit this little grill area with a tiny little flashlight, and I went over here in a and I had that car window down, and I just put my arm in the car pointed flashlight up towards the ceiling of the interior and let it then I lit the headlight a second time in a second exposure that second exposure looks like this. Just because it's hard to tell in a little bitty screen in the back your camera how well you did with that so I made sure I had an extra one just in case I needed it when I put it in on top of the other they put it in light mode it just wasn't needed it didn't do much to the image, so I ended up leaving that eyeball turned off then I let the car with green and when I let it with green we show you that shot but turn off the mask I walked to the left of the car until I could not see the other headlight area that way I knew it was going to be in shade and I couldn't really see what was inside the area where the grill should be so I knew it was going to end up being black when I composite that in with the other image it looked like this and I just thought there might have been a little too much green, so I painted on a mask to get it off of that front elected on the bumper I had another shot though where I had some green and that's what I used for that area that it was a softer green now this part in here was special the next layer this in orderto like that my hand was inside of this area my hand was inside on the right side I had a black glove on and I cupped it around the front edge of the flashlight so if I grab a flashlight imagine I had a glove on I'm just doing this if you're if you're the camera you would see this where if this had a black love on it it would block your view of the front of this flashlight and if there's an inn dance right here in that grill I can paint that side of it on the inside and then turn it off switch this way and paint the other side on the inside but my arm was actually inside there you can't see it because it had a black club and the light never hit me but I had to read gel on so does that give you a sense for how one of these might go together let's see what you see amore intricate one well here's one with a special effect innit take a moment open it this is the one from africa and in the one from africa there was a termite mound and with the termite mound I had something I try to make it look like lava coming out of it but just taking a red led the same kind I would use to trace around the chair that we had in here and I just drew when I was behind the termite mound the shape I wanted and what happened is when I put it together enlightened mode it ended up just about disappearing because the background behind it was considerably bright and so I had to do something special in order to get it to show up let me see if I can find the layer that has my lip whole uh it's a top one there it is in that I had to add a mask to it so the only area that showed up in the mask was the little area and if I didn't have that I had to have it in normal mode with axe and I put it enlightened mode and we show you what happened just but disappeared because the background was just his light or lighter than that area and it wouldn't allow to show up so I added a mask and I made sure the mask was the same shape as the uh the spew of lava and I changed it from light mode to normal mode to try to get it to show up without the mask it would have covered up the entire picture so you might be wondering how the heck to get a mask that contains something in that shape I didn't draw that man back so how the heck do you do that well here's a trick and I do this trick any time a layer contains some light graffiti in that like graffiti seems to want to blend with the background what ended up doing is my first hit all the layers, except for this one, you can quickly do that option clicking on the eyeball icon for that layer that's, all clicking and windows. So that's all I was viewing now at the time, it didn't have that mask, so let me drag the mask of the trash can so you can see what it would look like without it. This is what it looked like. There is a way to get a selection of whatever is in here based on brightness, and so to get it based on brightness, what you do is the following you go to the channels panel. Usually the channels are built right next to layers. If it's not going to the window menu on, you'll be able to find the channels, pal and move your mouse on to the very top channel where the little thumbnail picture is hold on your command key control of windows in click when you do that, it will have just created a selection based on the brightness of the contents of that channel. You can return to your layers panel after command clicking on the top channel and you can add a mask I'll click in the layer mask icon it's just converted the selection I had a moment ago into a mask. And the only thing I need to do if I show you the mask by option clicking on it is adjusted to get it to this area where you see the lava like stuff is white in the background is black. I could use a paint brush to cover up some of that background, but I mainly need to get this area adjusted khun do that. If I go into something like levels or curves, try to get that whole thing to show up, click ok and now that I'm going to make it so, only the areas that are white allowed the image to show up the areas that are black just cause it disappear if I option, click the mask to turn it off again to stop feeling it. That's what we have put that on top of the rest of the image now, and I have it so it sets off from the background it's a weird technique, but if what's in a layer is like graffiti, you go through that, you'll have to play it back, though, to see how it was done, but it gives you some sense for how I might have cheated on that one then oftentimes when I'm out, I keep my color gels with me all the time he and just a flash, light and colors. Gels are often enough for me to create something interesting and frequently create more than one version of the picture because it's really hard to decide when you're in the field, I don't want to go home and find that something is is that I don't like. So in this particular case, I was at an arch and I lit it from all sorts of different angles, you know, all sorts of different ways, using different colors of light and one of the things that I didn't hear if I show you some individual layers like there, do you see how I live? Just from one edge? I walked until I couldn't see a good portion of the arch in painted with red light. Then I'll look at what I couldn't see in here couldn't really see the top of the arch, so I would walk to an area where I could see the top and I'd like it with a different color of light. Then I'd say, what couldn't I see from that position? And I'd walk until I could see it and I like the different colors of light. Then when I put all those together, I can get more of a rainbow of colors, and if I add that in with some natural white light or other colors created much more intricate looking and result.
Ratings and Reviews
Julie Coder
I've been interested in light painting for awhile, so I was thrilled to see this included in Ben's bundle package, since I'm learning Lightroom as well. Really enjoyed it! I appreciate the "trial & error" approach of the class so we can see the thought practice behind the photos, not just the final images. Really helpful tips for editing as well. I love the images on his website, which gave me ideas for things to try on my own. Fun, fun, fun!
Paul
Really cool class so far. Just wanted something to get some inspiration and this is fun class but it's gonna force you to exercise. I don't work for creative live but I don't have to say that the quality of the few classes I've just started in photography is very good. I once was a professional photographer and I've taken lots of live classes and I feel the value of these is good. I am looking forward to watching the Clay Blackmore class.
Student Work
Related Classes
Lighting