Lesson Info
17. Sparkler Painting
Lessons
SPECIAL: Evening Light Painting Session
48:10 2Introduction to Light Painting
17:34 3Shoot: Objects on a Tabletop
22:43 4Shoot: Using Gels
14:55 5Editing: Objects on a Table
25:37 6Morning Q&A and Timing for Light Painting
23:22 7Students Shoot: Vase of Flowers
25:02 8Editing: Student Images and Composites
21:28Review of the Special Evening Shoot
08:25 10Shoot: Scooter Composite
27:07 11Compositing the Scooter
19:39 12Shoot: Light Painting a Person
18:19 13Student Shoot: Iris
05:46 14Light Graffiti
14:10 15Light Painting Example Review
20:09 16Fun and Unique Light Sources
27:42 17Sparkler Painting
10:20Lesson Info
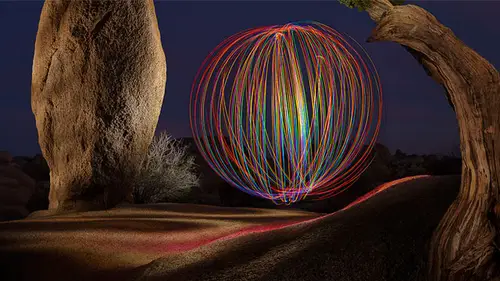
Sparkler Painting
So for the grand finale, what we're gonna do is I asked if I could do molten metal in here, but for some reason they decided not to I was able to get him to do some kind of molten metal and that is the day after the fourth of july. So on the fifth of july I go out to the back of, uh grocery stores in various areas around the country and they will have sparklers on sale for the cheapest amount you've ever seen in your lifetime. If they charge you five dollars for one of these on the fourth of july on the fifth of july they want a darn your give it to and so I have an entire box full of all sorts of sparklers, so I mean I didn't know sparklers came in different colors they come and read that come in blue, the coming green that coming gold they come in all sorts of different styles and so sparkler painting sparkler painting is like doing like graffiti where it's like pointing the light source at camera uh it's going to be very bright in these depending on what brand they are, some of them...
don't last very long length of it but let's see if I can do a sparkler painting for you let me see if I can find another light source here we go I have usually do this outside and there's just dirt around so I'm not worried about it in here we actually have a floor not wanna room so all I have is a glass with some water in it and that's so when I'm done instead of dropping on the floor I'll drop it in here and c is the tether working is the tether working let's see if we can do a test take this moment to get so we make sure we're ready to capture and let's see if there's anybody want toby sparkler painted receive our hand just you actually did the painting though you haven't done that so you get to do it because you already did the lady with the bass again gonna get enough participation so you must want coming out but you are right we'll have sparklers in area songs that isn't okay well burger beard but rest of you is fun, huh? Okay, so what? I'm gonna end up doing this? I'm gonna like you with a flashlight just a little bit make sure face shows up on then I'm going to take the sparkler and I'm just gonna be like tracing around your body on the outside I'll try to keep it, you know foot away so you don't get to me a little pickles but you might find that you feel a little you know, things like that but when I get near your head I'll try to be behind you so don't get your eyes okay uh that's you figure you're gonna trace around him I could just be a foot behind him. The camera doesn't really know much about that so first thing we gotta do anytime we're gonna show is gonna start focusing so I'm going tio put the flashlight right here and get teo teo packed up at all uh you're gonna be fine there ijust wantto do live you for the focus looks good. Good. Yeah. Okay. Let's do a quick test for exposure for my flashlight s o are you ready to try exposure? Yeah, we're at f sixteen s o one hundred ok let's see what we get eso just hold still in general are not going to save this one, so don't worry about it already open all right that's not too bad, right? Just need to get into space a little bit better and that's why? I need a light from just a little bit further away with faces and we could do that now we can either do this is a composite that we do it it's a single image, so if we do it as a composite, I would simply continue doing this until I get what I like so you might as well do that first because then we know we can put it together we could always afterwards we can try one single shot so are you comfortable hanging out way are checking out okay, so let's do another one ready? I don't see any open and then I'm getting in closer excite like more painterly look if you don't like the painter you look go further away close the main thing is just trying to move your body inside the side or from the back all right, we'll do one last way have a few to pick from open close to his face will be a little more painterly there look just a little too bright only one like it in the camera one more time like you blind me again open open clothe right? All right, all right. Okay, now let's try to do a sparkler. All I need to do is find the lighter that was right here. Hey, you got a lighter? All right, so sparkler is just like any kind of like graffiti, so they simply need to choose what we want to do with it and trace the edge what you want to do main thing is I need a lighter starting with you want to hide behind your subject so I'm gonna hide behind my subjects the camera can't see me doing this yeah, because sometimes I'm doing this when I'm alone and I don't have a remote trigger so I need to do a thirty second exposure to get it in, you know? I mean, you don't have the well this trigger, so I'm gonna be right behind him going like this, and then when I get in position about trace over him, yell open over, open, close. Yeah, water doesn't put out of work now, really, it'll burn out there yet really not be used for any number of ways. All right, you see the outline. So with this, the more radically moved the sparkler maur, the little sparks will kind of make it further away from your subject. He and you notice there's a little bit of light spilling on him on his shoulders, on michael's ears and such. And and we can deal that lets put this together with the other shots quick and see what you can do, and also let me show you what I do when I just it so you can just hang up, michael, I mean, you can sit on that, so I'm gonna come in here, go to develop and let's zoom up on the sparkler and you see what the quality of it it's on the edge, so if you want to work with a sparkler and you want to control how bright that is, I'll bring down the white to control the middle of it and if I bring it down far enough, if it was something where we had more of a white in the middle, he might start going toe orange the same one highlights that will control what your sparklers look like the thing that will make the spark there's really stand out is to bring up clarity will make it much more to find the other becoming sharper and then you can experiment with vibrance, so we got that then let's go back a shot or two to decide which one of these we might want to use like I might actually like that one you use this one it's a little bit hot, so I'll bring down the exposure I'll bring down my highlights and I might grab my adjustment brush and just say bring the exposure up where his head is because that was a little darker than the rest. Okay, then I'll take those two shots, and as of before I will choose open his layers and photoshopped, and all I need to do is set that top layer toe lighten her screen mode in this case, it wouldn't matter which one then we combine them together so sparklers can be kind of the ultimate, uh, like graffiti and if you want to see a few examples these air sparklers same image a few different ways these air sparklers she's, holding perfectly still, try to get some energy in it, sparklers and more. So hopefully you got an idea of different kind of light sources, and how you might think about them in the main thing to take away. Hopefully, it's. Just be creative with it. When you see interesting light sources at the hardware store checkout counter, you might go wonder what I could do with this with, like painting, and then go home and experiment and start creating things you haven't seen before and start pushing the limits. But like paintings, one of my favorite ways of shooting if you want to, seymour examples of my light painting. I have a website called the best of ben, and in there, I believe I have a light paying gallery, so you can see a lot of mileage is nice and big.
Ratings and Reviews
Julie Coder
I've been interested in light painting for awhile, so I was thrilled to see this included in Ben's bundle package, since I'm learning Lightroom as well. Really enjoyed it! I appreciate the "trial & error" approach of the class so we can see the thought practice behind the photos, not just the final images. Really helpful tips for editing as well. I love the images on his website, which gave me ideas for things to try on my own. Fun, fun, fun!
Paul
Really cool class so far. Just wanted something to get some inspiration and this is fun class but it's gonna force you to exercise. I don't work for creative live but I don't have to say that the quality of the few classes I've just started in photography is very good. I once was a professional photographer and I've taken lots of live classes and I feel the value of these is good. I am looking forward to watching the Clay Blackmore class.
Student Work
Related Classes
Lighting