Lessons
Lesson Info
Building and Using an Ink Comb
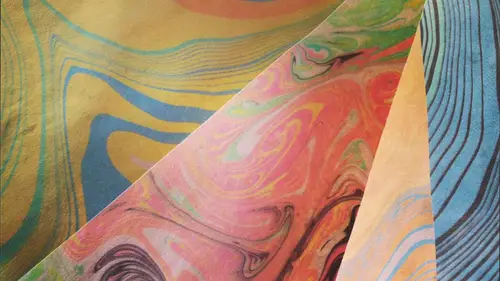
So now I did run one sheet of my newsprint through, and it still looks really muddy. So I'm going to go through one more time and see if I can't capture a little bit of the extra inc that is swirling around towards the bottom again. If it is below the surface of the water down towards the bottom of your water bath, it should not affect the quality of subsequent prints on the top. But now that we have explored the idea of manipulating ink with the handle ends of our brush, and we have used little bendy straws to blow on the surface of the water. And we have also used are floating tabs. I want to show you one more method and that's building an ink. Comb a lot of times if you have seen western paper marbling, italians are amazing at this, they've got some fantastic crafts people they create really intricate, almost peacock like designs on the surface of the water, and we're not going to get something that is as exacting is that but it's going to give you another way to kind of like contro...
l and push the ink around. And for each of you a table I have pre cuts a little piece of foam core foam core is a material that you confined at any craft supply store and honestly, any office supply store it's often comes in large sheets and aa lot of elementary school kids use it for a poster presentations, science fairs exhibits that sort of thing. What I've done is I've cut it down into strips ease or eight inches long and an inch wide, and then when I've done is I've measured an inch from either end, and I've poked a siri's of holes down the center. I did this using an all now on all, if you're not familiar, looks a little bit like an ice pick it's a it's, a long, slender blade and I did it on top of a cutting mats I marked all of my dots in pencil first and then I just kind of went through and poked those holes through there fairly narrow and small but what we're going to be using them for is to insert a siri's of nails um these nails I believe are right around an inch and a quarter there's nothing particularly special about these nails with the exception of the fact that they have a flat head there if you go to the hardware store there are a million different nail varieties finishing nails or the ones that kind of tend to have no little head at the top these have a very distinct almost tabletop surface at the top and that's really what we're looking for because that's going to prevent the nail from going all the way through our piece of foam core so if you want to go ahead and do this with me, we're simply going to push the nail into the hole and using your thumb press it all the way through so that the top of it is flush with the top of your piece of foam court now to be mindful these nails are sharp I don't want you puncturing or poking yourself but just be careful is you're putting them through now in this particular comb as I said, I measured an inch from either end and then using ruler I measured every half inch and that's where I poked ah, hole within all. So we've ended up with thirteen holes for this particular anc comb, and this again, is one of those workarounds in that you can certainly go to an art supply store or someplace that has specialized materials for paper marveling and by an ink comb. But this is really inexpensive and it's just kind of an easy work around and it's really going to do the same thing. Now, as you're poking them through, you're probably realizing that all of these nails are not necessarily perfectly parallel to one another. You can fuss with that a little bit, kind of changing the angle of them, but I wouldn't be overly concerned because there still is. We rake them across the surface of the our design are going to do the intended job of sort of pulling lines across the surface in uniform formation. Once you have pushed all of your nails through, we're just going to take a long piece of masking tape, and we're going to run it along the top just to secure all of the nails in place. Um, masking tape standard comes an inch wide, so it's really pretty much the same with as we have, cuts these foam core pieces. And this edition is really just teo, the nails are pretty secure, is they are? They're not loose. The initial holes that I punched through were thinner than the diameter of the nails themselves. This is really just tio an added safety measure to make sure that they stay in place. You can see I'm just pushing that over the top, pressing it down a little bit. I'm just going to tear off that little access bitten folded around the edge and smooth it out, and you've created a little income. So what we're going to do with these, then is go ahead and build up our pattern of banks again on the surface of the water. But this time around, instead of maybe using just the end of our brush, we're going to take our income and we're very lightly going to submerge the heads of the nails down into the water and just drag it across the surface and see what happens. So go ahead and pick out a couple of colors. Load up your brushes with the ink and we'll go ahead and start building up those patterns. J k on curious of any of our online viewers have tackled paper marbling before you getting any of that sort of feedback, or if any of them have done sumana gashi. It looks like they're trying different things. They're also trying different products. Some of them were using india rangers to see what actually happens. So fascinating. Really. Having anyone with that we'd like to see that you are trying to other materials. Please upload into art galleries, go to the core space because we'd love to see what what your experiments are turning out began. People are asking, checking out the thie, uh, combs and so you can get the right word. They're using other things. They're not just making one like a nito h is using on afro comb. Oh, I love that where the times of the comb are far enough apart, in fact, that that would work that was genius, very well done, also a tool well, for grooming dogs. Apparently somebody has found that works very well as well. That's funny, so different ideas coming through there as well. Let us see if there's any questions coming in as well. Um now they're asking what you know typically use these force and people saying card making another suggestions, and as you were saying earlier, tracy tt is echoing that envelope line of great yes, well, at the very end of this segment, we have some ready made stationary pieces. They are blank cards and envelopes, and we're going experiment with marbling those so these are things that you might be able to go to your local stationery store in just by those blank cards and envelopes and use them in lieu of the construction paper that we've been using up until this point, because he was saying earlier, if you were to do the marbling, you could then construct your own envelopes, the marbling it on the inside that way can I touch? And that is something not unlike our previous segment, where we were working with the handmade paper and lining the envelopes with those we deconstructed that envelope to make our template. You could do the same thing to actually trace the exterior of that envelope and cut that out and reconstructed with marble paper. So that's a great idea tried other things yourself, or do you have I tried what other banks is, if you just got hit knots, these are formulated specifically for this and they're relatively inexpensive on dh there's something about the way they're manufactured that allows them to readily float on the surface although I think it's definitely worthy of experimentation just to see if something like in india ink but again as I had mentioned, I've tried some other people marbling techniques and they require certain additives tio almost act as flotation aides for the yanks to keep them up towards the surface. Ok, now I don't know if you caught what I just did here it's because the bottom of my base it is getting a little muddy we're not getting the same clear contrast but I built up one series of concentric is concentric rings with two colors I've gone back loaded at my brush with two more colors picked a different spot on the surface of the water and have started building them up again and it's another way to introduce a third color to your design okay, so I feel like I have covered a large portion of my water bath so what I'm going to do now is I'm going to take my little in qom and I'm going to dip it in at one end and I'm slowly going to drag it across and look what that does it creates almost this scallops design I love that so much um and let's try it in the opposite direction just to see what that does so I think with just those two simple passes I want tio capture that on a piece of paper and just see what we've got so fun I love it let me put down a piece of paper towel here and we can kind of look at this a little bit closer you can see especially in this area with the blue in the green what has happened this beautiful sort of like segmented scalloping design has started to emerge I'm gonna take again my other piece of paper's howland just remove some of that access water um yeah dad that off excellent I think it's interesting with I mean as might be expected with the comb and all of these thirteen little elements were then poking down into the water that would create a much more intricate design and you can kind of just see by way of comparison between one of the ones that we did earlier where we were simply blowing on the surface of the water how different those two are I love the come it's a good thing how are we doing with the ladies in the audience are you having success with the comb is it doing very nice little muddy yeah I mean when you get a little bubble huh it's almost like that got trapped maybe under the piece of paper that you laid down again I love those different striations second color this was the first pass and the this was after the fact with nice additional very very cool that's great that it happens with a third percent finals see what else is left in there and I think they beautiful thiss behind it uh so what marilyn and um what madeleine unfeeling are saying is that they have done one pass um with a couple of colors they've laid their paper down they've pulled that particular design and then without cleaning off the surface of the water they then went back and added a couple more colors too buildout another design so you get those residuals of the first couple of banks around the borders and you get the new inks that you've added mohr central and focal are focused in the center very nice let's go ahead and has everybody gone through and kind of cleaned out their water bath from that last pass I'm just gonna do one more pass with the news prints again cleaning it up and you can see from the overhead cam that my water bath is starting to get ah little muddy again though we're using the newsprint to clean off any excess waters from the surface and I would say at this point we have probably pulled what if we done one two, three, four, five, six seven between eight and ten prints so I would say we probably could get you know another four five before we would want tio officially change out the water
Class Materials
bonus material with purchase
Ratings and Reviews
Deborah Willis
Instructor is very knowledgeable. Love that he has a very soothing voice. I LOVE his teaching style-he is very encouraging of his students to experiment, and I love that he comments on their creations during the session causing you to see elements of their creations that you might have otherwise missed.