Lessons
Lesson Info
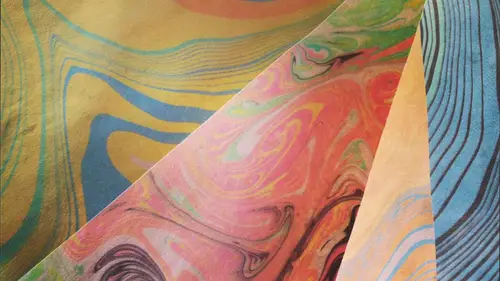
2-Color Paper Marbling
So I see our students are already jumping into this I love it so feel free to go ahead and start and we're working with our first two colors this is fantastic gently going back and forth between the two colors creating your pattern of concentric rings and you will find with this particular red as I'm sure rachel is seeing on her surface here it does tend to come much more in a pink hue when it's when it's transferred tio the paper so I am going to use the ladies are working on their first pattern as well I'm going to do that to um few people mr robert but what began is the ink type you're using here I think is called suman togashi inc and it will be on the materials list for the course like I said, most of the materials for the projects that we are going to be seeing I'm trying to source them from things you can find around the house but this is one of those instances where you really do need the specific material now ladies you are all quietly at work how are you how are you doing it'...
s a little psychedelic the way those things just sort of float around there on the surface I'm going to go in now for a second round and I'm loading up my two paintbrushes one with the red and one with blue and I'm going to start building up that pattern by simply tapping the surface of the water again trying to be mindful not to plunge the brush down below the surface and as a reminder, the longer you hold the brush to the surface of the water, the larger that particular ring will be and you can certainly see the just flowing out of the bristles onto the surface of the water it's a little bit easier to see with certain colors than other than others with the red and blue that I'm dealing with right now, you can certainly see it just streaming from the bristles out onto the water I'm going to set these aside and for this particular one rather than try and manipulate the ink in any way I'm going to just try and capture this beautiful concentric rings design and so again I'm taking my piece of construction paper and very gently laying it down over the surface of the water I'm going to allow it to sit for three to five seconds so three, four, five and then lifted up by the corners and you could see how beautifully it captured that design. I'm going to set this first one aside and place this down on paper towel it's nice to have a good role of paper towels next to you they're going to come in handy in this project and I'm just going to gently place it over the top of the design, I just pulled in balad away any of the excess inc. And I see the ladies are all cleaning up their first runs, which is fantastic. Onda again, this is where that, um, inexpensive newsprint comes in handing again. You can use, um, it's recycled newspaper from at home, but you really just kind of want to stick it in your water bath and drag it across the surface of what that's going to do is capture any of that excess ink that was not transferred onto your piece of paper the first time around.
Class Materials
bonus material with purchase
Ratings and Reviews
Deborah Willis
Instructor is very knowledgeable. Love that he has a very soothing voice. I LOVE his teaching style-he is very encouraging of his students to experiment, and I love that he comments on their creations during the session causing you to see elements of their creations that you might have otherwise missed.