Lesson Info
9. 8 Special Blending Modes
Lessons
Lesson Info
8 Special Blending Modes
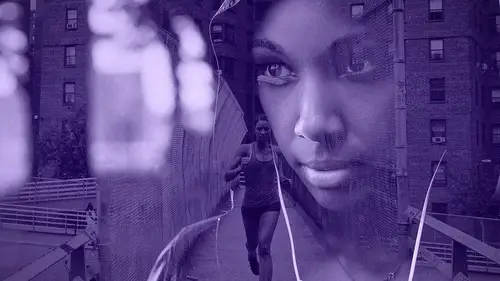
So earlier I talked about 19 original blending modes in Photoshop 3, were added when layers were included into Photoshop. There's eight missing, and those eight are what I like to call the eight special blending modes. Five of these were added when the fill adjustment layer was added, and I mentioned that earlier. The fill adjustment layer becomes really important with these eight blending modes because with all the others if you adjust opacity, compared to fill, they're exactly the same. But with these eight, they become different, they don't have the same effects. So let me show you what I mean by that. I'm just going to paint on a blank layer with white, simply white. That's it. Then, if I change the blending mode to Color Dodge, nothing happens. I can reduce the opacity and notice how when I reduce the opacity it looks sort of flat. If I reduce the fill it's gonna give us a very different effect. See that? See how it no longer looks flat? So those eight blending modes give you diff...
erent results when opacity is changed compared to fill. There's another thing that most people never tell you, which is there's one more thing that they differ in. If you double click to the side of the layer it brings up the Layer Style window. The Layer Style window allows you to apply a whole bunch of layer styles to a layer, but in this case the important thing is two things, that you can control the blending modes and opacity through this window, but also this little checkbox here that you probably never noticed before, Transparency Shapes Layers. Now I've actually asked a Photoshop engineer why this works, they weren't able to tell me, so I can't really tell you the science behind it, but I can just tell you that it works. When you have any one of those eight blending modes selected, you can uncheck that box, and notice how the blend changes. See that? See how the edges, the edges here around that highlight change? With any one of those blending modes the edges change when you uncheck Transparency Shapes Layers. So in this case, we can use white, a layer that has nothing but white, just the white circle, and change the blending mode to Color Dodge, uncheck Transparency Shapes Layers, which is why we have that little icon there, that little icon is telling us you made an adjustment to the advanced blending options. And now, this looks like a specular highlight, maybe this is a bright light here, and I can reduce the opacity. So I'm sort of making it seem, and I can press CTRL + T, CMD + T to transform, and I'm sort of making it seem as if that board here, whatever that is, is more of an actual light, so I'm creating light or a specular highlight in Photoshop. So when I'm compositing and I need a specular highlight, this is usually what I do, and actually, it would be a little bit blurrier than that. So I can go into Filter, Blur, Gaussian Blur, and I could blur it a bit more, and now this is more like a highlight hitting him. If we go back to the first thing that I said in the beginning, fill compared to opacity, watch the difference. If I bring down opacity, it really doesn't look like a specular highlight there by his headphones. If I change the fill, it just seems as if the light is getting dimmer, and that is true for any one of these blending modes. So another example would be Color Burn, which is the opposite of Color Dodge. So I'll just quickly show you the difference. I have this black dot here, oops and I actually painted it on the actual layer, you have to do it on a separate layer. So I'll create a new layer, paint, change the blending mode to Linear Burn, watch the difference. Opacity, fill, and I can also double click to the side of the layer, uncheck Transparency Shapes Layer, and notice the edges once I uncheck that. See the edges there, see how they blend differently? And I can also control the fill from here, I don't have to leave this box. So with these eight blending modes right there, Color Burn, Linear Burn, Color Dodge, Linear Dodge, Vivid Light, Linear Light, Hard Mix, and Difference, you get different blends by both adjusting the fill and changing the Transparency Shapes Layers checkbox, found in the Layer Style panel here. What I'm gonna do now is we're gonna use this same file, and I'm gonna show you just in one of the tools, we're not gonna go through all of them, one of my favorite blending modes to use when retouching. But, it's not necessarily in the layer. So I'm gonna create a new layer and to make things easier to see I'm just going to bring all these layers out and just delete that group so that we only have the model here, and we have a blank layer. So one of the things that most people do when working with a photo is remove blemishes, remove distractions on the face. And most people use, for good reason, the Spot Healing brush tool. And the Spot Healing brush tool allows you to just click and drag and start removing blemishes, make sure that you have Sample All Layers selected, that way you're working undestructively, and you're generating new pixels on a new layer, so you can come back and change your mind if you need to. And the tool works fairly well, but in some areas, when you paint, it generates pixels that don't necessarily work like in that case there. It generated these extra details, and the reason is that content aware simply looks at the surrounding areas of where I painted on to generate the pixels that are gonna be filled on that brush stroke. But, this tool can actually become more powerful by using blending modes, we have modes. We don't have all of them, but we have some, and the ones that we have on there are really, really powerful. So I can change the mode to either Darken or Lighten. If you remember from the example earlier, Darker and Lighter Color, that's basically it. Or Darken and Lighten, basically these two blending modes are almost identical, the only difference between Lighten and Lighter Color is that one looks at each individual RGB channel, and the other just looks at a composite of all channels to decide which pixel is brighter or darker. But in reality they're both doing the same thing, they're keeping the pixel that's the brightest or darkest. So we can do this same thing with this tool. Select Darken or Lighten, and what you have to do is think. The blemish, wrinkle, distraction that I'm trying to remove, not just from a face, it could be from anywhere, it could be from a wall, a shirt, or whatever. Is it darker or brighter than the background? In this case is it darker or brighter than the skin tone? So first I have to decide what I want to remove, so why don't we remove a little bit of the facial hair, and maybe some of these blemishes here by his eyes. So, are those blemishes and that facial hair darker or brighter than the skin tone? Darker, right, so that means we want to lighten it, exactly. So we can select the Spot Healing brush tool, select Lighten, and let me make sure I have a layer with nothing in it, so I'll create a new one and I'll delete that one there. So now when I paint I'm only targeting the darker pixels, also notice how he's got some little, tiny white hairs that I don't know if you can see on the screen there, those I will never be able to remove because those are bright, they're brighter than skin tones. So I'll remove all the blemishes around those little white hairs, but never those little, tiny white hairs because they're brighter than the skin tone. So that's before and after, and I don't now how noticeable that is there. Can you guys see that from there? Yeah. So this is something that I recommend using. One of the tools that I always talk about when I talk about blending modes, because most people never even notice that the modes were there. Does anybody use the modes when using the Spot Healing brush tool? One person, yeah. That is a great technique to use. Always think, is it brighter or darker than the skin tone. I think it'll work here as well. If I try to remove that wrinkle, notice how I remove the wrinkle but the highlight still stays, see the highlight over the wrinkle still there. And usually when I retouch, I don't like to completely remove wrinkles or completely remove facial characteristics because they're part of the person, so usually I just try to make them less noticeable. I reduce the opacity to zero, so the original wrinkle comes back, or blemish, or whatever it is, and just increase the opacity slightly so that it's not completely gone, and it's still there but not as noticeable, which is what I like to do. The other blending mode that I use when using the Spot Healing brush tool is, I think I could do it with, trying to find a good spot here, we'll do it here in his glasses, is the Luminosity and Color. Like we said before if we paint with Luminosity, we change, we keep the original colors but we're changing the luminosity. See how the original colors of the people that were there are staying, but now we're changing the luminance values. The luminance values are being generated through the pixels that are found around that selection. The other blending mode that I use in this category, or in this tool, is the Color. It does the opposite of Luminosity. So we keep the original luminance values, but we generate new color. So the way that you would use this tool is maybe you have somebody with like a stain on their shirt, or something like that where you wanna keep the color but not the luminosity or vice versa depending on what the blemish or distraction is on the person's body, face, or whatever it is that you're working with. And to finalize I'm just gonna talk about two blending modes that I haven't talked about yet, because they're not found in the layers panel, but they're found in the brushes. And just so you have a clear understanding of all blending modes, and not leave two out, we have Behind and Clear. So what I'll do is I'll just revert this file. Reverting a file simply means bringing a file back into its original state, so if you ever, like now I made so many changes that I don't really know what's going on, so I just wanted to come back to when the file was first opened. So instead of closing it, not saving it, and opening it again, you can simply go into File, and Revert, or pressing F12, and the file reverts back to the last time that you saved it. So that's another trick there for you. But anyway, let me fit the image to screen, and we'll use this image since it's been working good for us. I'm gonna create a new layer and I'm just gonna show you how this blending mode works. So I'm just gonna paint here and if I change the blending mode of the brush to Behind, and I'll change the color to red, notice that I can't paint over the pixels, the active pixels, I can only paint behind them. So in the brushes panel, under mode, you have an extra blending mode that is not in the layers panel called Behind, Behind simply means you cannot paint on pixels, you can paint only on transparent pixels. And that works for retouching, and all other sorts of things but in this example it's a lot easier just to show you with brush strokes. So I can't paint on active pixels, only on transparent pixels. So now that I painted those red pixels, if I wanted to paint with blue pixels, I can't paint over the red ones. So that's what the Behind blending mode does. And I'm sure somebody somewhere has figured out a way of using Clear, I certainly have never used it, but in case you're interested, Clear just clears away pixels. Which is exactly what the Eraser tool does, and since I never use the Eraser tool, as you see I don't even know where it is, there it is, so that's the Eraser tool, and it also erases pixels. So the two extra blending modes here were Behind and Clear. Behind paints on pixels that are transparent only, not opaque pixels. Clear simply clears away pixels. And those are all the blending modes in Photoshop. Does anybody have a question? So the one that you used, the red and the blue, you wouldn't actually do that? No, right not over, these two blending modes specifically, the one you're referencing, is used mostly for people who are drawing and painting, I wouldn't necessarily paint over a portrait like that. I did have a question, kind of going back to, this is from Jennifer, I know you asked us in the very beginning about who goes through the different blend modes, and just clicks on each one, and she was just wondering if there's a faster way to cycle through them than just clicking on them. I never use that keyboard shortcut, but I'll tell you where you can find it. In my website, I'll even show it now, if you go to PhotoshopTrainingChannel.com, I have all the blending mode shortcuts there. In the search bar, yeah and I never use the shortcuts and so I don't even remember them, but you just type in blending modes in the search bar here. And this one here, it's just a Youtube video that I talk about blending modes, but if you scroll down to the very, very bottom, there is, there you go SHIFT +, SHIFT -. So holding SHIFT -, SHIFT + allows you to scroll through the different blending modes and I don't know why you would want to but you can actually memorize the keyboard shortcuts for every blending mode, so all you would do is hold ALT + SHIFT, OPTION + SHIFT on a Mac, and then click one of these letters. I don't bother remembering the blending modes, but feel free to remember those blending modes, the keyboard shortcuts for those blending modes if you like.
Class Materials
Bonus Materials with Purchase
Ratings and Reviews
ML
CreativeLive has many excellent instructors for whom I have nothing but high praise, and some have classes or segments on blending modes, but Photoshop Week 2017 was the first time that I finally "got" blend modes. Kudos to Jesus Ramirez for covering a lot of ground. In this class, Jesus explained the rationale behind how blend modes are grouped and how each group affects pixels. His methodology - applying each blend mode to the same photo, blended first with a luminance chart, and then with color wheels - was very effective at illustrating the impact of each blend mode - a visual representation of what each blend mode does accompanied by an introductory explanation of the algorthm. He also illustrated how he had used the effect in his own work, provided useful advice, and left room for our own creativity to take flight. This one-hour class has something for beginner to advanced Photoshop users alike. Well done!
sam
wow! Amazing!
George Fargo
I would recommend it for beginners but when it said "like a pro" I assumed it would be more advanced. It covered the groups with mainly one example from each group. What I was looking for was some knowledge of all the modes in a group and the relationships. I know that lighten lightens and so does screen but what is the difference and when to apply each. Same with color dodge and linear dodge, and all the various members of all the groups. Otherwise I am doomed to merely "scroll through and pick one I like".