Inversion & Component Blending Modes
Lesson 7 from: How to Use Photoshop Blend Modes Like a ProJesús Ramirez
Inversion & Component Blending Modes
Lesson 7 from: How to Use Photoshop Blend Modes Like a ProJesús Ramirez
Lessons
Lesson Info
Inversion & Component Blending Modes
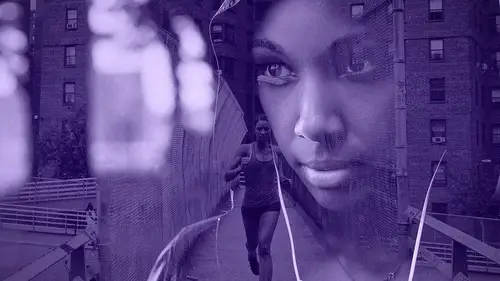
This is a really interesting category, it's called the Inversion Category, and basically all the Blending Modes in this category look at the differences between the pixels, and to be frank with you, I don't use this category or blending modes that often, for example, there's Difference, which again, looks at the difference of pixels and gives you a resulting effect, usually the effects looks really weird like that if the pixels are the same it'll turn black. So, again, not a whole lot of things you can do with these blending modes at least for my purposes, maybe you can find something that works with a project that you're working on. And the same thing is true for the ones that have colors, I really don't find much use for them except for one purpose, and sometimes, it happens a lot in compositing, you may be working with a photo and you've made a copy and for some reason you're applying effects to this but at some point you end up moving the layer and you're trying to move it back so ...
that it matches the same position it had originally but you've moved it because you were working on it or doing something else, or you changed your mind and you wanna bring it back, you can use the Difference blending mode to match the position of things, so like make things align because as I said before when things are the same color, they turn black, so in this situation, if I wanted to put that piece back in its place and again you would have to imagine that this is a composite that I've actually applied different effects to it, I could bring it back into this area and when it's close to black then it matches perfectly, it won't be 100% black because I already applied an effect to that layer, I changed the luminosity a little bit, so it wouldn't be exactly the same because in the real project you would duplicate or make a change or do something to it that changes it slightly, but you could always come back and match it by using the Difference blending mode and when it's close to black then you know it aligns perfectly back where it was. And I was using the arrow keys on the keyboard to kinda nudge it around and see when it gets close to black. So that is probably the only time I've ever used any of the blending modes in this category, Difference, Exclusion, Subtract and Divide, was just to align things and it was only using the Difference blending mode. We're gonna move on to the next category which is actually my favorite category, it's called Component, and I use this category a lot. The component category just looks at the hue, saturation and luminosity of the layer, and it uses one or a combination of those properties to create the blend. And I use that, like I said, all the time, and I'll show you a lot of different examples of how that works. I'll start with luminosity, just because this layer shows luminosity, but if I click on Luminosity, select the Luminosity layer, and select the Luminosity blending mode, you'll see that the only things that are kept are the luminance values of the image, that's why it looks like that. If I use the color layer and select Luminosity, the color disappears, but the luminance values of the layer remain. So that's why you can still see the shapes of the circles, the boxes and those different things. Also another one that I like using a lot is the Hue, so it just keeps the hue of the layer, so it kept the colors. And you can compare that to Color, so we have the Hue blending mode and the Color blending mode, the difference between the blending modes, between those two blending modes is that Hue only keeps the hue, Color keeps the hue and saturation of the layer. So once again, when you are looking at any given color doesn't really matter which one, you have hue, saturation and brightness. The Hue blending mode only keeps whatever hue that is, the Color blending mode, which is the one that is currently selected, keeps both the hue and saturation, so you can start thinking about how when you're retouching you may wanna keep just the luminosity, just the color or just the hue, so that you don't affect the others. And I have an example about what I'm talking about, there that we're gonna look at in a moment. So if I'm working with this portrait and I make an adjustment it might not be noticeable, for example if I just make a Medium Contrast, just gives a little contrast to the image, it might not be noticeable just by looking at the image, just like that, that I've actually changed the saturation of the photo, when you add contrast to an image, you also change the saturation. So, if I make an extreme adjustment like this one here, you'll see that I changed the saturation and again it might not be that noticeable now, or how do I know that the saturation was changed, well if I go into the blending modes, I can change the blending mode to Luminosity and you can see now how that same adjustment looks, that same extreme adjustment looks, when I'm only changing the luminance values of the image. So when you're making your edits to your photos, you have to keep in mind, by default I'm changing saturation, hue and luminosity, you might only wanna change one of those properties and this is where blending modes become really powerful. In this case I wanted to add contrast to the image obviously that's an extreme effect but it shows that by using Luminosity, I didn't change the other properties, so if I zoom in, you'll see how Normal adds all that saturation, Luminosity only adjusts the luminance values. If I go into my Medium Contrast once again, you can, it's barely noticeable, but it's there, see that, in this area? So these subtle changes may not be that noticeable but if you're printing them out, or maybe when you save them they'll become more noticeable, so always keep in mind, when you're making your adjustments, what am I really trying to do, if I'm just trying to add contrast, and increase, you know how dark and how bright some pixels are, then consider using Luminosity because you won't adjust the other properties in that layer. So one of the best, not the best, but one of the easiest techniques to color tone an image is to by using a Color Lookup adjustment layer, the Color Lookup adjustment layer is sort of like Instagram filters, you really don't have many options but selecting what the effect is and if you like it then you stick with it, if not then you move onto the next one. They're usually used in video, for color grading video, but Photoshop has them, so if I create a Color Lookup adjustment layer, I can click on this drop down menu and you see the list of all these different effects that I can apply to a photo, so I can just go down the list, sort of like some of you did with blending modes, in this case there's no categories that we can divide them into, but I can find an effect that I like, so, if I go up, there's one that I really think does a good job in illustrating my next point, which is this guy here, so if I select the FoggyNight 3DLUT file the Lookup Table, LUT, if I select FoggyNight, it applies that effect to that image. And I may not be 100% happy with it, maybe I like the color but I don't like that it flattens my image, so I can actually change the blending mode, so that I keep the original luminance values but keep the new color that was added to the image. So if I select my Color Lookup adjustment layer I can click on the drop down menu and select Color, so now I keep the color and the hue and saturation of the Color Lookup Table, but not the luminance values, so now I'm applying the luminance values of the original image to the effect. So that's another way in which you can make the Color Lookup adjustments a little more powerful because as you can see there's no controls really you just apply an effect and you can of course use the Opacity slider to reduce or increase that effect, but you really can't adjust it, so using blending modes gives you an extra layer of control, with 3DLUTs, Lookup Tables. You can also click on the drop down here and select Luminosity, so maybe you like that flat look but you wanna use the original colors of the photo, so that's what this is doing here, Luminosity keeps the original luminance values, but it uses the, I'm sorry, keeps the luminance values of the Color Lookup Table, but keeps the original colors. So again, you could probably see all the different things that you can do with Hue, Saturation, Color, Luminosity, those are the blending modes that I probably use the most, just because they work great with adjustment layers, when you're retouching, compositing and doing pretty much anything. And this is a cool little trick for you guys here, so we have this street and if I create a Black & White adjustment layer, it of course, makes the layer black and white, but we can actually change the blending mode and make this Black & White adjustment layer do something that it wasn't intended to do, so, the original purpose of this adjustment layer is for you to create a black and white image, you've seen it before, you can use these sliders to control the luminosity of the original pixels, so notice the reds, that building had some red in it, if I adjust the blues, changes the sky and part of these buildings, because that building has blue and the sky has blue. So makes sense right, just dragging those sliders make those adjustments, if we change the blending mode, this tool gives us even more power. So I'm gonna change the blending mode from Normal, to Luminosity, and that brings back the color in the image, what that allows us to do now, is use these sliders to control the luminance values but the color is back, so now, we can control how bright and dark things are in our image, so maybe we wanted to make those buildings just a little bit brighter, we could, maybe change the sky a little bit, so now we have a whole new level of control that wasn't there before with this adjustment layer, just simply by changing one blending mode, changing it to Luminosity. And actually, you can compare that to, I'm gonna convert this into a Smart Object, I like making things into smart objects because I can put them in that container, that's what it is and apply effects non-destructively so I can come back and change them later if I need to. So I made that straight into a smart object and another thing that you can do that is sort of similar, it's not exactly the same, but is very similar to what I just did there, is with that street layer selected, I can go into Filter, Camera Raw Filter, and in the HSL adjustments, the hue, saturation, luminance adjustments, you pretty much get the same thing, you have these sliders here, that control the luminance, so this is another way of doing the same thing, there's reasons why you would wanna do this instead of the adjustment layer technique. One of the biggest ones I would say is if you're compositing I usually don't like to create a lot of smart objects, so I think that using the adjustment layer is better because the smart objects give you larger file sizes, and I didn't show you one of the composites that I usually show in the beginning of my presentations, but one of the largest composites that I ever worked with had 1500 layers and it was, yeah, and it was almost five gigabytes, so actually, here's a question for you guys, d'you guys know what the, how big a Photoshop file could be, like the maximum file size, PSD? Two. Two exactly, two, so you have to use a PSB, a Photoshop big file, like large document file, so I had to use one of those files. But anyway the point is that in a composite that big I couldn't really use the smart object technique because it would just create a huge, huge file size and my computer wouldn't be able to run it. So, I mean just opening the file would take forever. So you could use this Camera Raw Filter technique on just on a single photo if that's all you're working on, but if you're working on a composite or multiple layers, or you simply prefer to use adjustment layers just create a Black & White adjustment layer, change the blending mode to Luminosity, and make your adjustments that way if you need to. And one of the advantages of using the Black & White adjustment layer, over the Camera Raw Filter, is a layer mask, a layer mask allows you to selectively make adjustments, so if I only wanted to target this building, and obviously this is a very rough selection, I can make a selection out of that building there, I'll delete the layer mask and I'm just gonna create a whole new one, I have a selection active, so when I create a new layer mask the effect is only applied to that building because that mask was created based on the shape of the selection, if you ever wanna look at a layer mask you can hold Alt, Option on the Mac and click on the layer mask so you can see it. So I'm not talking a lot about layer mask, but layer mask, when you start combining layer mask with blending modes and adjustment layers, I mean the possibilities are endless, you have so much that you could do.
Class Materials
Bonus Materials with Purchase
Ratings and Reviews
ML
CreativeLive has many excellent instructors for whom I have nothing but high praise, and some have classes or segments on blending modes, but Photoshop Week 2017 was the first time that I finally "got" blend modes. Kudos to Jesus Ramirez for covering a lot of ground. In this class, Jesus explained the rationale behind how blend modes are grouped and how each group affects pixels. His methodology - applying each blend mode to the same photo, blended first with a luminance chart, and then with color wheels - was very effective at illustrating the impact of each blend mode - a visual representation of what each blend mode does accompanied by an introductory explanation of the algorthm. He also illustrated how he had used the effect in his own work, provided useful advice, and left room for our own creativity to take flight. This one-hour class has something for beginner to advanced Photoshop users alike. Well done!
sam
wow! Amazing!
George Fargo
I would recommend it for beginners but when it said "like a pro" I assumed it would be more advanced. It covered the groups with mainly one example from each group. What I was looking for was some knowledge of all the modes in a group and the relationships. I know that lighten lightens and so does screen but what is the difference and when to apply each. Same with color dodge and linear dodge, and all the various members of all the groups. Otherwise I am doomed to merely "scroll through and pick one I like".