Adobe In Design Demo Tri-Fold Part One
Lesson 10 from: How to Create Marketing Materials for Small BusinessesErica Gamet
Adobe In Design Demo Tri-Fold Part One
Lesson 10 from: How to Create Marketing Materials for Small BusinessesErica Gamet
Lesson Info
10. Adobe In Design Demo Tri-Fold Part One
Lessons
Class Introduction
04:25 2Defining The Glossary Of Design Terms
26:26 3Adobe In Design Demo Update Your Current Materials
08:44 4Adobe In Design Demo Business Card Part One
39:08 5Adobe In Design Demo Business System Materials
23:55 6How To Procure Free And Low Cost Stock Images
11:51 7Adobe In Design Demo Postcard
16:16 8Object Styles For Continuity
07:40Lesson Info
Adobe In Design Demo Tri-Fold Part One
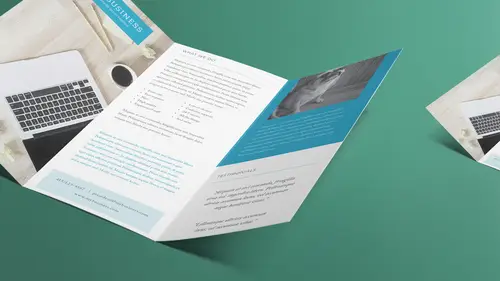
Alright so let's look at the tri fold brochure. Because this is where things start to get wordy and we get into it. Let's jump out here to the tri fold. And tri fold brochures are fun because they're not all equal panels. You look at it and think oh it's three panels. Let's actually look at the printed one here first. So we've got this tri fold brochure, that's what it looks like on the outside and the inside. But, and so yeah, so you basically have these three separate panels and then you fold one inside and one over the top. And again we go back to the whole, if it falls on the ground, what do we see? We see this or we see that. So these are the two most important panels that I really focus on when I'm designing a tri fold. So when we look at it on a page though, they're both on the other side. They're here and here, right, so those are the two. And what we have to make sure is that these two items, this panel and this panel, are the same, and this one is different. And it depends, t...
here's different templates. I'm going to show you the template that I use. And this one is slightly longer because it has to wrap around and you still want it to come over the edge. And ideally you want it to hang over just a slight bit so that you have a little bit of a lip for grabbing onto. But that's always the hard part is designing the three panels that are not exactly the same. The other way to do it to make sure that these two are the same and longer than this one that's short and folded in. And it just depends. And again, this goes back to where is this going? Are we printing it online and do they have a template for it? Because a lot of the online places have InDesign templates or Photoshop templates if nothing else. Some just have jpegs, but you can always bring in a jpeg and drop it in on a separate layer in InDesign. And I'll show you layers in a second. Just because we're going to turn on and off our, the guides that we have to create this template. But that's the hard part, is getting the template for that and getting one that's right. I have one that I use all the time, but there's certain printers that would rather use their own template. Which makes sense, they've got it set up you know for whatever works best in their work flow. So starting with a template when it comes to a tri fold brochure is huge. So let's actually open up the tri fold and see what it looks like on the page. So that's how we have it set up, and then we'll actually turn on our margins and all that so we can see our guides and everything else. So let's look at all the different guides we have. We have a bleed. We're not bleeding anything on here. I think that just probably adds to you know more stuff. We've got already three panels, six panels actually, that we have to work with. One's shorter than the rest or longer than the rest. And then to have a bleed would just add to that. Plus if you do a bleed off the front, then you've also gotta get it to end right here. And then you better hope that the person folding it is going to fold it pretty exactly so you don't get a little strip of white or the picture running around to the back side. You know I've done tri fold brochures where every panels has a different background color, which looks great on paper and is great if you can get it folded after. If not, it looks pretty bad. So this is the bleed mark again. So when we chose a bleed in the beginning we said that there was a certain amount of bleed. That's something else you need to ask your printer or if you're printing online, check if they have a template or if they indicate how much bleed needs to be there. Because you can always have more bleed and that's usually not a problem, but if you have less bleed, that's not going to help them at all. If they say you need a quarter inch bleed or an eighth of an inch bleed, which is a lot. But if you need that, if they say they need that, then you really need to make sure that you have that set up. Keep in mind, like I said, you can have more because they can always crop it back. But sometimes when you take things to a printer, you think oh I've got this bleed, it's all set up, and then they think that's your design and they shrink it down. I've had this happen all the time. And I indicate, because I don't put crop marks when I export to pdf even with a bleed, I tend not to put crop marks in there. I just let them know there's an eighth of an inch bleed all the way around. They should be able to drop it in to whatever they're doing and figure it out. And so a lot of times I don't have crop marks because you need extra space on the paper or the pdf for crop marks, and I tend not to do that so it fits on a page. But then they'll go, oh yeah we took it and we shrunk it down to fit. I'm like that's what, why is that there? So keep that in mind that even sometimes you think well I have more, what possibly could go wrong? I'll give you a list. So just keep that in mind, that you need to be aware of that. And always be thinking, where is this going and what are their requirements? So if they need this amount of bleed, give them that amount of bleed exactly. And also when we go to export to pdf or when you go to print, InDesign does something interesting. You set up let's say an eighth of an inch bleed, you've made sure your images have come out to the bleed all the way, and then it doesn't automatically print that eighth of an inch bleed. It's off by default. It doesn't even print you the bleed. You have to tell it, use the bleed. Okay, why is that not there, I don't know. That's not, I don't know. That's a whole nother Oprah right there. Alright so we've got our bleed marks. We've got our margin marks, and that's great. We've got our outside margins, but what I don't have is how much margin goes here? Where does the panel end? How do I know where I can set things up to? Well that's where our template comes in. And I'm going to choose layers and show you what I have. So without going too much into layers, layers here work differently than layers in Photoshop. These are basically, think of them as different layouts I guess, there's a layout here and a layout here and a layout here. And of course things show through. It's more that stacking order when we talked about images being or items being on top of each other. That's stacking order. Now we've also got pages that are kind of stacked on top of each other. Not pages, I don't want to say that. That'll sound like they're individual pages. But different, different bits of the document that lay out on top of each other. Some people put text on one and images on another. You might do, let's say you were doing a workbook and it's in Spanish and English and German. And you want the same pictures throughout. So you don't want three documents or three separate pages in the document because when you update a picture, you'd have to update it everywhere. You could do that in layers. You can have all the pictures laid out here, and the name of the company, but then all the text, the how to text, you've got one layer that's in English, and you turn that layer off and turn on the Spanish layer and then you print that or export it. You turn that off and you turn on the German one and do it that way. So that might be a reason for layers. In this case what I use the layers for, and I only have one layer showing, it's called layer four. And I've got the little eyeball on it. If I turn that off, all that goes away. That's all sitting on layer four, so it's just hidden. But what I have behind there, and I'm actually going to build it one by one. I have something here called fold guides and rules. That's where the folds happen, which you can see is kind of a wonky setting, right, because that's that weird one has to be longer so the other two fold against each other and the one wraps around longer. That's what's there. And then I also have margin guides. So that's where it folds. And that's the offset, so that amount here is the same as the amount here because I also want that nice margin not just here, but also from all the text, I want everything to sit completely centered within each panel that's on there. So I have that, and then I also have this. This is where the magic happens right there. So, and actually let's go to page one. So I've got some notes in here. So this is called annotations. And I often have a layer called annotations, and it's usually for my own use. It's things like don't forget to do this, don't forget to do that. Or I'm waiting on this for a client. But it's there so when I go to print a proof, they can see, oh that's right, she's waiting on that logo. And they don't think I'm stupid and forgot their logo. It's just that I'm waiting for it. So in this case I just have this set up. This is a template that I created, and so I've got these two short panels. So this is the outside panel. So when we're looking at the panel here, and I even indicated front cover, so I can remember the front is on the right. So the front cover, and then I've got the two panels here that are the same size. So those are the same and they fold up, and the other one's a little bit longer and wraps around. So yeah, and this down here just says that this annotations and fold guides are on a separate layer. It tells people to remember to turn them off when printing or exporting. So obviously it's just on so that when I'm setting this up I can look at it and say okay I've got that. I've got my guides. I know what the length is. And then I also have it so that these are all locked so that I can't accidentally move anything on that layer. Everything on that layer is locked. And then I can, usually I turn off the annotations, I don't need to see that. But I do want to see those guides because I want to see when it's time to start putting stuff on layer four. Let's say I'm ready to put something on layer four. Let's um, I'm actually going to copy this and delete it so that when I need to put it back, I know exactly where it goes. So if I was setting this up, I'd be like oh I really wanted a blue background on that. That would be cool. I can take my shape tool that I have my rectangle shape here and just drag it out because I have those margins there already. And of course see those green lines that are showing up? Look at all those lines. Those are those smart guides again. That's telling me where things are lined up to the same height and the same width. You notice that I have a green arrow up in the upper left. I can't move my cursor to show you because I'll lose what I have. IT says, where we love our customers. There's a green line across there. It tells me that the shape that I'm drawing right now is exactly the same width as that shape that's there. And then it also shows me it's the same height as the tall one on the front panel that's there. So that's what those smart guides are. You can turn those off if it drives you insane. But I'm going to do that, and now I have those margin guides that tell me where I can put those items on my page. So I can come in here, go to the color, and we'll just make that that color and we'll send that to the back. Alright, so we'll send that to the back. And now it's ready to go. I'm not sure that it was actually cyan that we had there, but we have that item that's ready. So again, I have these, and I have these marks turned on so I can still see where the fold is. And I can kind of see yeah that looks good, that's going to fold up nicely. I'm going to delete this. I'm going to go back up into here and choose paste and place. It's going to put that item that I copied right back in place. I'm gonna right click or control click on this and say arrange, send it back. Put it back behind. So again those layers, we can turn those on and off. And then I can print them. So when you print or export, one of the options is print visible guides or print, I'm sorry, print visible layers. And it will only show the ones that you have turned on or off, so that's really good. And I think that's the default, which is also really good. Alright, so I can turn those on and off as needed. When I go to print, that's obviously all I want showing on there as well. So far so good? So a template. A template is huge. Let's say you don't have a template, but you created one. Someone told you, like your printer said, well we don't have a template, which they should. But if they didn't and they said but here's what the panels need to be. Once you save that, I would save that out as a template. So once you've created something, make sure you save it as a template. And again, not only will you have all the styles there, so before we were grabbing styles from one document and moving them to another. Well you can actually save it as a template, and if you do that, not only do you have all those things like styles, but you also have all the formatting that you've created inside your document. So what I'm going to do is I'm actually going to save this as something new because I don't want to lose the one I have. I'm going to save as. And we'll save this out to the desktop. The tri fold brochure. And then what I would do, let's say I'm going to use this again and again. And I don't have these layers to work with, so I'm actually going to choose. Actually well we'll leave them there. We'll pretend we drew them, we drew them by hand. I'm going to get rid of the, let's get rid of the annotation layer. Get rid of that guy. It does tell me it has objects on it. Oh you know, maybe I need to keep those. I'll keep those as well. So I'll keep all that, and I'll say okay, I went ahead and I set all that up so that I know that I have everything set as needed. I want to use that again as a template. So how do I do that? So I am going to delete everything that is special to this particular document. So basically what I do, when I've created something I want to use again, I make sure that it's good. I don't do this half way through. I wait until it's done, sometimes until it's printed, and I wait and go okay, it actually looked really good printed. Now I know it works, and I want to use it again and again. So I might say well I'm going to create other brochures that have other information in them. So I might select this image. Let's select him and delete that. And then I'm probably going to delete a lot of the text. I might just keep, I might keep testimonials there. But I might select this text and delete it. And this text and delete it. So I'm selecting all the text doing command or control A and deleting it. But I'm keeping the frame. So I'm keeping kind of that skeleton, that work that's there. So I'm going to delete whatever I think I won't use most of the time. So whatever I think, like the images obviously. But maybe I want to change out the images all the time. So I'll just do that and create that. And maybe it's just that I'm going to switch out the dog pictures every month or whatever, every time I create a new document. And then I'm going to save this as a template. So I'm going to do file. I'm going to do save as. And we're going to come down here. Instead of leaving it as an InDesign document, which is the default, I'm going to choose InDesign template. When I do that, it changes the extension, and it's going to change it to an indt, which is an InDesign template file. And basically what that does, instead of opening up last time's and making changes, because that's what everybody thinks. Oh I'll just open up last time's. Let's say it was a newsletter. And we are going to change out the dogs every month, and maybe we're a dog adoption service you know, or a shelter. And we want to change out the pictures every month. We're going to go oh, we're going to open up last time's and make all the changes and hit save. But what happens, we think we're going to save it as something new, we go along and we get save happy and we hit save and we realize we just saved sort of the new version, but only the halfway version that we've done so far. What we want to do is not do that. We want to make sure that we have a clean piece every time and that we're starting from scratch every time. Because what happens with that, it's like the old game of telephone, it's like oh we'll open up, you know, we'll do April's newsletter. And we'll open up in May, and then we'll save it, but then we make a few tweaks like to our styles. Like oh this time this style doesn't work, so I'll tweak it a little bit. Tweak a little bit. And then we open up June's, we do the same thing. We have to make a few tweaks. And pretty soon December looks nothing like April. And then you know if you've got something that isn't like a newsletter, but maybe brochures, and then you go to the trade show. And they're all on the table at the same time, and slowly but surely you can see the difference in all of them. You don't have that consistency of your marketing materials. So templates are huge. And in this case we want to do it because we want to make sure that the template is set up with the margines and the folds and everything exactly the same. So we save it as a template file. And what happens when you save as a template file, instead of opening up a regular file and looking like a regular file, this is what a regular file looks like. This is what the template file looks like. It looks like a little square, but it's actually like a little sheet of paper. A little legal sheet. And basically when you open that, if I double click on that, it doesn't open the InDesign file that we had, the template one, I'm sorry, the one with all the information. It opens up a new untitled document. So if I do get save happy and I hit save right away, it says, oh okay great, what do you want to save it as? Oh, okay, I want to save it as an InDesign document as something new. Now we can save it as May's newsletter or June's newsletter or whatever. Does that make sense to everybody? So with a template I try to pull out everything that is not super specific to each month. You know so if you had, if it was a newsletter, and you had July 2016 on there, I might put month and then xxxx for numbers. So I see that it's different. And then I change that every time. You think oh it's not a big deal. I got a calendar one time and the calendar looked beautiful, except that the calendar was the same cover because they forgot to change it. Because they said oh we'll just pull last year's and we'll change it out. And they changed the picture and everything. They just forgot to actually change that, but if they had something that said your month or year xxxx because I use xxxx a lot because then I can do a find on that and make sure that I don't have that in my stuff before I go to print. I'll be like, oops, I forgot to enter the year in there, or change the year. Erika? Yeah? Can I ask just a question about this? Yeah. So the bonus templates that you've prepared as part of the bonus material for the course, are they the indt files? We have, okay, we have the indd files which is the InDesign document file. And then we have what's called an idml file. And the idml file can be opened in older versions, so it's an InDesign mark-up language file. So yeah it can be opened in that. So it's not an actual template because we have all the information there. But if they want to use that template over and over again or want to delete the information and keep the guides and all that, they can delete all that information, keep all the guides, and then save that as a template file. Yeah, so they're called templates, but I guess we didn't actually have them set up as template files. But we do also have a pdf so you can see what that is supposed to look like when you open it. Fantastic. And I should point out on the files there, the downloadable files, the one thing that's not included in there are the fonts. And that's because we don't have the right to distribute the fonts along with it. It's a licensing thing again. But all the fonts that we used are Adobe Typekit fonts. So if you have the Creative Cloud, you have access to Adobe Typekit, and you can go and grab those fonts from there. And if not, substitute the fonts. So just you know our choice of fonts, you could substitute whatever you want with something else.
Class Materials
Bonus Materials with Purchase
Ratings and Reviews
Laure Donteville
How lucky to attend this class in person!!!! So worth it and it was exactly what I needed to have the right tools and give me the confidence to jump start my business. I can't wait to finally put together my ideas to create my business cards and send my very first postcards to reach my future clients. Thank you Erica for such a funny and interesting class on things that usually feel so overwhelming. Yes, you can be a designer!!!!
Cynthia Dauterstedt
Erica is just awesome - did several of her courses and she has a great style, is funny and explains very well the basics and beyond what "Design Dummies" like me need to know to get the stuff done they don't have money to pay an expert for. Good Job, worth each penny!
julie haskett
She said at the beginning that her purpose was to make us confident enough to use Adobe In Design and she absolutely did. Perfect class, perfect instructor. Really enjoyed this and lots of info absorbed. Can't wait to put it in action.