Lesson Info
7. Biomorphic Collage Expansion
Lessons
Introduction to Abstract Collage
04:21 2Collage Materials & Techniques
10:25 3Collage for Simplification
13:13 4New Color Horizons with Collage
10:41 5Collage as Catalyst: Variation/Improvisation
11:42 6Collage: Remnants of Consumption
13:32 7Biomorphic Collage Expansion
14:56 8Deconstruct/Reconstruct: Cubomania
16:15Lesson Info
Biomorphic Collage Expansion
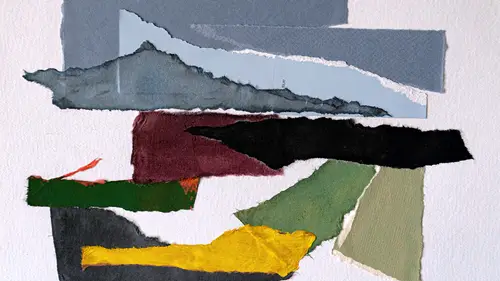
So there's a lot of different subject matter for collage. I mean, collage actually doesn't really even need a subject matter. You could just make collages as we've seen out of old boxes or ripped paper. But sometimes you see collages that work with more organic shapes. I like to call them sort of biomorphic collages where you might like for here, for instance, I actually very precisely cut out a photograph um that I took in Mexico of the of a pomegranate tree. And I if I flip it here, I think it's like really beautiful and and and ultimately could possibly be a collage element which is based on a biological or organic shape. Sometimes I also work with collages that are based on industrial shapes and we'll be working with that a little later in the course. So, this, you know, this collage has buildings. It's a very different look than this one. This one here also has my daughter celeste surrounded by flowers like this. Um So this also using photography is also kind of a biomorphic colla...
ge possibility. So, what I want to work with in this course, the possibility of using an image that is in this case actually um a photograph of a rhododendron flower. Um and use that as a springboard for where collage might meet drawing, where one image born from collage could morph into something else. So that's another possible, almost surrealistic or um thing that you might want to try where collage might meet drawing. And that is also an incredible gateway for making images that aren't up to you that push you beyond your habit. So in order to do that, we'll need a few supplies. So we're going to be working with. I actually think in this case just working with a glue stick is nice because we're just gonna be gluing down some super simple shapes. You want to have a mother image, call it a mother image. You want to have maybe a photograph that is botanical or that is something more natural versus something hard edge. Just for this particular activity, it can be a color image. It could also be done in black and white but I like color. I think color might be fun to try. Then you'll need some kind of glue, you'll need a backing. You'll need something to put the image on. A little ruler perhaps. Um, and then a sharpie and a range of colored pencils that my it doesn't have, doesn't have to match perfectly, but it might sort of pair well with the image. So really simple materials and really simple process actually. So I'm gonna clear these, Put them aside and put them in a place where I can reach them. And then I'm gonna take this image and I'm going to shop for um areas of the image that I think are kind of beautiful and sometimes I call this like window shopping. I'm gonna see if I might actually be able to use this little viewfinder here to help me find some sweet spots. So I'm gonna put this down on a section that I find beautiful and then I'm gonna go ahead, I'm gonna take a sharpie and I'm just going to find five sections of this image that I think maybe I might want to work with and they don't have to be all rectangular. Uh they don't have to be um all square, but I'm gonna encourage you to go ahead and shop for just five sections of whatever image image you chose. They could even be kind of long skinny sections if that's an inspiration to you. And then one more kind of enjoying this, like very pale green down here. So you can see that by using you can also sort of choose with your camera zooming in, zooming out, but you can see that by choosing sections like this with a view finder of some kind, it makes a little easier to choose. Now I'm going to go ahead and cut these sections out. I'm gonna save the remnants, not that we're necessarily gonna use it for this project, but remember I like save everything right, you know that about me by now. So so I'm gonna put the remnants on the side maybe for future use, I'm just cutting out these five parts and I'm gonna lay them wherever because we're sort of liberating them from the image. Were saying, oh well these were little juicy bits, little sweet spots that I particularly enjoyed. But in the end where they end up for this practice, we'll see, they might be upside down from the original orientation. I suppose that you could even use, you could even cut shapes off of your mother image that aren't rectangular. You could use circles, you could use different things. All right, so this is my remnant. I'm gonna put it on the side, here are my shapes. So I'm going to take a moment. I don't want to I don't want to think too much. I don't wanna, you know, the intellectual mind often gets in the way of creative flow, so you might just throw them down. Um and actually, I think that might be what I do. I might just throw them down any which way you can see that I'm wanting to arrange. But randomness is is actually can be a really good thing. And I'm gonna take my now that I sort of have a general sense of where I want them. I'm gonna take my glue stick and just go ahead and glue them rather quickly. And I'm leaving a gap. I'm leaving a little space in between and you'll see why in a minute and then this last big square, Why not? All right, So, it's a collage. It's a collage of remnants of shapes and now we're gonna take it and sort of morph it evolve, it use the collage as a catalyst for something even more abstract. So, the first thing I often like to do in this situation is to create some kind of boundaries. Some kind of container for the image because there's a lot of space around this. And sometimes when you create a little bit of a container for the image, you can, you know, rein it in a little bit. So I'm just gonna create a little container for the image by you could use a ruler for this, but I'm just gonna eyeball it here, I'm gonna bring a boundary in, might be like just off a square, like a little bit rectangular. And as soon as I do this, these shapes start talking to this line instead of that edge. So, what I've done is I've sort of amped up the energy between the shapes and the edge of the composition, which to me just makes it more exciting than having all this like nebulous space around it. All right, so, that's the first step. Now, what do I mean by evolving the image? You know, I've got these like rectangles down there and it used to be a flower, but now it doesn't really look like a flower anymore. What I'm talking about now is taking clues from these images, clues maybe leading off the shapes and extending them into the white space. So, I'll show you what I mean by that. One of the first things that hits me is the line of the flower here. I'm not really drawing on the photograph, but I'm coming off the photograph and following that curve to the edge. I can also come off the photograph here and follow that curve to the edge. So I'm linking it up to the edge based on color and shape. This curve can also hook to the edge. This line too can come even further down and hook to the edge. This here, there's a line coming off this one and this seems to kind of be curving in this direction. So I'm making these shapes, these sort of intersecting shapes coming off of and based on some of the shapes that I have here in my remnants from my image. And you know, again I'm not working super slowly. I am working kind of quickly so that I can come in and you know, just let it have a little bit more fluidity and flow. I don't know what it's going to end up looking like and that is actually fine with me because for me that's really like the beauty of abstraction and the beauty of collage is like making peace with not knowing right? Like making peace with like not securing an outcome with just like letting it be what it needs to be. So I'm gonna continue, let's running a few more lines off of here and then I want to kind of slip into doing some color Alright. I I do, I do like how that's starting to look. There's maybe just a little bit more, it's super fun to make these extensions to um And so you can see there starts to be a rhythm filling the space and this is where it's sort of fun to work in some color. So I chose some colors that more or less go with what's happening here. You can also do this with paint, you can do it with like an opaque paint, but I'm choosing colored pencils because you know, that's a quick and easy way to start creating this more from this extension. So this pale yellow green, this color is not going to match perfectly, but it will give you the idea pale yellow green coming off of this region here. And I'm just gonna go ahead and just color in this shape and I'm gonna look for a few more of these green shapes, yellow green shapes, there's a pedal coming off of here. And so what starts to happen as I start to fill these in a little bit is that these lines become shapes, right? What used to be a line is now a shape and that shape is inspired by what's been going on in the collage. I'm ready for some pink. There's a lot of pink in this. So, here's an area of pink, that color matches pretty good and this sort of shape. Iwork can be super inspiring and can really um generate ideas, generate ideas for um other projects like, you know, sometimes this in and of itself can be the piece you end up with, but sometimes what can happen is that you work on a collage like this, this biomorphic I call this like a biomorphic expansion right? You work on a biomorphic expansion like this and then it as like for me as I'm working, I start to actually generate ideas um and it's almost subconscious, you know, just by the act almost relaxing act of coloring in shapes. I start to think, oh, you know, this would be a really interesting painting or you know what, if I worked in this way with another subject matter? Um so this is really very dimensional, you know, now that I'm putting in these dark greens, you can see how the pinks are really starting to pop. So I'll just do a few more little shapes here and then I think you get the idea. So I I really love working with organic shapes. I like working with shapes that have some shifting the green here to be a little bit brighter. I like working with shapes that have um some flow and some pop. That's sort of my wheelhouse. Uh so this biomorphic expansion project is is really like perfect for a lot of the things I like to work with. So I recommend, you know, the next step here would be to continue coloring out the shapes um to continue working with um you know, these spaces, I think that you can vary, you know, subtle color variations, but I think that this the clue from this photograph and I encourage you to go and you know, take photographs with this in mind the color clues from this photograph and the shapes that come off of it. They're not something that I would have just thought to do. Like if I sat down without the photograph, I wouldn't have ever really come up with something like this. So the idea of having these little juicy bits of the photograph as a springboard, as an inspiration, as a spark really allows you to then jump into something a little different. Jump into something that might not be your habit in terms of working. So I encourage you to try this biomorphic collage, expanding an image. You might even have a bunch of photographs that you might just want to print out and cut up and glued down and draw off of. But I think that over time remembering to put a little container around it, really allowing these shapes to flow and then choosing some beautiful colors to fill it in. I think that you'll find that that'll be a really wonderful way to generate new work
Class Materials
Bonus Materials with Purchase
Ratings and Reviews
Susan Gold
Fantastic class! I am a beginner when it comes to abstract collage, and Amy demonstrates a generous number of techniques—all accessible and with clear instructions. She shows how each step can yield exciting variations, and she inspires play. Many of the techniques utilize a photo as a “muse” or “mother image," and it’s fun to discover new possibilities for my photos.