Drawing Eggs and Cylinders With Dimension
Lesson 5 from: Drawing Fundamentals: Cross Contour Lines and EllipsesAmy Wynne
Drawing Eggs and Cylinders With Dimension
Lesson 5 from: Drawing Fundamentals: Cross Contour Lines and EllipsesAmy Wynne
Lessons
Lesson Info
Drawing Eggs and Cylinders With Dimension
So, from ellipses, we can start to talk a little bit more about cross contour. So an ellipse is an ellipse, it's like an opening, it's a curve... But how would that apply to, let's say, drawing an egg? An egg is an egg, right? An egg is an egg when it's an outline of an egg. So I'm gonna demo it here for a second then I'm actually gonna give you all eggs, alright? And they're still warm because they hardboiled them so it's kind of nice if you're chilly. (giggles) So at home you can grab an egg from the fridge, you can try this. But I'm just gonna go ahead here and I'm going to work with drawing this egg. And let's see, here's the egg. Alright, it's a nice looking egg isn't it? Yeah. I think it's free range. (participants laugh) So this idea of drawing the egg and then imagining an ellipse that goes around the egg, alright? Like imagining a line that wraps around the egg, if you could see it go all the way around, our see-through egg, that would be an ellipse. Right, that would be an el...
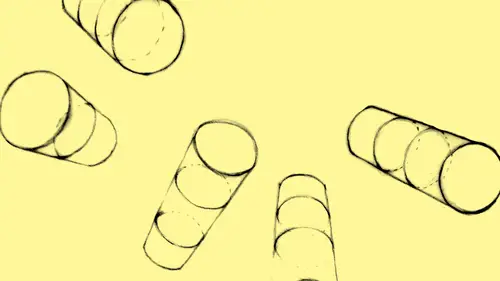
lipse in a different way. So if we can sort of trace that line, that can help us draw it with dimension. Which is really helpful. So let's take a look at how that might look. Right? Just like that. Easy. So easy, cross contour. Yeah, but that's fast and that looks easy, but (sighs) right? So how would we do that, let's figure that out. So we start with an egg. Egg-shape outline, flat. It's flat, it's not 3D yet. Then we might imagine the egg turned away from us in space a little bit, and maybe a line wrapped around it, if it was see-through you could see through the other side. Right, so it's pivoted away from us and we're imagining all the way around in a sculptural way. We're imagining these lines wrapping around the egg, and you're gonna get an egg with a little hair band around it. (giggles) So you get to see the lines wrapping around, it's really tangible. And then these cross-contour, they're going around the contour of the object is really what we're gonna practice. And that's, in a really simple way, anything that has an egg shape, whether it's a bicep, or an egg, or an apple, or lemon, whatever it may be, you can practice wrapping lines around it to help its dimensionality. And then it goes immediately from an outline to something 3D which is really really cool, alright? So let's try it, I'm gonna just do it here briefly so you can kind of observe how I might move into it. And then I'm gonna pass out some eggs and we're gonna put some little bands around them, and then you're just gonna try it from different angles and see how it feels, okay? So here I have a basic egg, I'm gonna just reiterate these ideas on top of this a little bit more darkly. So you have a basic egg shape, and you know, sometimes even drawing an egg itself, just an outline of an egg can be challenging. You know, for our purposes it honestly doesn't have to be... whatever perfect is, I really don't know what that is. Eggs have actually a lot of different shapes and sizes, but sometimes what I'll do is I'll sort of initially think about the high points of the curves, kind of work with almost a little bit more of a straight line quality. Like how far back does the egg go this way, how high is it this way, how far down in space, how far out in space. Just trying to kind of help it find its shape but for the most part if you just draw a basic oval in the general shape of your egg that you get, it's really fine. What about the cross contour line? We think about wrapping a line around the egg to help show the dimension. We can remember our ellipses? Remember the practice we did with our ellipses? I'm remembering ellipses, an ellipse can do that, but what happens when that ellipse wraps around an egg? I'm thinking if this egg is pivoted away from me a little bit, I can think about wrapping a line around the egg, and just really imagining how, and you don't have to imagine it because you'll actually have a band around your egg that you can draw. Thinking that this band wraps around the egg, and then if I think about a see-through egg, and you can try this if you want. What would happen... To that band as it wrapped around the other side. And it could take a few tries to kind of imagine what happens there, but then you start to think "oh" it has dimension, three dimensionality. And the other piece of this that's important, again remembering your line quality because if I get rid of this part for now, and I imagine that when the line wraps around the egg and goes around the other side my line might darken. And as it comes forward it may lighten, and as it goes back again it could darken. See what that does, it starts to kind of bring me around. Right? That sense of the undulation of the line happens all over and you really want to change the line quality when you can. So we're gonna just practice this from a couple different angles with an egg. So all you need is your pencil and a piece of blank paper. If you want to flip your ellipse paper you can do that... if you don't have anything on that side. And I'm gonna hand out some eggs. I tried it, these little hair ties go around the egg quite nicely. So I'm gonna give you an egg and a hair tie, how's that? and you can wrap the hair tie around the egg. And they are still warm. I'll give you one with one wrapped around it already, a little head start. (participants thank her) They're nice and warm, there you go. See they really treat you right at CreativeLive. Warm eggs, you can probably eat them afterwards. (giggles) And then we'll draw a cracked egg. No no, we're not gonna draw a cracked egg. (audience laughs) That is actually, a very cool thing to try. They're nestled in here, sweetly. Great, okay. What you're gonna do is you're gonna position your egg, I think we could probably have time to draw it maybe two or three times from different angles. So I'm gonna put a little band on mine. Whoo! Come on. Okay. So if I turn the egg, if I look at the egg straight on, so everybody take their egg and look at it straight on. You see how that band just feels like a straight line? See that? But if I turn the egg in one direction, see how the band starts to wrap around it? Right, you can see the wrap? And if I turn the egg in the other direction, I can see it wrap in the opposite way. So these are some of the challenges you wanna put out for yourself. So you can put your egg down in any position, and you know, put it somewhere where it feels pretty stable. And you can start by just drawing a basic oval. And then depending on the angle of the egg to you, after you draw the basic oval, just simply try to draw the band around the egg, and just sort of notice how it's wrapping around. Does that make sense? Yeah. So draw it all the way around, and as you draw it around the egg think as it wraps around, how it might change in line quality. And then once you have one down let's try a second one, and again you can turn the egg in any position you might want to. But this variety, practicing this variety, becomes very important as we move along. And again we have these practice pages that people can go to to practice this, and also just having an egg at home and working with that is really useful too. So as you're wrapping the line around, the band, notice again, as it comes, if it crests around the dimension, the part that's coming towards you, maybe allow that to have a little bit of a lighter touch. And as it wraps around the edges of the egg, see if you can maybe push on your pencil a little harder and work a little bit with the line quality. And if you really wanna challenge yourself, you can play with making that little dotted line go all the way through and see if you can give the illusion of a see-through egg. So this is our chance to apply these cross contour lines, and you can see immediately how much dimension the egg takes on. Alright. I think for the safety of the eggs, maybe I'll just come around, you guys can put them back in the bowls so you don't have as much stuff on your table. So I'm just gonna, can I take your egg? These look great, these look really good. You know, it takes some practice but I can see that people are absolutely creating dimension. And do you see how these ellipses do... Very nice setup here. These ellipses do help you with this idea of wrapping around. I don't wanna give that up to you because it's nice and warm. (participant giggles) Okay so we have two more exercises, we're about at our midpoint and we have two more things I really wanna do with you. One is noticing how this idea applies to cylinders. And the other is playing diagram-a-banana, I really wanna make sure we have time to do that because that's really important, to me anyway. (giggles) So with cylinders, I have a couple of wooden cylinders here that have bands wrapped around them, and I use that as some help for this idea. So with cylinders, and here they are, you have the idea of wrapping. And we also have the idea, first off however is making a long tube-like shape, and then noticing the ellipse at the front of it. Right? Because if this cylinder is facing you directly, straight up, that would be a perfect circle. But as I turn it in space, that perfect circle becomes an ellipse. And you can see that there with the height to width sort of worked out. So we have this idea, and then, "oh" here's our cross contour again. Notice how you can apply it again, and the thing about that is that once you master the cross contour going around a cylinder, it can absolutely relate to tonal rendering down the line. Because if we wrap, this is further along, but in terms of tonal shapes in lesson four, wrapping tonal marks around a form, they can follow these lines. And that can create more dimension. So that's a little bit more advance but that's something that this could be used for. Here's our cylinder, this is what we're gonna try, just a cylinder with the lines wrapped around it. And there's a cylinder from a couple different directions. So I'm just gonna quickly demo the idea, we're gonna be sharing cylinders a little bit, it might be a little awkward from your view. But we have rolls, we have these tubes so we'll make it work out. We're just gonna try this because this absolutely feeds into our banana drawing. If you imagine if I could take this cylinder, and if it was maleable, and I could bend it like a curve you could imagine it could become a banana, right? That might be a long stretch, but anyway, this is the idea. Okay, so I just want to demonstrate the steps here and then I'm gonna hand you some cylinders to try. Question? Quick question is the horizon line that you have, can you just explain to me what's that do? How does that help you? So, a little bit of that is just placing... These diagrams, if it was a full on drawing I would really pay a lot of attention to creating a back edge of a table to help the objects feel like they are seated in space well, that they are on something, they're not just floating in the air. In this case because these tubes are skewed to my eye, they are narrowing a little bit as they go back in space, you can see that, they're a little wider at the front and a little narrower at the back. So that's a lot about foreshortening and we're not going to get so deep into that, but what I'd prefer for you guys to try, is rather than drawing... Challenging yourself to draw the tube like that, like super forshortened. If you can angle it a little less-so just for our purposes with wrapping lines around, that would be easier now. But it's a really good question and how you choose to position something in space, and how you show the ground plane by adding that horizon line is a really important indicator of where you are in space to those objects. And we're gonna get more into that also in our third lesson which is all about perspective and placing objects in space. So we'll do more of that. Does that help to answer your question? (participant agrees) Okay great, alright. So I just wanna wrap a few lines around this cylinder and then I'm gonna have you guys try that. So here we have a cylinder in process, I talked a little bit about how these lines... And you can try this out, just sort of notice maybe that the lines converge just a bit as they go back in space away from you. And then you really wanna make sure that you have a sense of this front ellipse. It's not a perfect circle because it's not facing me directly. So there's a difference in its height to its width, and I'm noticing that, and I'm also noticing that the partial ellipse that I'm seeing back here echoes the one in the front here. And then I can do, really, a similar thing to what we did with the eggs, I can start to pretend that there's lines wrapped around this cylinder getting darker as they come around the top, a little lighter here, wrapping around, and then maybe if you wanna play with this idea of a see-through cylinder, you can kind of work with that. And you see how automatically as soon as I make that cross contour line, it pops. It becomes three dimensional, which is really kind of magic. And then, if you wanna just try one cylinder and put a bunch of lines around it, or however you wanna manage it, we're just gonna practice this for a little bit, and then we're gonna jump into diagram-a-banana, which is absolutely gonna be super fun and you're gonna love it. So I'm gonna bring these cylinders out to the tables, you guys can share them. And again, these have stripes on them, these are a little more rustic but also something you might find at home. So I'm gonna put a nice one and a rustic one on each table. And you guys can share them, and just see if you can position them, maybe between the two of you, where you're drawings... It's not coming at you really dramatically but it's a little bit more from the side. And you can play a little bit with wrapping some lines around it. And actually maybe I'll put a few hair ties around the cardboard ones to make it a little easier. And we'll go from there. So, fresh piece of paper, see about getting you're pencil ready. I think I can probably fit... yeah it does work, awesome. Makes that look snazzier doesn't it? (participants agree) Very snazzy, yeah, alright. So I'm gonna wrap a little something around this for you guys too, to make it a little easier. How's that? (participants thank her) Well also because you can follow those around. So like we did with the egg, following these cross contour lines around the cylinders which are set up for you already, you can just play with that. So start with your basic tube shape, look to see, can you see one side or the other, and then wrap your lines around it. And maybe play with the variation in the line quality. Again, similar to the egg, but now it's a long cylinder. And this takes practice, and again, it's a way for you to really manifest a more three dimensional nature to something that otherwise might feel like a silhouette. Really practicing wrapping lines around. And the practice pages we have for people online and also in studio, there's also multiple cylinders that you can trace and practice this, and it really does take drawing it from multiple angles. Makes it really kind of sink in to see how these cross contour lines wrap around to create dimension. (soft pencil strokes) And just remember and replay this idea of those loose ellipses and how really implying those on these shapes and continuing to practice those is gonna help you create this sort of dimensionality. So we started with the ellipse, we moved in to how that might be understood as a cross contour line that wraps around a rounded form. And now we're gonna move into a slightly more complex shape, but I think a fun shape, in a moment which will be our bananas. But you can see how having, if you have any kids blocks around, or you know, drawing your pepper mill in the morning, like knocking it over on the table and doing a couple quick sketches of it from the side, you know, how everyday objects would be a really idal way to practice this. And so I encourage you to continue practicing these ideas with just basic everyday objects and then ultimately allowing that to help you move in to more sophisticated drawings. Do we feel like we've done a cylinder? Yeah? Okay, great. Alright, so I'm gonna collect the cylinders and then we're gonna bring out the bananas.
Class Materials
Bonus Materials with Purchase
Ratings and Reviews
Melisa Williams
I am taking all of Amy's beginner drawing classes. I like them because her approach is really concise and just very helpful. I am learning lots of techniques. I was one of those "I don't have talent" people and this makes me realize it's a skill anyone can learn if they want to. Thanks Amy!!
Joy Hunter
I've SO wanted to learn to draw and have tried different things, I've tried tracing photos, creating a grid and then putting in the lines section by section, but this is teaching us more - the ideas behind just the mechanics. I love she tells us to feel a connection with the objects we're drawing. I really feel like I'm getting better.
AShley
A great course to learn how an artist visualizes objects to make their drawings look 3-dimensional on a 2-dimensional surface (such as your paper). Awesome!
Student Work
Related Classes
Illustration