Drawing Coffee Cup With Ellipses
Lesson 4 from: Drawing Fundamentals: Cross Contour Lines and EllipsesAmy Wynne
Drawing Coffee Cup With Ellipses
Lesson 4 from: Drawing Fundamentals: Cross Contour Lines and EllipsesAmy Wynne
Lesson Info
4. Drawing Coffee Cup With Ellipses
Lessons
Lesson Info
Drawing Coffee Cup With Ellipses
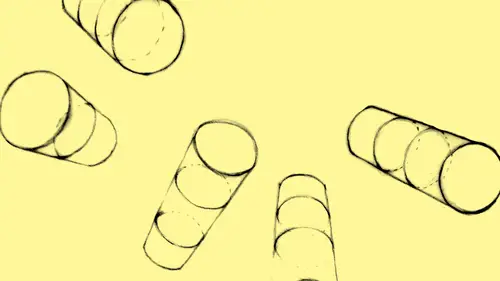
You ready to try some ellipses? Okay, so I'm gonna free hand a couple, just to show you what I mean. And then you're just going to play with it. And you don't have to get super caught up in height to width at first, I just want you to work playfully. So, this is the cup you're going to use. It's super simple. And actually, you know, you don't actually have to even draw the cup. I'm mostly interested in you drawing the lip of the cup, because this is the ellipse. This is the thing that we're kind of practicing at first. If you want to get into the cup, you can, but really working with the lip of the cup. So, I'm going to start by. You may ultimately when you get started mirror sort of what I'm doing. So, I'm starting here with the cup at a particular angle. I'm just looking at the lip of the cup. And, I'm going to start by making a very light oval. And, this oval- notice that I'm not making an oval like this. I'm not starting out, like, that. Why do you think I'm not starting out like t...
hat? Because you can't correct it? Yes! That's like super heavy. I have to be super confident to be like, that's the ellipse, right? So, I'm starting out very lightly and I do this a lot when I'm sketching. I start out lightly and I start to kind of feel the shape. And as I'm working it, as it starts to feel a little more... correct then I can sort of start to play with darkening the lines. So, I'm encouraging you to have a light hand at first. If you know you're like super heavy-handed, just remind yourself to work lightly at first. And so, one of the things I'm considering right here is if I took my pencil and I measured the height of this from the top to bottom of this ellipse, and I turned my pencil to the side and I said 'one, two, three.' Well, actually it's about a third. So I'm saying the width from the back rim to the front rim to my eye, is about a third of the distance across. So, that's something that you would see from your view. Okay? So, I can double-check that. I can say 'is this about a third of that?' Pretty good! Right? And so, let me talk a little about how exactly you would make that measurement. Just a little tricky on camera. But let's all try together. So, I'd like you to hold your cup in your non-drawing hand, whether that's left or right. And I want you to hold your pencil in the other hand, okay? So, hold the cup so that it has an ellipse of some kind. Right? It's going to have a certain dimension. And then, I'd like you to take some concentration. But this is something you can practice at home. It's a really good skill. It's a measurement, sighting a measurement. So, what you're going to do is put the tip of pencil- I like to close one eye when I do this- so you have the cup out in front of you, you have the pencil in your drawing hand. You're going to put the tip of the pencil at the back edge of the cup. Hold it straight up and down. You see that? And you're going to drag your thumb down the pencil until you have measured the height of the cup from the back edge to the front edge. You see that? Then you're going to turn that in space and notice you can fit one, two, three- however many across you can fit. This takes some practice and we may end up eyeballing it a little bit, and I'll talk more about that measurement but that's just something that you can, can also just look at it and say 'Wow, that seems very narrow versus the width. So, we'll work with that. Alright, so the main thing here is, I want you to try to practice drawing some of these ellipses from different angles. Let's try like three or four of them. You can go ahead and just position your cup in any way and just start to trace around the rim and I'll try a few more just my vantage point. So you're gonna, fluidity, remember you might want try to hold the pencil like a spoon versus a writing implement. The fluidity of the arc of the ellipse is very beautiful. So, if you can kind of have a sense of a loose hand when you're doing it. That can be really nice, really useful. Sometimes, also as I'm doing it I have the shape I think I want, I can darken up the line in some places and then lighten it in other places. Sometimes when it takes a curve towards the back, I'll change my line quality a little bit. And then as it comes up to the front lip, maybe I'll lighten a little bit. And I go to the back again, it might lighten a little. So, when you make a variety to the line going around the ellipse, that can help the eyes sort of have the experience on a more organic way. So, you've maybe drawn one that's very wide. If you haven't gone for a super slim one, try that. The super slim one, where it's really narrow can be very challenging, especially when you get to the outer corn- well, they're not corners, but curve. We want that curve to feel fluid, so if I'm going for something a little thinner, this curve here, as it curves around you want to just be aware of trying to make that feel continuous. And this, like anything, takes practice. It takes time. And these are things you can doodle, you can just not even be looking at something and say, I'm just going to practice drawing loose ovals, right. Of different... different scales and different shapes. So this practice of drawing ellipses is something really useful in terms of what we're about to move into. So, why don't you go ahead and just draw one more. Maybe try one you haven't tried yet. Tipping it in a certain direction and maybe even tipping it vertically. Try just one more ellipse. (soft drawing sounds) Alright. Great. So that's a little warm up. And again, we'll be finding these ellipses in all the objects we'll be moving into next, so this is just a way to move into that. And again, your practice pages have ellipses for you to trace over and then you can continue to practice this and I just again encourage you to vary your line quality and really kind of go for breath and looseness when you're moving around these forms, okay? So, ellipses are really important to practice. And a lot of it, again, has to do with the height to the width when you really get down to it.
Class Materials
Bonus Materials with Purchase
Ratings and Reviews
Melisa Williams
I am taking all of Amy's beginner drawing classes. I like them because her approach is really concise and just very helpful. I am learning lots of techniques. I was one of those "I don't have talent" people and this makes me realize it's a skill anyone can learn if they want to. Thanks Amy!!
Joy Hunter
I've SO wanted to learn to draw and have tried different things, I've tried tracing photos, creating a grid and then putting in the lines section by section, but this is teaching us more - the ideas behind just the mechanics. I love she tells us to feel a connection with the objects we're drawing. I really feel like I'm getting better.
AShley
A great course to learn how an artist visualizes objects to make their drawings look 3-dimensional on a 2-dimensional surface (such as your paper). Awesome!
Student Work
Related Classes
Illustration