Lessons
Class Introduction
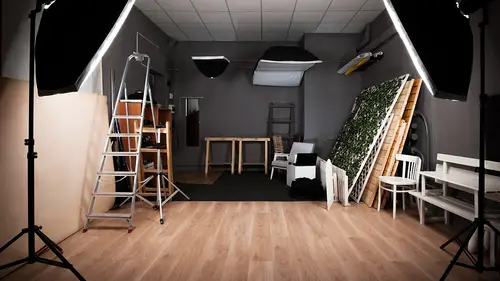
02:54 2Home Studio Space Considerations
15:19 3Recommended Gear
19:06 4Low Budget DIY Studio
06:45 5Camera Settings For Low Light
08:55 6Live Shoot: Low Ceiling
28:28 7Backdrop Considerations for DIY
12:00 8Build a DIY Backdrop Stand
12:42DIY Portrait Lighting
17:30 10Live Shoot; DIY Portraits
28:34 11Build a DIY Light Tent
20:17 12LiveShoot: DIY Product Photography Part 1
18:30 13Live Shoot: DIY Product Photography Part 2
13:45 14Live Shoot: DIY Home Business Photography
04:39 15Build a DIY Macro Lighting Tub
12:09 16Live Shoot: DIY Lighting Tub
10:46 17Live Shoot: Natural Lighting With Modifiers Part 1
21:12 18Live Shoot: Natural Lighting With Modifiers Part 2
09:21 19Build DIY Gobos
04:48 20Live Shoot: the Ultimate in DIY
21:11Lesson Info
DIY Portrait Lighting
Okay, so now we've got a backdrop up. So now it's time to show you guys behind the scenes what it looks like to make some of this DIY lighting equipment. One of those, I want to show you how to make a soft box out of a cardboard box and some lights from Home Depot. All right, cool, thank you, Kenna. Yup. All right, here it is. Oh yeah, Kenna, could you bring over that Profoto as well? I just saw you grab that, it reminded me. (mumbles) All right, cool. So, here's what we're trying to simulate. So this is a Profoto Softbox. It's awesome, I love it, and I use it all the time. I mean, I've been a professional photographer for 10, 12 years now, so I have all this equipment, and this is what I actually use. But, like I said earlier, maybe you don't. Maybe you want to at least experiment with some of this material, some of the stuff, before you spend hundreds of dollars on a soft box. And I'm not kidding, getting a high-end Pro Softbox, this is probably $200, $300 for this, including...
the speed ring and all this other stuff. It's great. But this was, like, 20 bucks. And it's cardboard, and it's cool. So let me talk about how we made this. All right, so here's what I've got. I've got a light stand, and like I said earlier, I think everyone's just gonna have to buy light stands. If got it clamped on with my industrial clamps there, and then if I open up the box and show you what's inside, you can see I've got regular light bulbs. Now these are LEDs. Even just as early as five years ago, I probably would have used incandescent bulbs. Well the problem with the older incandescent bulbs is that they get really hot. This becomes a fire hazard, no joke. So I don't recommend using incandescent bulbs, 'cause they get pretty warm. Let me describe what I've got going on here. I'm gonna move this on this side, I'm gonna go over to the table, and show you how I constructed it. Any hardware store in the world, almost, sells lights like this. This costs seven dollars and 50 cents, okay, $7.50. What I did was, I unscrewed this shield, the heat shield here, okay, I unscrewed that heat shield, and I actually cut the heat shield off. See how I did that? I cut the heat shield off. That pretty cool. Throw this away, you're not gonna use that anymore, okay? So why did I cut the heat shield off? Well because what it does is it leaves a little rim down here that I can screw on and hold the cardboard around this little light. So now I'll move over to here, I'll show this. So you can see here inside of the soft box, and I'll just unscrew this so everyone can see on camera. There we go. I actually cut a hole in the back of that to be exactly the same size as the little $7.00 light, so that fits on there, and then the whole system clamps onto the light stand. So how did I get these lights in there? Well, on Amazon, if you all search, you can find these adapters that go from a single socket light to a quad socket light. But I was running short on time, and I wasn't able to purchase it on Amazon, so I went to my local hardware store, and I found they've got these splitters. So I bought one splitter to go out from the main body of the lighting kit, and then I got two more splitters, so I've got a total of four lights. Like that, so there's now four lights coming off. Now these are LEDs, so they're not really hot, and they don't draw as much power as the older incandescent. So I'm comfortable, somewhat comfortable, about putting this inside of a cardboard box. But I just want to warn you at home, this is DIY, and your insurance company may not be very happy with you if your house burns down, and they understand why your house burned down. So just be careful with some of this stuff. Just always be thinking about temperature and safety. All right, so next I've got some diffusion material here, and you can use literally anything that's white and translucent. So, wax paper, tissue paper, whatever. This is just a leftover piece of diffusion material from an older soft box that I had years ago. And so I just taped it on there. Cool, it works great. What did I do on the inside? Well, it's cardboard. We basically want the inside of your reflecting surfaces to also be white. So, I just took paper, copy paper, and just glued it on here. So you can actually see the copy paper just glued on. So I'm not using the brown reflector inside, I'm using the white product, the white paper. And then this box, the box that I used, is just copy and print paper box, you know it's a ream, or it holds, what, 10 reams of paper or whatever. Simple. As I said earlier, the bigger the better. Diffuse, diffuse, diffuse. Make your sources of light as big as possible. Okay, well we're holding this whole thing together with clamps and tape. So I mean you could go get a big huge cardboard box, but I guarantee you it's gonna fall apart. It's not gonna be strong enough to be held together with this. So that's why sometimes we actually buy the nicer Profoto gear, is because it can support its own weight. In this case, we just have to be gentle and careful, and not move too fast. I've got two different light set-ups here. These are LEDs as well, but this is warm. So these are 2700 Kelvin, which produces a very warm, kind of yellow-orangy light. The lights that I have in here are 5000 degree Kelvin, and so those are a bluer light, basically more like daylight. So I've got basically two options here. I can just swap these out, I've got a warm light versus a cool light. And when we shot photos here in a minute with our model, I might actually use this and show you what it looks like and compare this soft box with a different soft box. So what's another thing we're trying to simulate? Well, let's talk about these, 'cause for those do-it-yourself-ers, you know, we're always trying to save money, we're always trying to find alternatives to our $300 to $500 professional gear. Well these are fluorescent soft boxes. And I will say, this is great way to get high quality lighting at a very low cost. I bought these online, I don't even remember the place, but it was an online video supply house, and had these starter kits. Four lights, the grand total was like 150 bucks, or 180 bucks. I thought wow, that's a really inexpensive way to get four soft boxes. So you can see these are florescents. And so the color temperature of these florescents is actually gonna be different from the color temperature of those. But this is a great way to shoot really inexpensive. I recommend them to a point, 'cause what you're gonna find over time, though, is that they're not really durable. Especially the little fittings here that kind of control the angle. If you don't screw this thing down really tight, the thing flops down. And I just know over time, these are just gonna kind of fall apart. But they have two switches on the back, kind of medium lighting, and bright light. So in just a few minutes, I'll take a picture with this with my do-it-yourself-er, and I'll take a picture with these and we'll compare the two, and you'll see that the do-it-yourself product actually produces a quality of light that is about the same as these. So that's what we're going against, or that's what we're building so we don't have to spend a lot of money. Now on the other hand, you compare that to the Profoto, and this stuff is just durable. It's built to take a beating, and you can take it anywhere in the world, the inside's tough, all the material is tough, so at some point in your career, you're all gonna move to this eventually anyway, so this is a way to get started. So I'm not gonna spend too much time, 'cause we already had a question about them, but these are great. I Can't recommend these enough. For 30 bucks, for 30 bucks, you get this 2000 Lumen light, it's fairly bright, the color temperature is nice, they even tell you right on the back what the color temperature is, 5000 Kelvin. The downside of these is that they're not dimmable, so you get one amount of light coming out of it. And that's fine, you can control it by diffusing more, putting more layers in front, or moving it farther away from the subject. But I think for the do-it-yourself-er, it's probably the best way to go. I actually have a set of older work lights that were the old tungsten. You guys have probably seen 'em, you know, it looks a bit like this, but it's a tungsten bulb, and oh my gosh, they're hot, they're really hot. So you're trying to work with your model, and pretty soon, the whole room is 80 degrees, 90 degrees, and it just becomes unbearable. And the subject, if she's wearing makeup, the makeup is starting to melt off of her face. So maybe they're good for Hallowe'en. These are great, 'cause they're cool, the color temperature is nice, you can white-balance off them well. There is an issue with these, though, that I'll talk about. Because they're LEDs, you see there's actually a grid of little point sources. So in the right scenario, the shadow looks funny. So the shadow coming off of a hard edge can actually be like a stepped shadow. The shadow isn't smooth, the shadow is a little stepped. So some of us photographers, we get into stuff, like what is a shadow look like, what does the catch light look like in the eye? Those are important details that over time, you'll migrate away from these. But when you're first starting, it's just stuff to think about. Is it a point source of light, is it a grid of light, are there 100 little point sources of light, those things kind of matter. Kenna, I've got one more thing I need you to grab. Is that other little work light over there? That orange one? Yeah, okay, cool. This is battery operated, and again you can find this at your local hardware store, you can find it at Costco, and this is about $30.00. So it's battery operated. What do you notice about this one? Well, there's a single point of light, and so if you need a point source, this is the light that's gonna do it for you. And I've done some photography with this, and later this afternoon, we'll do some photography with it as well. We'll use it on a gobo, or a go-between, to create a nice looking backdrop. So, point source versus a surface area, think through those things when you buy your do-it-yourself lighting equipment. Okay, oh, I have one more thing I want to show you, and that's that reflector back there on the stand. Okay, so this one I used my survival blanket. Thank you. We talked about this earlier, so I'm not gonna describe the physical construction of this. I mean it's pretty obvious, right? I just use a foam core, and then I just tape the survival blanket on to it, that's great, but what I wanted to show you was how I made the connection point to the light stand. So, a typical light stand here, and I've got a flash umbrella bracket here, and then you'll see I've got what we call a stud. The stud screws into this, and it's do-it-yourself, so it all falls apart if you're not careful, so here's the stud. All right, so what did I do here on the reflector? Okay, so I found these little nuts, and I found' em at the hardware store, and basically what it is is like a knurled knob, okay, it's a knurled knob, and if I unscrew it here, I'll show you what's inside of the knurled knob. I just bought a quarter by 20 screw. Okay, a quarter by 20 screw, just took a hacksaw, and I hacked it off. So the quarter by 20 screw, the threaded portion, is maybe an inch long, and I've got these knurled nuts, and I just screw a knurled nut on either side, I had these square washers, and I used them to provide a little more surface area, and of course since I hacksawed the screw in half, it's sometimes hard to screw together, there we go. So now, here's one side, here's the other side, and that's just a really easy way to create a hands-free reflector board. So no you take the stud that goes into your light stand, you screw that there, great, and then that just all mounts together inside of the light stand, like that. So, inexpensive way, and it's stiff, it's sturdy. You can actually take this outside, it's not gonna blow away in the wind, especially if you put your camera bag on the system. It's actually almost a professional-level lighting tool that you can use years and years to come. And when this material, this Mylar, when it degrades, you just peel it off, and put on another sheet of Mylar. Or, you can make multiple of these. You know, just have a white board, an all gold one, you can do aluminum foil, whatever you want, so the sky's the limit. So that's a really inexpensive, great tool, and even today, now that I've been doin' this for 12 years, I still use this type of set-up in my studio. It's a really great tool. I think this is a good transition point, so let's answer some questions if we have them. You bet. All right, L. Brady 91 asked, "How did you cut that heat shield off?" When you told is in the beginning. Okay, a couple of ways. One way is if you have tin snips, you can just drill a hole with your drill, and use the tin snips and cut it. I have this other tool, I don't even really know what it's called, but it's this vibrating utility tool, that just (buzzing) buzzes real fast and hard, and it's got like a cutter on the front, and I just took that tool and just kinda went (buzzing), pushed it around it, and it sliced it, and then the other way is a Dremel. A little Dremel hand-cutter tool, it's a little spinning wheel and you can just chop it off. So any of those work. Even, I don't know, a pair of wire clippers could probably work. A question from I. Garp about using LEDs. Is there a flicker problem ever using LED frequency to pay attention to in regard to your exposures? Yeah, sometimes LEDs have this flicker issue, sometimes fluorescent bulbs, especially older fluorescent bulbs have a flicker issue. Most of the new stuff though has such a high frequency, see all lights, all lights, basically pulse on and off. Most people don't notice that, but they're all pulsing on and off. So older fluorescent, like the long four-foot long fluorescent tubes, those actually pulse on and off at like a 60 Hertz cycle, or maybe 120 times a second, I forget the details. But if you had a faster shutter speed, sometimes you'd take a picture when the light was in the low cycle, and the picture would be dark, and then you'd take another picture, the overall ambient light would be bright. Well now the frequency is so high that it's not an issue, especially because our shutter speeds are pretty long. See our shutter speeds, today they've been a sixteenth of a second, a hundredth of a second, so that means the light's gonna pulse multiple times during the time the shutter's open, and I haven't really had any issue with the flicker. Great, thank you. Maybe one more. This is from Brooke Blanchard, who says, "Can I mix the LED snap-on lights" "with a few studio strobes that I have?" Is that possible to sort of mix those? Yeah, and the answer is absolutely yes. And I do this all the time. The most important thing, though, is you have to make sure that you white-balance for the subject, right? So when we have our model come back up here again, I'm gonna do another white-balance for each lighting scenario. So let's say for example I'm gonna use this one. These are with the LED screw-in bulbs. And let's say that's gonna be what's called the key light. I'm gonna have that on a subject, I'm gonna white balance right there. Now for these other lights, let's say these other lights are in the background, and they're shining maybe on the profile or the backdrop. I'm not worried about that. I don't have to worry about the color temperature so much with the background. The key, though, Kenna, is that if you have one light that's a warm color temperature here, and another light that's a cool temperature there, that's a problem. Because this side of the face is gonna be warm, or whatever, this side's gonna be cool, this side's gonna be warm, andnow you have to choose which side to color-balance on. Some photographers to a neat job with that, because it's kind of a creative effect, but that's what you have to be thinking through.
Class Materials
Bonus Materials with Purchase
Ratings and Reviews
Jodz
I was so glad to see Mike! He taught my first DSLR class (Nikon D70 - then Nikon D300). I love his presentation style. It is so clear and he takes care of showing details that get in the way of actually 'doing it'. And I like the way he emphasizes good manners when dealing with a model. Well done Mike!
user-0ee681
I've watched this class a few times when it's been on-air and I realized I really need to just buy it. I find Mike so likable and engaging, and I love how he talks you through the shoot while experimenting. Sometimes the experts show you the perfect way to do it the first time but it leaves you not really able to troubleshoot when you are doing it yourself. I already own a lot of gear that his DIY equipment is emulating, but it's really artistically inspiring to see his creative approaches.
joanna
This course is fantastic! You don't need a lot of money to start a studio or go on location. Mike shows some great easy hacks anyone can use to create a studio and create professional photographs that will earn you the money to then purchase more pro equipment. I got some great ideas I'll be using on my next shoot!