Preference Changes For Efficiency.
Lesson 5 from: Advanced Editing Techniques in Adobe Premiere ProAbba Shapiro
Preference Changes For Efficiency.
Lesson 5 from: Advanced Editing Techniques in Adobe Premiere ProAbba Shapiro
Lessons
Class Introduction
04:42 2Taking Control of Your Timeline
10:46 3Best Hidden Keyboard Shortcuts
18:10 4Timeline Modifications
15:06 5Preference Changes For Efficiency.
18:38 6Tips for Navigating the Timeline
11:34 7More Keyboard Shortcuts to Save Time
07:57 8Useful Tips for Editing an Interview
26:12Lesson Info
Preference Changes For Efficiency.
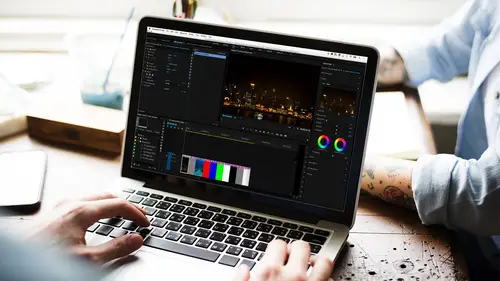
There's a lot of things you can turn on and turn off, and there's some key things here that you should be aware of. A lot of times, if we don't know it does we just ignore what an icon does, and sometimes you can discover, "Oh this could be really, really valuable." So I do want to talk about these. This is probably the most valuable one. It looks like a magnet, it is snapping. And snapping can be turned on with the S key and turned off with the S key. So sometimes we actually do it by accident, and look at that, I still have a track that is locked. Let me go ahead, and don't know how I did that, but when you bring two clips close to each other and snapping is turned off you can just like... They can overwrite each other, you can leave little gaps. But if you turn it on, when you bring two clips close to each other, as soon as they get close enough, like a magnet they'll snap together, and that way you won't have any kind of a flash frame or a gap. That's the whole purpose of snapping:...
things will close. So then I am saying, "That's great," and I am want it to snap to my timeline, and some of you may have discovered it doesn't do that. For a long time, and they may have switched this, or I may have switched this, you need to go into your preferences under General; and in there, there is an option to snap to your timeline. Now while we are in here, I know a lot of folks have been using Premiere now for years and they're used to under the General tab find all the things such as snapping to timeline, what's the duration of my transitions going to be for both audio and video, that all has been moved in the most recent build down to its own section called Timeline. So let's go ahead and jump over there to Timeline, and this is really pretty useful. This, by the way, is where you can change the default duration of your video and audio transitions, and by the way you can do that in seconds or you can do that with frames. So if you are jumping around to different frame rates for different sequences, a half second is always a half second, but if you do frames, 12 frames is whatever 12 frames is, and if you're in a 60-frame sequence it's going to be a quarter of a second, actually a little bit less. Still image duration, while we're in here, is the duration of any time you bring in a still image, a photograph or a graphic, it will default to a duration of five seconds. So when you throw it onto your timeline, if you're not doing a three-point edit, it'll be five seconds long, and you're probably aware that you can stretch it longer, you can make it shorter; but sometimes you may be doing a slideshow, and you know you want 10 seconds for every single one of your images. So you set your still image default duration to 10 seconds, and then you import your still images. If you make this change it will not affect any images or graphics that you've already imported, okay? So this is from the moment that you import something new, but now let's go back down to some of these areas. So snap playhead in timeline when snap is enabled. So that's something that I like to have turned on. If it's not turned on actually, so if you are going to go to a marker, are you going to bring the playhead to the end of the clip, let me show you actually how that doesn't work, and then once we change it, how it does work. So I'm bringing the playhead here, and it doesn't really snap to the end of the clip. I don't necessarily have that precision, but if I go back, and let's see if I remember the keyboard shortcut, command comma. Yes, that's the keyboard shortcut to get to your preferences, and I believe it's the same on a Mac and a PC. But if I go to my timeline, zoom in so you can see this a little bit better, I'm going to say, snap playhead in timeline when snap is enabled. So the magnet has to be turned on; go ahead, hit okay. Now when I drag this over, boom, it's like a magnet and I'm right there to the end of the clip. And I generally like that turned on. If I am doing something where I don't want it to snap, yes I could go into the preferences, or I could temporarily turn off snapping completely by hitting the S key and turning that magnet off, and then I don't have to worry about that situation. So that's some of the snapping and some of the preference changes. Now while we're up here, I said there were a couple of other things that we looked at the wrench, okay. There's also the ability to add markers, and markers are really useful in many aspects of editing. We saw me use markers at the very beginning of the session when I put markers in the timeline, and I used them as a reference to cut my music to. And that's a very useful thing, and we did automate the sequence, but you can use markers for a lot of things, and you can put markers on your timeline, or you can put them within the body of a clip. So if I go over here, and I click on that, it puts a little marker here, and if I double click on that I can actually change the name of the marker. I can change the color of the marker. There's different types of markers, mostly I use comment markers, but if you are exporting something out to a DVD or even to a QuickTime movie, you can put markers in and they can be chapter stops. So if you're playing that movie in QuickTime, literally you'll have a little drop-down, you may have seen this in some movies that you've played for your YouTube or Vimeo, where they can jump immediately to different chapters, and that would be a chapter marker. And when you export it you say, keep an eye out for chapter markers. And you have other things where like if you're going out to Flash files you can do weblinks, hotlinks. But, for right now, we're going to use them as comment markers, they're just generic markers, so sometimes I don't even need to give them a name if I want to use them for something else. So I could click on that, but I am not all about moving my mouse back and forth. If I want to make a marker, I hit the M key, it makes a marker. If I hit the M key twice, it opens up the dialogue box, and I can write something in. So I can say, at this point, "can't look any better" "Modest comment." Okay, so I now have a marker here, and if I go to my markers list, I should be able to see my markers on my sequence. There we go, just had to catch up, there it is. Can't look any better, and I can find exactly where that marker is if I need to do things and change colors. So being able to use markers to write notes to yourself of things you want to change, very, very useful, and you can jump to different markers by simply clicking on them and finding them, so you have a whole marker list. Again, very useful, but I sometimes can use markers for other situations. Maybe at this point in my sequence, okay, I want something to happen as a matter of fact. Maybe I'm timing that at this right now, this beat of music, right there, I want to be able to have something happen on the clip. So I hit M with the clip selected, and you'll notice that marker is right there. Now I find all of this waveform and stuff a distraction. Luckily, I was paying attention to myself at the beginning. I'm going to turn off audio keyframes. I'm going to turn off waveforms. Look how clean that is, I don't need to worry about that. So I have a marker there, and right at that beat of music I want to make sure that a certain event happens, okay? I can go over here, I have this boat, a very short clip of the boat. I'm going to mute this. So I want the boat when it's... right there to line up, I put another marker, and all I have to do now is line up these two markers and my event is going to happen at the same time as the beat of music. Now that's pretty cool, but I did something horrible just now, didn't I? I just kind of screwed up my timeline. I want the event to happen at that moment, but I don't want to step on my other clips. Let's zoom in a second. By the way zooming in is simply the plus key and the minus key on your keyboard, and I'm going to bring this, let's go ahead and bring this full frame. So I'm going to undo that. I want this to line up with that, actually I want this to line up with that. Really, I just want to change the timing of the in and out point of that clip. What I really want to do, and let me see if I can zoom back out a little bit, is I'd love to take this clip, bring it up to this level, slide it over, let me bring my playhead there, snap this to the playhead, say "Okay that's perfect, it's happening at the right time." Is there enough media on this clip? I know, I'm probably getting myself in trouble. This is what happens when you don't pay attention to yourself, I don't think I have any extra media on that clip. No media on this clip, so you think I'd give up? Never give up; never surrender. I bet I can make this clip longer if I slowed it down a little bit, I'm going to cheat, I'm like, "Look at the shiny object here while I figure out a solution over here." And I get to teach you something else new. I want to change the duration of this clip, click on that. It's right now at normal speed. It's normal speed is six seconds long. Let's make it a 50 percent normal speed, see if that works, much longer clip. See if I have enough, nope, not long enough, yeah. I'm not giving up, I'll make it lower. It's a boat, nobody cares how fast or how slow it's going. Let's make it 30 percent, okay. We have a lot, so I would line it up, I would trim it down, I would trim it down, I would then drag it and bring it in, right? I just achieved my objective, cheating along the way, but you don't have to do it that way. I'm going to go ahead and undo that slide. I'm going to keep it slow, so I have enough media, but let's say that's there and it's actually inside. So I put my marker in, I have plenty of handles, and by the way, if you want to move something up and down, from one track to another, you don't have to drag it, okay? Oops, luckily I'm not a doctor, "Oh, I didn't mean to leave that scalpel there." If you hold the Option key and the up and down arrows, you can actually move any selected clip to a different track, so I'll move it back down. So what I really want to do here is I want this marker to line up with the, now well hidden, with the tool-tip marker that's down there. To do that I want to do something called a slip edit, okay? I want to slip the in and out points simultaneously for this clip. I want to technically do this. Let me zoom in here so we can see. By the way... how many people out there, and I can see you all over the planet, use the keyboard shortcut for the zoom? I see one person using a flipper, so we have the dolphin community watching, because you think it's really stupid you can just use the plus and minus keys, right? Okay, there is a reason to use it. If I want to zoom in to say just these three clips, I hit the Z key, I mean the zoom tool. I select those three clips, now I'm working specifically with that range. So there is a reason to want to use the keyboard shortcut Z or zed. The Canadians are going, "We don't have a Z key!" The Australians are going, "We know!" Okay, if you haven't noticed I am a little random. It could be worse, you could be my children who grew up with sarcasm from the age of zero. But I want to go ahead and I want to move this, though I'm going to double click and load this into my viewer, and technically what I want to do here is I want to move the in-out points so that this is kind of over here. I want to basically grab this and do what's called the slip edit, move the in and out points at the same time. And it's very easy to do a slip edit, as long as you have the middle when you load a clip from the timeline back in the viewer, but it's not really helping me line up my marker. I really want to do the slip edit inside of my sequence, and I can do that. I need to switch to the slip edit tool, and we have all of these tool tips. So some of them are hidden, and so if we hover over our tools, there's a regular tool, your selection tool, your default, the V, it looks like an arrow, but you'll notice that some of these, and let's really zoom in, have little arrows there, and that's an indication that if I click and hold there are additional tools underneath that I can choose. So there's trim-edit tools, we talked about this in some of the other classes, I might bring this in if we have time today. So I have ripple edit, roll edit and stretch edit, but I want to do a slip edit, and if I go down here, this is the slip tool, it's the Y key. And underneath that is the slide tool, but what I want to do is a slip edit in the timeline. So I hit the Y key or I select that, I go over to my timeline, make sure I have the Y key, that I really did select it. Sometimes I like just for grins to have that there so I have a nice target to hit. So slip tool, I want to get that over there. I simply click and drag, you'll see this is where it's good to have 17 fingers. As I do a slip, it's hard to see actually a little bit, but if you notice, ironically, the upper left and right is the end of the first clip, beginning of the last clip, and the bottom part is the beginning and end of the middle clip. They happen to all be based upon the same scene because I did that automate to sequence, but I can go ahead and I can start slipping this. And if you notice, there, my little... marker snapped right to where this other marker in my playhead was. So what I did, seemingly like an hour ago, by bringing something up, moving it over, trimming it, bringing it back down, you can simply do really quickly, and I'll do it in another instance. Oh, I sure do have a lot of that Shanghai footage. Okay, so let's say I want to do it here. How did I manage to lock my tracks? Probably held down that Shift key. Okay, so maybe I have the dancer here, V key, do it very quickly so... Not a lot of movement, okay. I want this point; it's not very dramatic. If I go hit the marker without a clip selected it just puts it on the sequence, I don't want that. I want the clip selected. So that's the point I want the action to happen. Here in my sequence I want... that's where the beat of music is. And probably I could see it if it wasn't so small, green on green, this is good. Sure there's a marker here, it says there's a marker there. Just can't see it, but let's imagine there is. Slip tool, Y key, let's go ahead and make sure this is snapped marker, there it is, and... bring that across, like this. It worked perfectly without a nut, so I'm going to do this again. Oh yeah, I just remembered, it worked for me last time because I just put entire chunks of clips in, and I had to extend that clip, so really you need some handles. So I apologize for that in my haste, but using markers to line things up, especially actions to music, if you want something to happen when a person is saying something very specific in a narration, you can put a marker in the narration, you put a marker on the action, and you just line up those markers. If you need to, you can do it with the slip edit tool, because I want to show you the slide just because it is in the family of slip. Slide tool, and I need to make sure, and if you notice it this is where it caught me, I put entire clips here in my timeline. If you see these little triangles that means you've used the whole end of that clip. I'm going to go ahead and do a little bit of a trim here. Okay, and let me do a little trim here so I just have some media to work with. Okay, so now I know there's plenty of room. So, a slip edit, remember Y, I can change what is happening. In this middle clip the duration of the three clips don't change, but what happens in the middle, the start and end point does. The slide tool, which is the U key, is very similar. Again, the duration of the three clips don't change, but maybe I want the action of the middle clip to happen earlier to later. Maybe it's a reaction shot of someone yawning or going, and I want it to happen earlier or later but I love the length. Hit the U key, I can move it to the left. This gets shorter; this gets longer. So I can move the position of the middle clip, the in and out points don't change, but when the event occurs it does. And if you look in the upper-right-hand corner you can see, on the bottom, that's the in and out points of the clip before and after, and then the clip that's not changing in the middle is on the top two.
Ratings and Reviews
carla valencia
great class! easy to follow and very good tips.
perrault095
A lot of new information on a color correction and color grading for me. Abba's shortcuts are very useful. This class will speed my workflow. Highly recommend this class. I am very thankful to Abba for answering all my questions!
Shafi Mushtaq
Learned so much in like 1 hour only even though I'm watching in 2022! Still worth it!