Lesson Info
56. Photo Critiques Images 68 through 84
Lessons
Day 1
1First 2 Years: The Truth
1:23:37 2Teaching 2 Photographers in 28 Days
1:10:45 3Rate Your Business
1:05:08 4Year One in Business
1:00:34Day 2
528 Challenges
1:21:39 6Fear
1:04:07Price & Value
1:10:17 8Checklist, Challenges, and Next Steps
26:35Day 3
9Day 1: The Natural Light Studio
38:09Day 4
10Day 2: Mapping Your Set and Outfits
1:54:32Day 5
11Day 3: One Composition - Five Poses
35:49Day 6
12Day 4: Flow Posing
49:31Day 7
13Day 5: Posing Couples
55:55Day 8
14Day 6: Capturing Beautiful Connection & Expression
40:47Day 9
15Day 7: The Rules - Chin, Shoulders, Hands
56:24Day 10
16First Weekly Q&A Session
1:00:15 17Day 8: Rules - Hourglass, Body Language, Asymmetry, Connection
28:39Day 11
18Day 9: Styling & Wardrobe
40:50Day 12
19Day 10: Shooting Curves
48:40Day 13
20Day 11: Posing & Shooting - Groups of 2, 3, and 4
28:46Day 14
21Day 12: Posing & Shooting Families
28:36Day 15
22Day 13: Products & Price List
56:53Day 16
23Day 14: Marketing & Shooting the Before & After
41:20Day 17
24Day 15: Phone Coaching & Scripting
52:56Day 18
25Second Weekly Q&A Session
1:02:21 26Day 16: Posing Young Teens
43:02Day 19
27Day 17: Marketing & Shooting - Family First Demographic
33:14Day 20
28Day 18: The Corporate Headshot
1:05:43Day 21
29Day 19: Glamour Shoot on Location & Shooting with Flare
53:56 30Photoshop Video: Glamour Shoot on Location & Shooting with Flare
11:06Day 22
31Day 20: Photoshop - Warping & the Two Minute Rule
1:22:22Day 23
32Day 21: Posing Mothers & Daughters
42:22Day 24
33Third Weekly Q&A Session
1:31:41 34Day 22: Marketing & Shooting - 50 & Fabulous Demographic
1:04:00Day 25
35Day 23: Shooting into the Backlight
58:22 36Bonus: Shooting into the Backlight
06:52Day 26
37Day 24: Marketing & Shooting - Girl Power Demographic (18-30s)
39:17 38Photoshop Video: Girl Power Demographic (18-30s)
1:07:21Day 27
39Day 25: The Beauty Shot
46:32 40Bonus: Vintage Backdrop
04:54Day 28
41Day 26: Marketing & Shooting - Independent Women Demographic
49:40Day 29
42Day 27: Sales & Production
54:30Day 30
43Day 28: Posing Men
52:19Day 31
44Bonus: Pricing
42:32 45Introduction
11:36 46Photography, Style, Brand, and Price Part 1
1:06:49 47Photography, Style, Brand, and Price Part 2
47:24 48Marketing Part 1
38:01 49Marketing Part 2
1:12:04 50Money: What's Blocking You?
49:15 51Bonus: The Folio Shoot
52:29Day 32
52Photo Critiques Images 1 through 10
23:11 53Photo Critiques Images 11 through 27
25:01 54Photo Critiques Images 28 through 45
30:19 55Photo Critiques Images 47 through 67
36:47 56Photo Critiques Images 68 through 84
23:22 57Photo Critiques Images 85 through 105
36:01 58Photo Critiques Images 106 through 130
34:49 59Photo Critiques Images 131 through 141
13:45 60Photo Critiques Images 142 through 167
25:27 61Photo Critiques Images 168 through 197
29:13 62Photo Critiques Images 198 through 216
25:51Day 33
63Identify Your Challenges
35:06 64Identify Your Strengths
22:16 65Getting Started Q&A
22:54 66Rate Your Business
31:29 67Marketing Vs Pricing
33:26 68Facing Fear
23:45 69The 28 Day Study Group
15:02 70Selling Points
40:35 71Interview with Susan Stripling
18:03 72Emotional Honesty
29:09Day 34
73Sue's Evolution
18:36 7428 Days Review
15:14 75Student Pitches
11:28 7628 Days Testimonial: Mapuana Reed
09:02 77How to Pitch: Starting a Conversation
37:28 78Your Block: Seeing is What You're Being
35:30 79Your Block: Valuing and Receiving
37:09 80Building Confidence: Your Own Stories
20:45 81Building Confidence: Your Self Worth
36:05 82Pitching An Experience
34:16 83Pitching An Experience: Your Intentions
18:15 84Pitching An Experience: Social Media
30:14 85Final Thoughts
24:35Lesson Info
Photo Critiques Images 68 through 84
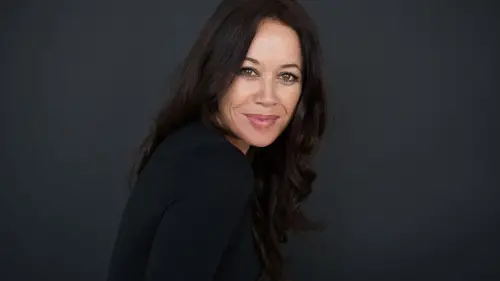
Can show the hands, hour glass, body language, connection. Again, this is what I call your classic cover girl. I prefer this shot a little bit asymmetrically. This is the only symmetrical pose I have in my posing manual. Good number there, number two. You're at the top of the head. You could have given me a little bit more at the top of the head to the belly button, or a little less to the boob line, but I like it. I like the hip that pops out. It's just a classic 101 for the folio. It works, and she's got a really good smile. Nice and sharp. So, well done. Just asymmetry, so, the holes under her elbows are almost exactly the same. I would like you just pull back to the top of the head and give me a little bit more on the left side, and that would have worked way better. Let's have a look. We've got, elbows are pulled back. I really like the outfit. The chin could have come forward just a little wee bit more. I like her connection to the eyes, but I'm not believing that mouth. So, in t...
he back light, her body is whiter than her face, so just watch that you're bringing out, you can either layer mask, or make sure you're using your recovery to drop the highlights, 'cause your body looks a lot whiter than her face. I like that you can still see her freckles, so you've kept it natural. It's a good hair and makeup, I just, it's an in-between expression for me. But then, sometimes some people just have that in-between expression that's neither incredibly smiling nor nothing. So it might just be classically her, but I'm not attracted to this image. So, even though it's ticking boxes, I wanna feel more connected to her, and I would feel more connected to her if her chin was down, and her eyes were more directly connected to me. But I like the outfit, and good elbows back. That works, 'cause you didn't pin your shoulders, so you've made your body look good. All right, so this is a classic, again, classic shot that I do a lot in my repertoire. It's a big seller for me. It's cropped too tight. I would like to see the girl on the far right hand side, I would like to see her chin more towards her shoulder, with her chin pushing out. And then she would have been engaged with the other three. These three are in perfect alignment, and then this one is not. I notice, interestingly enough, these two are closer to the reflector, so they've got no nose shadow, and this one's not. You could have lightened these two up in Photoshop just to even it out a little bit more. But this one, turn her all the way that way. Get them nice and square, and get them in. But you know what, at the end of the day every single one of these girls is connected to you as a photographer, and every single one of them are definitely in a group. And I can see, as mom and three daughters, this would be a priceless shot for them. So, the only girl that really falls out for me, is I could've actually Photoshopped that girl out on the right, and it would have looked like you'd posed this for three people. She looks inserted. Watch this arm connection, here. Bring her chin around, and you would have absolutely perfection nailed it. But, it's a good shot, and I bet you it sold because it's great to see a mom with her beautiful, grown up girls, and like I said, they'll own this for a lifetime. So, chin that way. All right, I love the shot because I love the styling. I like the hair. I like the makeup, but her chin is too far down. If you'd pulled that up, in fact, I really hope that you took the shot here, and then the hands are not so much unnecessary as... They're actually not too bad. They do look kind of small, though, which is kinda weird. They didn't have to be there. The shot would have worked without it. The collar was just enough. I hope you took the shot here, but I also hope you took it here, and here, and here, and here. I wanna see you experimenting more as photographers with one composition line, and then just adjusting that tilt. So it would have really been good if you'd taken the shot here, which is too low because she's looking up through her eyebrows. Whenever you see anybody looking up through the eyebrows their chin is too far down, and it looks like they're looking up, like this. So I would've taken the shot here, and then here, and then here, and then here, and then here, and just seeing the real difference in her body language coming up. But other than that, I am drawn to it, and it's very close. It's beautifully Photoshopped. It's beautifully exposed, and it's beautifully styled. It's just too forward and down. You know, this is a classic shot in my repertoire, and you've done really, really well. I would've connected the elbow to that knee. If you're gonna bring the knee up, have the elbow on it. You could've brought that knee right across, touching the top of that chair and it would've just worked. But in terms of that being a classic lifestyle portrait, or a classic business profile lifestyle portrait, you've absolutely nailed it. The hands on the neck, not the chin, well done. The other hand is ballet hands. You've got some working in the shoulder. I can just see this hint of a knee here, and if I'm gonna put that knee in, I'll bring it all the way in and across. That knee could have come right across and touched that chair, and you would have had a beautiful hourglass in the image. But this is really close and well done, really well executed. Okay, so we've seen a few cover girls, 'cause you know it's one of my go to poses. So there's two things I'll criticize in this image, and one of them is that she's leaning forward too far. So, this is obviously shot on the 35, or maybe a 24 105, or one of the wider angle lenses, because I can see a variation between her face angle and her body line. And it's just shot a little bit too high. Now this girl's not super lean, but she's not curvy either, so you could've shot her straighter, and even though she's leaning forward 'cause she's laughing, I feel like she was put in this position and then made to laugh. So, I just wanna make sure you're coming down lower on your angles, because this is a cute portrait. And again, the expression in it is real enough. I hope she bought it, because I can see the connection to it. But remember, there's a difference between this, a cover girl is about placing the hands and shaping the waist, but really what I'm doing is creating triangles on either side of my body, which give me a nice line. And then I'm working my body with those hands. So I'm using my hands, my hips, my chin, and pushing my booty back and I'm working the cover girl pose. I'm putting my hands up higher and in to make my waist look smaller, because if I have my hands down here, my waist looks smaller when it's up here and in here. That's what the cover girl is for. You've gotta be careful when people cover girl that they're not just doing gratuitous hands. This is not about just having your hands here going, "I want you to put your hands here, and then look comfortable." It's about going, "You're a cover girl. Work it like a cover girl. Work it." Okay, hands in, nice and tight. Keep it in. Keep them high. Keep them working, and keep them relevant. Don't just put those hands together, and just do this. It just doesn't work. It's kinda like you're going... It's wrong. I will say, though, really good light. Good background separation, good drop away, good focal point, just stand up, pull those hands back. We're at Slide 75, so if you're critiquing alongside me online, you're on glamourcritique.com and you're following me along. If you've just joined us, if you can't follow along because I'm going too fast, or you would rather watch what I'm saying then go back, I'm gonna leave the images up there to critique for the next seven days. Okay, this image here has throw in as yellow and green as the background. Beautiful girl, and it could have been a beautiful shot. I think it's failed in post-processing, and you've whitened the eyes too much. But here's the biggest faux pas of this image. This image does the one thing that you've gotta really watch. Jenn, come up. This is one thing that you've really gotta watch. If you stand in this direction here, Jenn, back this way. Okay, now she's got her front arm down, and she's got her back arm up. And what you can do, is you can see from the front you can see this arm and elbow popping out, and it makes her, in the photo look like she's bigger here, in the shoulders. So if she tucks her elbow back, and then gives me that beautiful hourglass there, then instantly I get the curve of her breasts, not the width of her arm. And the whole point is that we're showing the curve of her body, not the width of her body. Now, this is a very common posing fail for most people, and we feel like the back arm, you would be better having the back hand down, and then the front arm up, as long as you can see a triangle in the front. See how that makes her look slimmer? But if I had that here, like this, and you can't see that from that angle, then she looks wider again. So always creating triangles around the body, always, always shaping the hourglass. So the back arm is never forward, it's always back. Okay, but the body is open and 45, with this around the diamonds. Thanks, Jenn. So, can I just ask you a question about cropping? Sure. This is from LA Photo, who says, "I was always taught or told not to crop the fingers or at joints-- Who taught you and told you that? What a filthy lie. Can you just touch on cropping a little bit, since... You know what, I don't mind, okay, classic. Look at the next shot. Hands are cropped out. They need to be cropped out. Why would they be in there? You look at where the hands are, and where do you decide where to crop the hands out? You know there's an awkward moment where something looks like it's going out of frame and it's cropped off. So, if I was dancing, like this and you just cropped my hand off, you'd go, "Where's her hand?" But, if I was up close doing a magazine shot and you cropped my hands off, you wouldn't say, "Where are her hands?" It has to be relevant to the image, but if you're keeping it there because you think it's a rule, then you're not looking at the relevance of the hands in the image. And if there's relevance, if it's dancing and it's cut off it's gonna look weird. If it's fashion and it's cut off, it's not gonna look weird. So, tell me where the hands are relevant. Tell me what the body language of the image is, and why they should be in there. And if you think that they deserve to be in there, they should be in there. But if you don't see the need, like this image doesn't need hands. This is a beautifully executed image. It's beautifully styled. It's an incredible outfit. She's working her front shoulder. She's got her chin forward. She's got a tiny little smile in the eyes. It's sharp, it's connected, and it's beautifully executed. It's an outside shot, and I love it. I would take this to the next level on Photoshop and Alien Skin because I know that there's some filters that would just go on this shot that would just absolutely take this to the next level. But I do not need to see the hands. I wouldn't have liked to have seen more in this image, so I'm really happy with that. So let's go with that, that's great. Well done, well executed. Okay, another before and after. So, we've got chin, shoulder, hands, everything's working in this shot. This is a typical beauty shot for me. It is elbows back. She's at a crop number two. She's at the top of the head to the belly button. She could've given me a little bit more number two on the middle image. She could've given me top of the head to the belly button. But that's okay, it's just a little bit tight. And sometimes with the tighter images, when people go to buy them, a husband or boyfriend will say, "Why did you crop the head off?" So, it's really important that you're not over-cropping. But it's a beautiful image. I just feel like in the middle image her face is slightly turned off the center a little bit, so she's gone to here. I would rather see her directly straight to the camera. Or she's down in the number two position, has done a full rotation, and look back over her shoulder. You can see her breast line. You can see more back than breast, so she could have brought her elbow back. But you know this is standard buy, everybody buys this stuff. This is what people come here for. I would be really pleased if my photographers were producing this level of work. It's a beautiful portrait. She's connected. She looks gorgeous, and it's really nice hair and makeup. Okay, we've got two fails here. One of them is it's shot too high. Two is, that background has gotta go. So, this has not been photographed well enough with reflectors, because we've got too much of a big highlight at the back, and not enough light to her face. When the background casts a shadow forward, you have got way too much light behind you and not enough light in front of you. The only way you can bring light in front of you is to fill it with flash, or bounce it back with a reflector like I do in 28 Days. On 28 Days there is an entire section on not only natural light shooting to the background, but removing that background. So, you should have watched that video and removed this background. So put your hand out, you're gonna get a knuckle rap, because that's a direct miss of a video that I've worked on for you that you should've nailed this background. So, I want to see more reflected light going back to your client. Diffuse the light. If you have to double filter that curtain to stop the amount of light going back to her, then that's fine, but make sure you're double filtering. All right, chin, shoulder, hands, hourglass, body language, connection. How perfect would this image been if I had removed this here? Okay, how perfect would this image have been if I had taken this arm away? Because again, this here is a beautiful body language, and this here works for me, but this here doesn't. Okay, it's kind of like, I'm touching my breast. I'm feeling the wall. I'm touching my breast, and I'm feeling the wall, and both of them feel nice. All right, what are we touching here, people? What are we touching? 'Cause whatever we touch, we look at. So if we touch the wall, we touch it low and lean on it. We don't touch a wall like this, unless we're leaning on it, using our elbow, or just have our hand touching a doorframe. Why else would we touch it? We would never stand up, touch a wall, and then look back over our shoulder. Okay, so body language is paramount. This image was beautifully executed, but it's beautifully executed with an orange arm poking out the back. Okay, so if you Photoshop that out for me I would like this image more. I would like to see a little bit more smile in her mouth, but in terms of styling you've nailed it. Background is beautiful. The chin is forward. Her face looks pretty. The dress is red. It's gorgeous. And don't hold the whole boob from the front. If you're going to touch the breast, remember we don't flirt and touch our breast. If you're gonna hold the breast, pull the arm away and just touch here so there's some space between the boob and the hand, looks better. But other than that, you're so close. So close on that one. All right, chin, shoulder, hands. Really common when people put their elbow up to fall into their neck and lose their neck. She needs to come up and extend through her neck. So, this is where I look at my client and I say, "Lift up, tall. Lift up nice and tall, Margaret. Lift up nice and tall, long neck, chin forward." Then you can connect the front shoulder. Her shoulder is working. Everything is working in this image. Okay, I don't know why you cropped this arm out, 'cause if you'd given me more space around here you would've nailed it. Okay, I wanna see this space back in, and I wanna see her lifting up, tall. So, you remember the rule for lift up, tall, right? So, both of you come in here for a second. When people sit down in front of you, no matter how they sit down, so Jenn, you go onto your knees and put your elbows on there, and just relax in a comfy position. Nikki you sit to the side with your elbow on there. And both of you sit in a fully comfortable position, like how you would, no, hands forward, but just how you would talk to me. Okay, everyone does the same thing. We all go into this comfortable position, neck position, slouchy position. This is where, as a photographer you turn to your client and you go like this. Lift up nice and tall, Nikki. Lift up nice and tall, Jenn. Okay, relax back down to where you were. Lift up nice and tall. Lift up nice and tall. Okay, it's like a puppet. We take that and we say lift up nice and tall. Lift up nice and tall, and we do this. We say lift up nice and tall, chin forward and down, stop. And that is when you get people to work up through their body. This woman here is in a fully relaxed recline with no neck. Okay, so it's lifting up nice and tall. So, it's a pinch. Now I will walk up to a client, pinch the back of her hair and lift them up, like this if they don't get it. And then the second time I do it, they never do it again. I never have to do it twice. Thanks, ladies. Okay, everything about this image works for me, in the sense that the hand works, it's got a true smile, there's a gap between her back and her arm, so we've got triangles around the body. When there's triangles around the body, body looks more flattering. The chin is forward. Shoulder is connected. We've got a good smile, nice and sharp. But it's just very boringly retouched. To me, that is just like a catalog shot. I wanna see you fashion this up a bit. The crop is kinda square. It's not quite horizontal. You haven't committed to a horizontal, and you haven't committed to a vertical. I would have taken this shot up to a horizontal, cropped the top of her head off, done a splice and then given it a little bit of a filter. This is good, standard imagery, but I want more than good, standard imagery. I want, wow! I wanna look at these images and go, aww, that' so amazing. I wanna do that. So take it further. But in terms of connection, everything, this works for me. Yeah, this is, as a photographer that's been shooting for 25 years, and if one of my girls produced this, I'm like, this is good, standard portraiture. This is the sort of photographer that I'm like, you're belting out this on an every day, you're gonna do well, but it's not a wow portrait for me. I wanna see more connection. I wanna see, just something, a better crop, or I would love to see this worked a little bit more. Question from ACM83 with regards to cropping. The question is, "Can Sue talk about when shooting her style does she like tall or wide shots, portrait versus landscape? I see people shooting images that would look good as a portrait, and they shoot it wide." So, what is your take on that? Have you noticed, ever since I started shooting video and incorporating video and marketing with video into my brand, that I've started shooting everything horizontally? And now I really, really struggle to shoot anything vertically, although all of the cover girl shots, all of the one, two, three, four fives are all vertical. So, I think it's really important that we are mixing it up. You know, I just go with the feel of it. I tend to go horizontal on anything lying down, anything lying or sitting with reclining, and anything that's close with elbows back, or shoulder forward, or look back to me as definitely a horizontal image. Anything else is vertical, but I just move with it. Yeah, sometimes I see people make that mistake, but I think, I don't know whether it's the eye, or experience, but ever since I've started shooting video, everything I'm shooting now is horizontal. Remember, the portrait photographer and the wedding photographer is the only person that turns their camera vertical. Fashion photographer doesn't. Most of them are shooting on a square format, or a large format. Medium format's always been square. So I learned to shoot and compose a square image, and then crop it afterwards with using masking, not using cropping and camera. So, it's only since we went 35 mil digital that we all started to turn our camera vertically. When you watch TV, you watch horizontal TV. You watch a vertical story in a horizontal frame. So our eyes are used to watching a horizontal version of life, and we see horizontally. So, it is natural to shoot horizontally, but you've gotta know where to crop an image horizontally. And I'm a big camera cropper, because I believe you get a different image if you crop in-camera than if you try and crop it afterwards. All right, this image here, I could have done without the hands around her body. If you're not gonna show them, drop them down. You went to the effort to pull her elbow back, which gives you more boob than back, which works for me, but the hands could've come down. The red works. The makeup works. Far too much mascara, but sometimes you just get clients that wear too much mascara, and they love it like that. So if that was her choice, that's okay. If that was your makeup artist, I would've booted her for that. I'm definitely seeing tan lines. Don't wanna see tan lines. You could have warmed her up, tanned her up. You know, Totally Rad! Actions have some really good cinnamon filters, which you can drop in and erase back a mask layer, which gets rid of tan lines that I've always used. But there's lots of ways to do an orange masking. Again, that's something I was shown more of on Photoshop. A little bit too much blush, and you're still looking down on this client. Her arm is still pressed against her body. I want you to be very aware of arms pressed against the body. They need to be pulled away. Elbows need to be pulled away. When we press our upper arms against our body, we get, I call it leg of ham. The arm pops out like a leg of ham. It looks fatter than it is. Women do not buy images when their arms look fat. Okay, so bringing that elbow forward, you would have nailed it. Overall, expression-wise, totally nailed it. Sharpness, exposure, excellent. Just a little bit more lower, dropping those hands down out of that shot would be good. All right, so, chin, shoulder, hands... I feel like everything's working in this shot. The shoulder's working forward. The chin's working to the shoulder. The eyes are working to the camera. The expression is working. She's even got a bit of shape in her hip. It's really muddy. It's really insipid in its editing. So, if you'd given me a little bit more contrast in this black and white I would've really loved it. It's the editing that's really dropping this shot down. I would've loved to have seen it in color. But other than that, the essence of that is perfect. It's really good to see a lean body with the elbow back. And we've got a good shape in the waist, so everything there is working for me. Just pull back a little bit, not too cropped at the top of the head. Because you've cropped to the belly button, which means you're shooting at number two, or number three, actually, and we wanna pull right back to number three. We wanna give a little bit more to the top of the head, so that your client's not saying, "Why is this overcropped?" All right, so from here... We're not sharp, for starters. And we look like we've tried to save this image by sharpening it. I know what you saw when you were trying to save this image, because it's definitely got a mood and a movement to it, but you unfortunately have pushed it a little bit too far. So, I need to make sure that you're not, that you're shooting a little bit lower. You're still shooting down, because you're shooting down on that chin line and down on that shoulder line. And a little bit more connection from the chin to the shoulder. But the only thing I can really complain about in this shot, is you've pushed it a little bit too far because I can see how high the grain is. So you're either shooting at a really high ISO, or you shot this underexposed and tried to save it in Photoshop. And it's got great connection. It's got great connection, and it may have even been an image that sold, but it does have some fundamental errors. But you know, this is a cute shot. At the end of the day, her expression wins over everything, and I really, really like it. So, question from Paige Hugs These, who's asking if you could please elaborate on filters, and if that's the way you bring a shot from good to wow. Is it using filters, or... Could you clarify? Really I'm doing my post-editing on Alien Skin. My post-editing on Alien Skin is just putting that color strand through the image that doesn't look like a normal photo. I'm always trying to, even if it's at 20% or 30% I'm trying to add a color filter in some way that takes it toward the mood of an image, that takes it away from being a real image.
Class Materials
bonus material
Ratings and Reviews
a Creativelive Student
I have purchased four of Sue's courses and love them all. I have learned so much. I found the lesson on connecting with people thru their eyes has made a huge difference in my photos already. Her before and after's made me cry. I want to be able to take these kinds of photos for my family and friends. I just love what she does. She is such a great teacher. I learn much better seeing things done, so this was the perfect choice for me to learn. I love Sue's humor, her honesty, her detailed teaching and sweet and wonderful personality. Her sessions will or should not disappoint anyone. It is the best money I have ever spent on self-help teaching. Thanks a million creative live. You GOTTA LOVE SUE!
katie
Pure gold. Sue Bryce is likable, talented, funny, and an amazing teacher. She calls you on your BS (your excuses for why you aren't succeeding), gives you business, posing, marketing, pricing and LIFE advice. The class is 58 hours long - and you spend the majority of it looking right over her shoulder, through her lens and watch her walk through many, many photoshoots. She verbally and clearly repeats several critical formulas for success so it's imprinted in your mind. Her advice is crystal clear and your photography will dramatically improve after this class. Before Creative Live, you'd NEVER have had the opportunity to shadow a photographer of her quality... hands down the best photography class I've ever taken.
JRomkee
I have just began this course and I am excited to see how following her model will help me to improve and get my business started. I have been through the first two days and there is lots of information to absorb and things to get in order before I begin the actual challenges. I am thankful that there are photographers out there who are will to reveal there secrets ad are truly invested in others improving themselves in all aspects of their life and not just their photography skills. Thanks Sue Bryce for your passion for empowering woman and your knowledge of creating and sustaining a business by being true to who you and commitment to the improvement of others! I am excited to grow myself and my business, I am confident this will be worth every penny! Were the templates for the email PDF included in this course
Student Work
Related Classes
Glamour & Beauty