Lessons
Lesson Info
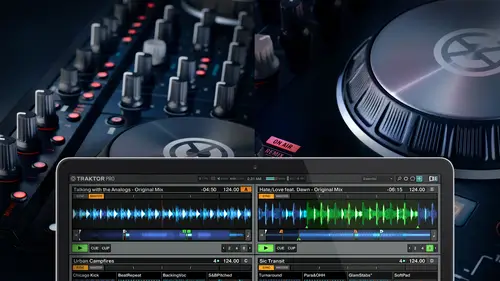
Kontrol X1 and Z1 Overview
Hello and welcome to the second course of three here a creative live tractor pro controller and mapping my name is nick trick, a kiss on the lead product specialists at native instruments I'm also an artist that goes by the moniker new trick and the first course of three we went over tractor pros software essentials, so it was me with the mouse going over everything that you're seeing on the screen in front of you, but the most efficient way of using any native instruments piece of software is with the hardware controller and tractor has plenty of them. So what I'm going to go over in this course is a very specific control earthy control x one will go into detail of this, but we're also going toe kind of review the different types of controllers that tractor has. There are two main controller types for tractor pro we have the modular set up, which is what you see in front of you, the control x one, the controls, the one and the control f one and then we also have all in one solutions l...
ike the s two and the s four, which I don't have with me, but what I do have with me is the brand new flagship of tractor, the control essay we won't get into too much detail of this, but I will give you a brief overview once I've went over the control x one and some of the mapping and I'll show you a quick routine as well, but I wanted to have it here because this beast of a controller here has control over just about everything that tractor does, which is saying a lot to the fact that we were able to cram in every single control within tractor on a unified all in one piece of hardware really speaks to the design team that we have a native instruments and gives any d j right out of the box and all in one solution and an extremely powerful tool in order to create very dynamic deejay sets, so let's start by going over the tractor control x one z one, and in the third course I'm actually going to get into extreme detail on the control f one so this is just pretty lights for now, let's look at these two guys, so ah lot of what I did in the previous course was go over the software and we did a mouse and we kind of went over everything that you can do with the tractor pro software. Now we want to see how those different sections correspond to what I have here in front of me, and I'm going to start with the mixer looks like this. So the first part we went over it was the mixer, which is what you're seeing right here and in front of you how do we control the mixer with a piece of modular hardware? Well, I have here the controls the one the controls he won will plug in act is a audio interface for tractor it also works with an ipad or an iphone so you can plug this in and runoff tractor deejay, which is a ios app that we built and let's go over the signal flow right? So the signals and start with the deck, which is the x one here and then flow into the gay knob so I have auto gain enabled, but I'm gonna turn this off for a second and you got to see when I turn the game knob on the controller, the game will move in the software itself. So let me they find a track here and we'll load up a track that I had already and the previous tutorial and I could have done that with hardware. I'll show you that in a second, but we're going over the mixer right now, so all right, so if I hit play on this track, I can adjust the gain and then I thought I was describing I can just cut the fader, bring it up about the fate of thes signal, then flows into the theo most common move you'll see someone doing on the is cutting the base and then bringing it back in it's a fairly simple technique but when used effectively it really helps guide the crowd and when the dance and when not to dance and then we have our filter press the on button to activate the filter we have our low pass filter are high pass filter you can also call it a low and high cut for you audio geeks out there I think the main difference between a low pass in the high pass is the decibels proactive that's gonna be cut uh that's a myth I'm not really sure if it's actually true but evidently a high cut has a steeper cuts ratio then a high pass anyway next we have our volume fader what I like doing with the builders actually setting this up so my perfect base cut ratio so wait so it can actually turn it on and turn it off so that's the kill so if I really just want to set it up I have my filters that right here I pressed the filter on and that's the basic kill it's a little bit easier than twisting down based off and bring it back in and I can actually find tune which frequency that I'm cutting out a lot more effect simply by using that cut and then on the bottom we have our cross fader which I need to set up here so you go to a c and b indeed that's a pretty good prospect remember I mentioned in the first tutorial that we have a cross feed amount going to that real quick I'm gonna load up my preferences, go to mixer and then down here and cross fade I have smooth and sharp let me just give you an example of how this works so now I have it set the sharp so as soon as I moved this just a fraction of the inch it's gonna be at full volume all right? Or if it's on smooth which I'm gonna leave it up as I crossed fate is going to be a very smooth transition in the middle section I have my cue so if I want to listen to what's happening on deck b in my headphones I press q b going listen to have what some say I have something playing in dec b and I want to listen to what's happening in take a hit a I have my cue mix which will mix what's happening live versus was happening my headphones mikew volume and that just about sums it up before the z one very, very simple but also a key part of controlling tractor and it's all hands on none of this mouse business the main benefit of using a piece of hardware I'd like to compare it to typing or let's say playstation, we've all played video games we've all created a player in fifa are or madden and so we've had to type our name imagine if you had a complex greek last name me it takes forever to type that I have to go to tea and then click over to our aaa and it's just a pain in the butt when if I had a keyboard I hear I could just see a tear I k k s and I've typed my last name in a matter of seconds it's the same thing with hardware all right? We don't want to have to click a mouse in order to do a command we have a piece of hardware that we can control, so cutting the base and adding filters and these type of things could be done very easily with a piece of hardware ah versus using um the mouse next I want to go over the tractor control x one which is a two deck controller that fits within the modular set up. Now you're going to see these used a lot more for house and techno guys in europe but also scratched battle djs will use this if it's really well into any d j set up but especially those who are using, say, cpj's or turntables and want to effectively use tractors effects q points and have a piece of hardware that you can browse so first let's get into reviewing the effects so this takes up the largest footprint of the controller so I want to make sure that I explain exactly what it is and how you can control it so we have four effects knobs here on each steck and we also have four effects buttons these are going to control the different parameters the knobs and these are gonna either activate effects or activate specific parameters for the effects so how do I control it in the hardware? Well just like a hat in course one on the left hand side I have effects unit one which is a group effect and effects unit two is a single effect so first you can see that I can adjust the dry wet with this knob I can adjust the parameters of each effect with the knobs below so this is my river this is my delay this my gator I can turn on the effects with the button they light up so what if I want to change the effects missile downshift and then I can hit mode and this is going to change the mode which would be group versus single let's stick with group for now say I want you to change the effect there's two ways you can do it one is to hold down shift and then turn the corresponding effect knob and that's going to go through my entire list that I have and this is when it becomes a very useful to go into your preferences and limit the effects that you don't have because when you're scrolling through effects, you don't want all of them, especially the ones that you don't use, so I know just because I said it out myself that my reverb is theis second effect in says this is a cool trick here hold on shift, turn all the way to the left and then with the button and I can actually scroll through one by one so river bs the second button in our second affected one two there's my river I know my delay is the first one, so twist all the way to the left tap once I'm on delay, right? So you can memorize the order of your effects and efficiently and quickly load up the effect that you want and when you're in a club and you're in the middle of it, you want, you know that your effects aren't set out the way they want to. This is something that is extremely helpful. I can't even begin to tell you how many times this is ah come in and several of the djs that I trained a native instruments used this process so it's something that is kind of universally used amongst pros so that's how you select a different effect on a group on a single effect because shift and then this mode this top effects toggles between the different types of effect I can't scroll through one by one but what I can do is scroll through with the encoder so shift in the top encoder is going to scroll through different effects so I want tape delay so the whole twist to the left tap through doesn't apply in this scenario another reason why it's really good to kind of limit the amount of effects that you have and that does it for the impact section so on top I should first say that the x one split into two sections deck a deck b both sides are identical on top I have my fixed section where I can control tractors effects select tractors effects and switched the type of effect that tractor is using in the middle section I have my master effects on and off both sides have a loop any browse encoder I have a touch sensitive browse knob so all I have to do is simply put my finger on this knob and on my laptop the browser will open up big this if you have a big computer like an imac, it doesn't really help too much right because you're happened browser already displayed but if you have four decks and you're on say, a mac book air this is extremely helpful to just be able to touch the knob and have your browser come up tow load a track into deck a I'm gonna hit this left arrow their loads if I want to go to tracking the deck b I simply pressed the right arrow. I can also turn on snap in kwon ties and I didn't go over snapping kwan ties in the first tutorial, but I will now if I hold on shift, which is my modifier button the same way the shift key on your keyboard modifies whether you're typing a lower case or a capital letter, the shift key here will give a number of police functions a second purpose, so I hold downshift look at my screen here I'm going turn on snap! And what snap will do is if I'm creating a q point it's going to put that key point directly on the b grid. So it's in a snap to the secret quantifies, is going to kwan ties my q points whenever I prosecute point too, the nearest beat, so whatever beat that I'm on it's going to qantas eyes to that so I can turn it on by holding out shift it hitting the left arrow snapped the same views I'm gonna leave both of these on right now, so groups I just activated many mode, which we'll get into very shortly on the left hand side, I have my loop encoder so before what I was doing was clicking with the mouse, choosing my lips, eyes, this is simply not effective on the display. I have my mount of beats sew up the thirty two beats down c one thirty second to the beat and I'm going to go ahead and play this track activated luke I simply press display will blink and to make the leap smaller I simply turn to the left. You can already see how that could be a lot of fun. You can also be jump with this so if I wanted to be jump around song we go back to my original key point. I'd like to be jump in thirty two beat increments it's, you can be job in any increment you want, but I think for what I used to be jump for it makes most sense to do that. Wait, hold on ship way, let me turn on think that's why I was a little bit off beat when I would be jumping, so see, I'm jumping throughout the track all have to do is hold on shift and twist this knob and then I'm be jumping throughout my song, very convenient, a lot of fun, very easy to do, I can also do loop moves as well, so we went over this in the software as well when we're on the move, right? It was this section right there, right, loop. And we could change the position of wherever my loop is. So we can do that on the x one simply by. All right. So very easy. Way to create a loop, move and that's by first activating a loop and then holding on shift and then twisting the leaping coder. And this works for the right decade. Swell.
Ratings and Reviews
Student Work
Related Classes
Electronic Music Production