Lessons
Class Introduction
02:36 2Lens Choice for Macro Photography
06:14 3How to Use Extension Tubes
06:06 4Inexpensive Macro Tools
08:01 5Camera Settings
04:16 6Camera Support
07:05 7Shutter Releases
03:29 8Lighting
06:52Lesson Info
Focus Stacking
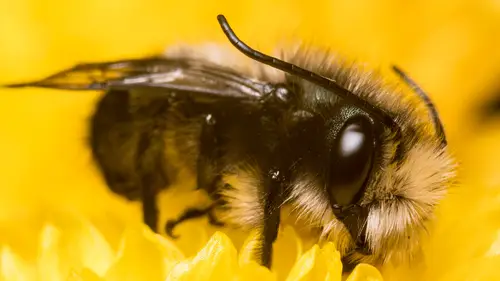
Focus stacking allows us to shoot at a narrow depth of field, but stack up a bunch of images together so that, once you've stacked them and merged them in Photoshop, that whole object is in focus, but the background's still blurry. It's a really neat technique, and I would recommend that you all try focus stacking. Let me show you a couple of other images that illustrate this point. Oh, what the heck, let's just show some macro shots. Here's an animal. This was in the Galapagos, one of my favorite places to travel to. Actually, that was in Guayaquil, Ecuador, and this is an iguana, using my macro techniques to focus on the eye. You can see my head in his eye. It's always fun to get yourself in the photo of a lizard. This is in Africa. This is a baobab tree flower. Took this with my 200 to 400 millimeter lens. Interesting, doing macro work with a 200 to 400 millimeter. This is one of those big honkin' lenses. That's the photo for this course. This is a bee. I took that in my office. I h...
ad bees coming in through my window, and this bee was flying around my office. I whacked it, kind of knocked it out a little bit, put it on a flower, and took some pictures. (students laugh) Don't tell PETA, please. But what's good about this photo? Well, the good thing is, is that I've got its eye in focus, and most of its antennae in focus. I think that's all great. You notice that the rest of the body, though, is out of focus. I think that's okay. It's okay as long as you get the eye in focus, but look at that catch light. That's one of the things that we're always looking for in our macrophotography as much as we are looking for it in our portrait photography, looking for nice, beautiful light. Well, how did I achieve that? I achieved that by having a relatively large light source close to the subject. Well, this subject is smaller than my pinky nail, so that relatively large light source doesn't have to be that big. It really only needs to be a few inches large, but you just have to get it nice and close to that bee. Okay. Little, I don't even know, is that a fruit fly? I guess. I'm not an entomologist, but that was in my back yard, and that's concrete behind it, with a little bit of help for color. (laughs) There's another one. Again, beautiful detail. This photo, I shot with my PVC tube that I just showed you. I shot this for my book with my PVC tube. Does great work, and this one, actually handheld, but I was using strobes. I was using two little Nikon strobes with nice, big, soft boxes. Let me show you what those soft boxes were. These. These are turkey meat containers from the grocery store, and I just cut out the back so I could stick my flash in there, and then on the front, I literally used paper. This is printing paper. I just taped printing paper on the front, and I made this little metal mount that mounts to the bottom of my camera system, and took my flash photos that way. Super inexpensive, fantastic beauty lighting. Turkey meat, who knew? Turkey meat, it's what's for macro. (students laugh) Sorry. (laughs) And then the last thing that I want to show before I really get into this focus stacking thing is, I just want to show you the difference between ... Let's see, what is that one? Oops. I for information, there we go. This was the Nikon 105 f2.8. I took that at f5.6, okay? So I think this is called a shooting star. These little shooting stars are blooming right now in my garden. Actually, two days ago, I photographed this, and then I've got other shooting stars behind it. So you can see f5.6, that's the depth of field. Even the stem on this flower is blurry and soft at f5.6. Here's the same exact composition, no change, but this is at f40, f40. At f40, the background starts to come into focus, and you may like that, or you may not like that. I actually kind of like this photo better. I like the aesthetics of it because the background's blurry, but what's frustrating is, this pedal is blurry, and the stem of the flower's blurry, so what I'm gonna show you now is how to do focus stacking in a way that gets just the flower and the stem in focus, but the background stays blurry, and that'll show you, now, this series of images. So this image is the result. In fact, I'm just gonna go full frame to get all the clutter out so you can see what we've got here. I changed composition a little bit from the previous shot. You can see that. What we have is, the flower and the stem are in focus, but the background is nice and blurry. Do you see the aesthetic difference between this shot and the other one that I shot at f40? So let's go look at what my aperture was for this image, for this series of images, here we go. f9, so at f9 and 105 millimeters, I got the look that I was after. Now, check this out, as I go, let me just push right arrow on my computer. You're gonna see how the focus shifts from the front of the flower, then to the middle of the flower, to the stem. I shot this series of images like this. Dun, dun, dun. Whoops, wrong, that's not it. There's the last shot, and in the last shot, you see the stem is in focus. Now I'm gonna go the other way, towards the front. Bup, bup, bup, bup, bup, bup. Towards the front. Cool. So what I did, the actual process I used was something called focus stacking, and in my camera, the new Nikon camera, it's called the D850, it has a method built in the software that will take the lens, it'll focus down a length automatically. It'll take a picture, change the lens focus ever so slightly, take another picture, change the lens focus, next picture, next picture, next picture. So I'm gonna show you how to do that real quick, and then I'm gonna show you another inexpensive way that you can do the same thing if your camera doesn't even have that software. Let me set up my tripod over here. Okay, I'll get my D850 out, and I'll show that to the camera, to the studio camera. D850, put that on here, and I think, as time goes on, over the next few months and years, I think a lot of other camera manufacturers are going to do the same thing. For this one, let's use the 60 millimeter macro. What I'm going to is a menu called the shooting menu, and in the shooting menu, there's a segment called focus shift shooting. It's very cool. I'm gonna go into that segment, and I start out with the number of shots that I want to take. This is experimental. You're probably gonna have to do this quite a few times to get the right secret sauce. You can take anywhere from one shot to 999 shots. For this example, I'm just gonna do 10 photos, just to give you the idea of how this works, so I'm gonna take 10 photos. Next is focus step width. What this is is basically how much focus change should happen between each picture. I wish Nikon had some better way than from one to 10 'cause that doesn't really mean anything, so again, it's like trial and error. For the photo that I just showed you of that shooting star flower, this was the setting I used. I guess that's, what, a four or a five, something like that. There's five units of focus per picture. How much time, in the interval, until the next shot. In this case, I don't want any time to pass. I just want it to shoot through the whole image sequence, so I put zero seconds. Then exposure smoothing, what this is, is maybe you are shooting an aperture priority, and the flower's moving a little bit, and it's gonna use a slightly faster shutter speed when the flower's over there, and a slightly slower shutter speed when it's over there, so this will help smooth the exposures to prevent any brightness changes, so keep that on. Silent photography, Nikon now has this new thing, it'll take pictures with the mirror locked up so you don't have to listen to the clunk, clunk, clunk, but for the purpose of the class, I like you to hear the clunk, plus the clunk just feels good. Then you can put it into its own little folder. All right, all that to say, we're ready to take a picture. Here's how it would work, is, I would normally focus it on my ... Let's pick a little different flower. Pick this one, I'm gonna break the steam, there we go. All right, I'm gonna get in nice and close, right there. That's too close. Okay, I'll lock that into place. Bingo, cool. So now, I'm gonna focus on the front part of the flower manually. See, I focus on the front part of the flower, and then, when I hit go, go back to my menu, focus shift shooting, and I hit start ... (camera clicks) 10, 10 shots, cool. Now, when I go back and hit play, and I scroll through those images, it's gonna be hard to see on the house camera, but what I find is that I didn't have either enough shots, or I didn't move the focus distance enough for those 10 images to get front to back, but you get the idea, right, the concept? Now, let me go back to my computer and Lightroom, and pretend that we've downloaded that information into Lightroom. Here we go into Lightroom, and remember those images, here we go, there's the first image, and then the next, and the next, and the next, and it's real subtle, but you can see now, the stem is in focus on that last shot. So I've got those images, and now, what I want to do is, I want to bring them into Photoshop and use this stacking technique in Photoshop to get the front to back in focus. Clicking those photos, does the aperture remain the same, or does it, 'cause the depth of field is getting affected, so shouldn't the aperture also change accordingly? Or does it not change? Yeah, in this case, the aperture stays the same. Each of those shots were at f9, and so, even though ... I think, maybe, what you're asking is, some macro lenses, when you change the focus distance, the aperture actually changes. A 105 millimeter f2.8, when it's focused at infinity, it is actually f2.8, but when you come in nice and close, it actually changes to an f4 lens. In this case, 'cause you're at f9, which is smaller than the maximum aperture, it stays at f9 the whole way.
Class Materials
Bonus Materials with Purchase
Bonus Materials with RSVP
Ratings and Reviews
Audrey Reed
This is probably the 30th class I purchased, and the first I watched in full. I like the instructor. He is funny, engaging and obviously knowledgeable. I don't shoot marco and was expecting and introduction, and that is what I got. Lots of good info on gear and techniques. I am excited to try some of his ideas!
Linda
I learned a great deal. Taking photos and attending classes prior to this class. He showed examples of both bugs and flowers. Yes, he did use a Nikon camera but it is unrealistic for him to show all the examples that he did with several different brands of cameras! I have a Canon 5DM4. It doesn't have focus stacking yet. But I did learn that they applied for a patent. So it is coming. If you are doing studio work, the focus stacking is built into the Canon software that comes with the camera. For lighting I have the Canon macro flash that fits around the lens. I have the 100mm and 180mm macro lens. Just received Canon's two extension tubes today. They did work with the autofocus and camera settings. I thought his style was approachable. My macro work is all about flowers. His flower examples were on point. All in all, it was a solid class presented by someone who enjoys his work! PS The iguana's eye photo was stunning!