Lessons
Lesson Info
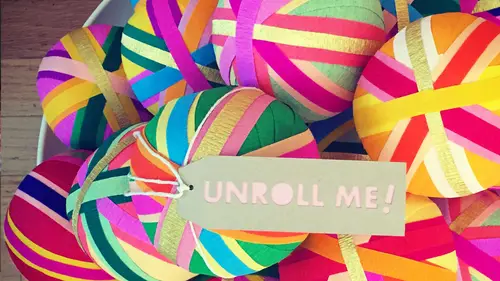
Decorating the Exterior
So now that you've completed the contents of your surprise ball, what we want to do is spend some time decorating the exterior, and I want to show you first how to give it a very simple but fun exterior decoration. And then in the next segment, we'll delve a little bit more into small ornamental exteriors, so we're going to be dealing with a little bit of a nicer grade of crepe paper for this next step. The crepe paper streamers from the party store were great for wrapping oliver contents together, but for the exterior, we want a little bit of a higher quality and what I tend to gravitate towards are these really great folds of crepe paper? I have some online resource is available in the materials list for this course that shows you where you can purchase these. This is a german do blake crepe paper, which basically is two different crate papers that have been fused together and the way that they come together is pretty fantastic cause it's slightly different shade on either side. Now,...
for most of these, you're only going to be seeing one side of it when you're wrapping it around, but one of the things I love is the really vibrant shades that are available. In the folds of crepe paper and when you unroll it, it's, you know, having that bright pop of color on the other side, I think is a really nice detail. Some of the differences are a little bit more subtle, and some of them are a little bit more dramatic that they make for great decoration and because it is a little bit higher quality, you get a different stretch to it. There's definitely a different feel and how we're going to start this is by cutting some of our colors down into strips and one method, uh, that works perfectly fine. I'm working with a little bit of a on a work surface that scott measurement guides on it, and I want a strip that's about an inch and a half, so I'm lining up one end of my crepe paper fold along one of the lines I'm measuring over an inch and a half on either side, doing sort of a line roughly these don't have to be perfect cuts, and I'm taking a really sharp pair of scissors and cutting along that line. Now this works perfectly fine, but I have to tell you, because so many of the projects that I make do involve paper I have found. The guillotine cutter to be a really great tool now this isn't old school one that I purchased from a swap meet it was probably came out of an old school you confined contemporary ones and crafting stores and the thing that is so nice about them is they're incredibly strong and they do a really nice clean line so for this for example, I'm going to push it through about an inch and a half there is if you can see there's a little bit of a guide rail here so I'm not going to cut my fingers off you do need to exercise a certain amount of caution when working with ease you just go through and it creates a nice even cut I'm going to do that one more time and four I'm gonna go to another inch and a half and I'm gonna do it one more time. All right? You always want to leave the guillotine cutter with the arm down for safety and I should say that this's really an adults only tool if you're working with kids, police just stick to the scissors or the adult should do the cutting for them. But what have ended up here with our from the folds of the crepe paper I've cut two strips that are an inch and a half wide, which is a pretty great with for this sort of softball size that we've created and essentially, what we're going to do is we're going to wrap it tightly around of this prize about to get a nice, even layer this is one that I've already wrapped, so let's, go ahead and do that. Now this is on the interior, we didn't really use any adhesives except for that last piece where I take it down just to secure it for this, I'm going to be using some tacky glue. This is really one of my favorites, and I love this new configuration where it comes with the nozzle on the underside, so the glue is always ready to go down at the nozzle, and so what I'm going to do is I'm going to do the exterior in the lighter blue color, so I'm just going to put kind of a couple I'm using the glue really sparingly at this end, it's really just enough to hold it in place, and you'll find that its grips really quickly and easily now a ce faras a starting point that usually always tends to be maybe a little bit of a flat section where the ball naturally wants to sit. And so I tend to try and find that spot and that's where I start with my gluing, so I'm going to press it down, hold it for just a second and then because it is still wet. But it's going to be able to hold well enough I'm going to put one finger over it and then with my other hand I'm going to slightly pull as I wrap around and as it stretches it can conforms to the contours of the shape and so as I'm wrapping I'm kind of going from side to side so that I get continuous coverage as I'm going around again applying a little bit of pressure so the crepe paper remains taught and I almost made it all the way through with that single strip I've reached the end of it so I'm going to do a little dab of glue on the end press it down into place to secure it hold that for just a second and I'm going to move on to my second piece of the same size again just a little dab on the end it doesn't take a live it grips it really well basically going to start where I left off play that piece over the top again holding it with my index finger as I pull so that it doesn't get away from me and then continuing to wrap it around and I'm kind of as I'm wrapping and sort of aiming for any of of the space that hasn't been covered yet wrapping it all the way around and at this point I've got really good coverage of the whole thing is covered in this beautiful light blue so I'm going to take my scissors instead of tearing this time because now we're dealing with the exterior we wanted to look a little bit neater so I'm gonna slice that off had in a tiny bit of glue and then a really simple way to ornament the exterior is to add contrast in colors in bands of color all the way around now quite frankly I misspoke the easiest way is if you were just to take it as is and perhaps wrap a bow around it which I think would be beautiful but I want to show you a simple but a little bit more elaborate design so when you have been making surprise balls for a while you will end up with a box much like this one that is completely full of really beautiful colored strips of crepe paper and as I work I can just kind of dig through find the colors I want and go with it so I'm going to go with this really beautiful sort of canary yellow as the first stripe that ideo I'm going to go back to my tacky glue can add a little strip I'm going to begin now trying I'm going to try now to begin an end most of my strips in the same area to kind of contain all of the the ends of the crepe paper to one end of the surprise ball so I'm going to press that down hold it in place really wrapping around almost like a little racing straight when I get to where it's ended and cutting it off having a little bit more glue press that down into place and hold that for just a second now one thing I'd like to do is do a little bit of a lie wider band of crepe paper color and then layer with a slightly thinner one and so for that let's see let's go with now let's go with the red they almost end up looking a little bit like racing stripes but then once we start criss crossing them, you get a little bit more of a complex pattern that is really pretty and simple to achieve there's really very little skill involved in this wrapping technique. It's not difficult to achieve really good and results by just creating simple stripes cc I just followed that yellow stripe all the way around got it to the point where it's slightly overlaps gonna add a little more glue hold that in place for just a second and then we're going to go on to our next color. So I think for that I got this great orange again keeping in mind the recipients and the events um I tend to like when these air just a riot of different colors but if you are doing, say, a baby shower and there's a specific color palette it's easy enough to achieve with the crepe paper I do love that the crepe paper is so versatile in that it comes in a huge array of colors that down into place and then you go with a green it's funny in using crepe paper for other projects I often end up with scrap mitts I feel a little bit less guilty about that now because they just end up going in my surprise making box surprise ball box all right wrapping that around overlapping it and securing it with a little bit of glue hold that in place hold for just a second so now you basically get the general idea and if I were to complete this one in particular I would add another stripe this direction and another strike this direction and what you're going to end up with is something that's completely covered in a riot of stripes there's even gold foil crepe paper which I really love and I tend and a lot of my surprise balls with just a strip around the exterior use that on this sort of orange one is well but it's a sweet and simple way to decorate the exterior without a lot of without a lot of effort without a lot of extra materials because you're basically just using scraps of the crepe paper it's inexpensive and it's a lot of fun what I want to do next to show you a little bit more elaborate exteriors
Class Materials
Bonus Materials with Purchase
Ratings and Reviews
Anna Butterfield
Really engaging teacher and such a fantastic craft. I've gone on to make a tonne of these with my family and they make such a wonderful gift
Julz P
A natural teacher, great craft idea to add a bit of fun to gift giving!
user e3c8cf
Love these - a fab idea and a great instructor and class which talks you through step by step without getting boring. I will definitely be making these as little extra gifts for all my loved ones. Thank you for introducing me to them Robert.
Student Work
Related Classes
Mixed Media Art