Lesson Info
6. Packaging
Lessons
Lesson Info
Packaging
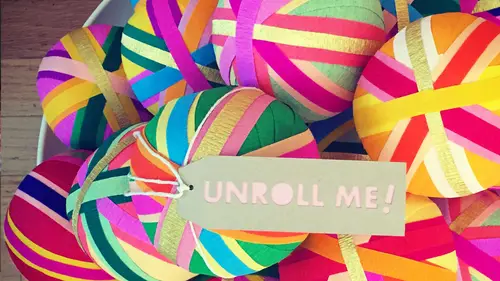
So let's talk about a couple of different packaging variations you've gone toe all of this trouble to create this amazing surprise ball it's really nice just to take one more step to present it beautifully now I have to say one of the simplest and most effective ways to take one of your surprise balls this is one that we did with the stripes it's just to simply put it in a gus it'd plastic bag we see through bags or great it's going to keep it nice and clean to sort of taper it around the edges I just folded the edges of the bags back put a little piece of cellophane tape in the back to kind of show off the shape and then piece of satin ribbon just tied around the top I also trimmed the top of the bag a little bit it was a little bit hard to find the exact size I wanted so a simple work around and I also used I don't think I don't know if you can see it I used a little bit of a scalloped edge scissor for this just to add a little bit of a decorative touch which I thought was nice I'd l...
ove to receive one of these I think your guests and any recipient will as well but let's look at one other variations somewhat similar and that is wrapping it up in cellophane to look like a big bond bond looks like a big piece of hard candy I think these are gorgeous and the thing that's fantastic about these is that we simply wrapped it in a solid color of the nice crepe paper and then the next step is wrapping it in the cellophane we didn't even have to go to the trouble of adding stripes or any other exterior decor if you're making a lot of these, this is a really good way to kind of get a beautiful presentation for honestly the least amount of effort so I want to show you how to do this real quick I'm going to set this aside cellophane comes at most party supply stores in roles um and simply it's a little it's almost a little bit like cling film it will stick to itself ah little staticky but what I'm going to do is take a solid color surprise ball I'm going to place it more or less in the center of the role and I'm gonna roll it around until I've got I want about five or six inches of overlap and then I'm going to take a sharp paris scissors and cut straight across good roll your role aside I'm gonna reposition this a little bit closer to me and I'm gonna start it to send closest to myself you could see it's a little tricky to work with because it is a little sticky and staticky I'm going to place the surprise ball right in the center. I'm not going to adhere it in any way to the surprise ball. I'm just rolling it forward, it's going to overlap on itself and then this area where it overlaps, I'm simply going to take a small piece of transparent tape and secure it, and now we want to cinch up the edges, and so I'm just gonna gather it on one side and honestly, the easiest way to start holding that altogether. It is with a simple twist tie, so I'm going to wrap it twist tie around that points we had a good couple of twists and then I'm just gonna bend the ends of the twist tie back around itself. So there's nothing poking out, make sure that the prize bull is nice and pressed up against the since ten and I'm gonna pull it together on the other side again, gather that up, grab another twist tie with a good twist and then I'm gonna bend those end pieces around so there's nothing poking out now. Different portions are a little odd on this the way it is, so what I want to do is I want to trim down the ends of the cellophane really simple to do I'm just going to kind of gather it together, take a sharp pair shears I'm going to give it a nice trip so that was probably what five inches of cellophane on the one side I just want to make sure and do roughly the same amount on the other end it looks a little bit more like a raft candy at that point now to finish it off I'm just going to add some nice satin ribbon again the sky's the limit on color variations especially when you're doing this particular wrapping method I think they look great a solid colors but it also would be really sweet if you wanted to do some simple candy colored stripes on the inside make him look completely edible plus with that boat just a little bit I'm gonna trim the ends so they are even all right and then I'm gonna move over to the other side of the exact same thing you want to try and keep the both of the bows on the same side of the surprise ball versus one facing forward one facing backwards just something to be mindful of again sweet and simple bow excellent. All right, let me give a quick trim to the tale ends of the ribbon. All right, I love these guys I think they look great I think they look completely edible and I think they'll be right at home in almost any party now I want to show you a couple of other wrapping methods all right, friends, so a couple of final packaging ideas if you go to any of your bakery supply stores, they've got a variety of cake boxes in all different sizes and it's likely that you're going to find one that is approximately the size of your surprise ball. They make a nice presentation, especially if you're giving this eyes more of a formal gift, or even if it's something that you're sending through the mail the's come flat packed, and they're easy to put together. I love these ones with the craft exterior in the white interior. One edition I would probably do is some crinkled paper on the inside, just to kind of give it a little bit of abetting s so it doesn't roll around so much and transit. I have been making these for a while, and so I want to show you an example of one that I've put together with a little bit of an extra tag, you can see it just it nestles really nicely inside, it closes nice and flat be bound up if you're shipping this the male, maybe you want to consider putting it in a little bit of a larger box just for some extra protection, the's, air ones that I put together for pop up shop that I participated in a couple of years ago, so they've got some of my branding and tags on the exterior but tags are actually a really nice idea on any sort of gift, and they don't have to be elaborate, they can be really simple. A trip to the office supply store is going to lend you with all sorts of different options. I'm a big fan of the standard oak tag. You can write a simple message if you're a little unsure about your own handwriting or you don't want to do your own handwriting on a tag, maybe consider stamping you could stamp a design with a premade stamp and at the office supply store, you can also find customizable stamps with the little movable letters to spell out your own. A message I did some thatjust say's unroll may surprise ball festive fun inside, and I think it be a sweet little tag to sort of tie on to the top. Um, if you watched my studio tour, you know, I mentioned one of my favorite tools is my elektronik paper cutter. It allows me to cut out all sorts of cool and fancy shapes, and so I've actually used that to create some special tags for the surprise balls I've been doing right on the ball itself. Wrapping it with some simple twine and then adding a tag that says unroll me, I love these. I feel like they're a little bit of an alice in wonderland reference, you know where she's walking through and she finds the bottle that says drink me or the little cake that says eat me, I love a surprise ball that says unroll, may and then once I packaged it up, I had a little bit of extra twine on the exterior and then add a simple tag that says surprise adds to the element of anticipation. You're not sure what's exactly in there, but what's in there is a lot of fun. So I hope these give you some sweet and simple ideas for packaging up. You're surprised balls that you put so much thought and effort into. I guarantee the recipients are going to love these in any format they receive them. I would be perfectly happy just to receive this. I do want to tell you it's always a good thing to see a craft fail. And I wanted to show you this just by way of example, this was an early surprise ball. I did it is lumpy is all get out, but I tell you what, if somebody made this for me, I would be so happy to receive it and you can see, with a little bit of practice, I was able to go from lumpy guy here to something that's, muchmore, spherical and a little bit more pleasing. But again, I don't always think that perfection is the point with these types of projects. It's really about sharing something special with your guest, with your loved ones, with your friends and your family. So I do hope you'll take the time. Tio, gather together all of those goodies and make your own surprise ball for the next festive occasion. Or just because.
Class Materials
Bonus Materials with Purchase
Ratings and Reviews
Anna Butterfield
Really engaging teacher and such a fantastic craft. I've gone on to make a tonne of these with my family and they make such a wonderful gift
Julz P
A natural teacher, great craft idea to add a bit of fun to gift giving!
user e3c8cf
Love these - a fab idea and a great instructor and class which talks you through step by step without getting boring. I will definitely be making these as little extra gifts for all my loved ones. Thank you for introducing me to them Robert.
Student Work
Related Classes
Mixed Media Art