How to Combine Images using Blending Modes in Photoshop
Lesson 1 from: Creative Effects in PhotoshopAaron Nace
How to Combine Images using Blending Modes in Photoshop
Lesson 1 from: Creative Effects in PhotoshopAaron Nace
Lesson Info
1. How to Combine Images using Blending Modes in Photoshop
Lessons
How to Combine Images using Blending Modes in Photoshop
17:44 2Advanced Blending Modes in Photoshop
08:03 3Adding Text in Photoshop
13:34 4Working with Stock Images in Photoshop
04:52 5Accessing the Blur Gallery in Photoshop
02:08 6Learning to use Blend If in Photoshop
06:59 7Creating a Double Exposure Album Cover in Photoshop
32:34Lesson Info
How to Combine Images using Blending Modes in Photoshop
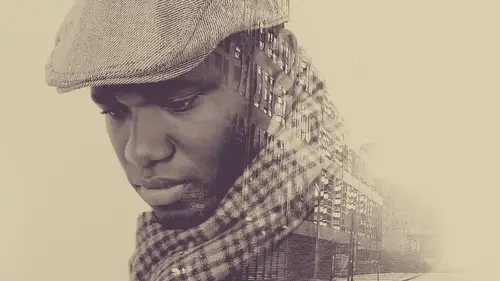
I'm so excited about this class because we're going to be doing four different images together, and not only that it's going to be a huge participation from you guys as well, because creative effects, it's there's really no guidelines, it's totally just we're going to combine different images in different ways. I'm going to show you guys how to use blending modes and later masks and just really great methods that are very simple that can create very artistic images, so we're going to be going from start to finish on four different images during this class and before we do let's just go through. Ah, short little keynote, it is very short is very short, so photo shop it's a great tool for editing photos, but it could be used for creative purposes as well, and this is kind of the stuff that I really love, like combining things together and creating, we're gonna be doing like a piece of like album art in this class as well. We're going to combining images using blending most layer mass and...
other really simple tools, but we're going to create some stunning images, so in ninety minutes we're gonna be going over several different examples and a market album cover in this class, you're going to learn how to combine images using blending modes as well as advanced later masking, we're going to show you guys how to transform photos and graphics using photoshopped filters. We're going to talk about the blending modes and get everyone so they can understand how the blending modes are grouped and how they worked and we're going to show you some great ways to shift through them and then we're going to show you guys how to work with type in photo shop, so yeah, that's ah that's it we're going to do a quick preview here, let's just, uh just trump jump out of our presentation, so I'm gonna jump into photoshopped. This is actually three of the four images that we're going to be doing in this ninety minute segment, so really, really cool image is just a brief little preview now we're going to go ahead and close these down and build everything back up from from scratch again, and they're probably going to turn out differently this time because that's just that's how this sort of thing goes, even if I wanted to make it the exact same, it would be very hard to do so let's go ahead and start by choosing kind of getting used to the idea of creating different images and combining different images together and kind of talking about what I look for whenever I'm going to be bringing these things together so the images that we're using for today they're from petroleum dot com, which is a stock image website you can use stark images for your own creative effects like we're doing today or you can take your own photos I either way is totally, totally good so what I'm looking for when I when I start to pull images for these effects generally I'm looking for relatively simple portrait in this case we're going to be working with a lot of a lot of portrait's I'm looking for something relatively simple with a high contrast between light and dark that's really where the blending moments start to shine is the differences between light and dark because the blend bodes really play off of that for instance, this image just immediately stuck out because it's it's a beautiful image we've got a great subject it's very simple, which means if I decide to make this image quite a bit more complex it's not going to be overly complex sometimes when you combine multiple images together you just kind of get a jumble of of images and it doesn't really tell a story, so I like things to be start off by combining two separate images that are relatively simple and bring them together that are more complex. The second thing that I look for when I am bringing images together is how well they're going to play together for instance, this this image here, you know she's she's highly made up she's got her hair slicked back and this is to me this is like a picture of urban woman you know this is not like you know little miss sunshine out out in the country playing with the owls and barber barn animals and stuff like that playing with the out I will definitely don't see her skipping through daisy you know you kind of want to bring that into the end image like you it's going to help tell the story if you combine this together with the photo that actually might say something about this subject maybe where they would actually live or you know where they would be doing this is something that would reflect a little bit more and continue telling this story so I wouldn't use a beach I wouldn't choose like, you know, beautiful mountain landscape so for this image we've chosen a picture of a city at night so we're going to show you we're going to go ahead and start off with that so let's go ahead and open the image of this subject here here we go and we're going to open our next image which is this guy this is uh it's new york rain what's that that's the wrong sound actually, you know what I did have this because I knew I was going to get it so we're gonna open them both and we'll let you guys vote um there we go. Beautiful. So we want to combine these together now before I do, I want to just look at what? What I have to actually work within in my base image. So obviously when I'm combining images together, I don't my goal is not to cover up my subjects face like this, we want to keep intact, right? I don't need something to fill up all my background as well because I like the simplicity by image. So what I want is for something to fill up this dark area that surrounds our subject and kind of get her to blend in with whatever we have in the background. So that to me says if it's a dark area in the original photo, I want to combine it with something that's dark in this second photo for the for the exposure. I don't want to combine it with a bright, sunny day because it's not going to fit you want to match the lighting of the second shot as close as you possibly can to the lighting of the first shot. So that's, why we've chosen a couple cities at night so let's, go ahead and bring those into this image here very simply describing the move tool. We're going to hold down the shift key and click and drag from one image to another here we go let's go ahead and close that down we're going to do the same thing with this so shift click and drag from one image to the other and we can close this down as well okay that's it after full screen and go ahead and zoom in just a little bit all right now my first goal here is to create a layer mask because although these cities you know they look good like that on their own if I was to just change the blending mode they would wind up affecting the entire image you can you can see them outside of their as well so the first thing I need to do is create a layer mask so in this case and we've got over multiple ways to create later masks but in this case I'm going to use the most simple method that I possibly can and that's my general strategy start with the most simple method you can and then move more complex. So in our last class we went over how to use the pencil and in this case the pencil would work but we don't need to use the pen tool because our edges are fairly consistent and we have a very, very clean background so what we're going to use is our magic wand tool because it's it's the most simple tool to start with so basically I'm going to choose the tolerance that works twenty is a good starting place if you need to select more, you can always increase your tolerance or hold down the shift key to add to your selection so in this case, all I'm doing is selecting out my background perfect so were selected out now I'm gonna go ahead and load this as a layer mask on our background and then I can choose to enable or disabled this lame ass. We're actually gonna wind up using this layer mask for other layers because we want we actually want her to be completely visible. All right, before we do, I'm going to just refined the edge of the layer mask really quick, so we're going to go to select and I'm gonna go to refine mask. Here we go. All right, let's go to reveal layer here, there we go, let's try overly I'm just going to zoom in. We did have some hair on the top of the selection in a really great way to just refined the edge. If you do have hair in your selection is to grab your refine radius tool so using the refined radius tool, I'm just gonna make my brush a little bit larger and I'm going to paint in right up here at the very top right over top of where we have here and it's going to do a really nice job, you can see how it extended all the way out to the edge of my hair. So let's, vote. Ok, um here we go. All right, zooming in. I'm gonna hold all torre option and click on my leather mask so we can see that's actually a really nice layer mask that we started out with just a magic wand tool so more than good enough for what we needed to for what we need to cover. Okay, now, this player mask we can have visible on this layer, you can move a leather mask really, really easily just click on it and drag it to another layer, and now that layer mask is on another layer, which in this case, is a perfect way didn't actually need on our first layer. Now there we have done it's perfect. We're going to do the same thing with this city as well. So this time, instead of just clicking and dragging because that would just move my layer mouse, I want to hold all torre option and I can click and drag and that's going to duplicate that layer mask okay, now, in this case, we actually want to invert our lame ass because a lot of time this is basically what you would want if you were compositing your subject you'd want you know you'd want your subject cut out on top your city in this case we're actually going to put the background into the image of our subject so I'm gonna click on the layer mask and we're gonna hit controller command I to invert that okay we're going to do the same thing with this city controller command I to invert the layer mask and now we can see the city's air only visible inside of our subject so as faras later masking goes that's a pretty much as complicated as we're going to be getting you guys can see it's it's really not that difficult to select just your subject and unrefined that's election a little bit better ok now we have one more challenge we're going to go ahead and start with this city our next challenge is going to be making just one area I want this area to be visible right here through my city I want to be visible through my city and I wanted to blend in in a very nice natural way and to do that I'm going to use something called blend if what you guys have probably heard of before it uses the light or the dark of the underlying layers to show the visibility of this layer so clicking on layer to aiken doubleclick right here which is going to bring up our later style and then we're going to be going from right to left someone hold, alter option and go from right to left and you can see her face is going to start to shine through. Let me explain that, it's, because this layer that we're on, we're telling it to be not visible in the lighter areas of the underlying layer. It sounds super complex, but if you do it a couple of times, you'll really get the hang of it. If we did the other way around, it would start to not be visible in the darker areas, so in this case, we want the face to show through, so I'm gonna take this all the way the left there and start sliding this to the left. There we go, we can see our city is really just starting to disappear from that light area in that cool, so already we're off to a good place and there are only a few more things we got to do. Sometimes I say things and like, I don't know what I'm going to say next we're off to a good place and we'll just keep going with that were alive, I just going to keep talking, you know, say something dumb, and then you know, a few minutes later and say something spartan, you kind of all right? So the next thing I want to do I actually I like how dark this is I like the darkness of the original photo because it it looks real and it looks like it's following with the actual light of the image when I add the city over top to me it's a little bit too like it doesn't really look real anymore so what we're going to do is I'm going to grab a levels adjustment layer so adjustment layer right here we're going to go down to where we see levels okay? And now I can choose to have it be lighter or darker okay, now by default this is going affect everything that's underneath it and if I only want this level adjustment layer to affect the city, I'm going to clip it so clipping masks very helpful and by the way, if it seems like we're covering a ton, this is all going to be very similar from photo to photo so you've got to keep talking like fifteen different things for this photo but it's going to be the same fifteen things for the next one and the same in most time you're in photo shop it's kind of the same thing over and over again so I don't feel like you know, if your brain is like eighty percent full right now you're fine we're just going to keep showing you guys over and over again okay, so making this a little darker, I'm gonna right click on the levels, and I'm going to go down to create a clipping mask, and this is going to make the levels adjustment layer visible on lee, where our subject is visible. All right, so we're actually really close. We're going to do the same thing with both layers. The very last thing that I want to do is change the location of my city. Because right now, it's kind of boring. I don't see any cool towers there's, nothing on her face if I just click on my layer itself and I use my move tool it's going to start to move. There we go. Um, yeah, actually doing it right. That's good. Oh, I know why. Okay, let me back up just a little bit. I was going to say you have to change by default, the layer and the layer massacre going to be moving together, right? Which it doesn't even look like my later mask is moving, and the reason it doesn't look like it's moving is because I have blend if as an option on. So let me just take that back off and show you what it would be like if I was moving the layer and the liner mask. All right I don't know what that's helpful at all for you guys but that was the idea so if this is the case if you got your city and it's in the right place it's like this let's just go back if you have your city and it's in the right place all right there we go and you did want to move it it normally would do this right you can get around that by clicking on this chain link between your city and your mask or whatever your subject is that way you can click on just your layer and the layer mask is going to stay in the same place because I'm not linking them together so by default that would do that but now I can actually move one independent of the other all right there we go but you weren't seeing that because the background is light and I had blend if on which was telling this layer to not be visible where the underlying layer was light does that make sense? I know they got a little bit complex there but I was trying to explain why it's necessary to make sure you you do unlinked those because we didn't see the ruin result but it was still important in the in the image all right so here we could basically choose whatever we think would wind up completing its image so I'm gonna make there's background a little bit larger all right so we can feel a little bit more of the image all right and then it's totally up to you wherever you know wherever you'd like to put that looks kind of nice right it's not like too much um you know will be really cool actually this week all right, I'm going to duplicate this layer controller command j to duplicate that let's clip that as well I'm going to change this from normal down here to lighten so now I have duplicates of all these lights and aiken aiken bring some like right on her lips to make that chronic send that that's going to that's going to be cool all right? We're gonna just have a little bit of fun right now off all of photoshopped this is really fun if you're not having fun and photo shop you're not doing it right photo shop is a lot of fun because you can really just do whatever whatever you want and a lot of the time I have no idea what I'm going to do when I start it really comes in, you know actually kind of playing around and getting in there like, for instance, I had no idea I was going to wind up doing this um a lot of it comes in just you know, those times when you're just kind of playing around and something works and you just kind of run with it never go for that kind of looks like lips going over there anyway. Something like look like loops, little. Ok, maybe if I make some of these others black there we go. There we go. Got looks like and I know. Yeah, yeah. Oh, now you see it. All right. Ok. You were not my side a minute ago, julio. Good job. Now you see it. Okay? We're good. We're good. Yeah, it kind of looks like an eye, right? Um, let's. Just move these up just a little bit cool. We've got our eye and, uh, and some lips, they're alright. Added bonus. I wasn't planning on doing that, but, uh hey, why not? I'll take it very cool. All right, so there is one example of how we can combine multiple photos together. That's pretty cool, right? Nice, simple. Probably. Everyone feels like that's, you know, within their grasp doing. And it didn't take that long at all.
Class Materials
bonus material with purchase
Ratings and Reviews
D Kelly
Excellent Class. The instructor is down to earth and he feels like just a good bud who just stopped by to teach you PS. It is very fast so working knowledge of PS is a must! I learned some neat tricks and love being able to be creative. I do a lot of photography so it will be fun to start collecting my own images. in which to be more creative with.
JOSEE DECARIE
His classes are very well explained, very interesting and he is dynamic, I love the courses of Aaron Nace.
Edward Ries
The course content is excellent. However it appears that the instructor assumes the online class are already experts. He zips through actions faster that can be easily followed so the how to value is lost. The results are evident but the various steps to get there are lost in the speed with which they are executed. This diminishes the value of the course except for those who are already extremely versed in photo shop actions.