Lessons
Class Introduction
03:27 2What is the Painterly Look?
04:12 3Overview of Techniques to Create Painterly Photographs
11:19 4Selective Focus & Extension Tubes
14:22 5The Magic of Lensbaby
36:33 6Tips for Beginners Using Lensbaby
12:31 7Using the Lensbaby Velvet 56
27:37 8Shooting Through Natural Materials
07:22Shooting Through Non-Natural Materials
16:58 10Painterly Backgrounds
06:44 11In Camera Multiple & Double Exposure
13:25 12Exploring Creative Blur Through Subject Movement
06:39 13Exploring Creative Blur Through Intentional Camera Movement
12:59 14More Painterly Look Options
06:25 15How to Create Painterly iPhone Photos
29:44 16Vertical/Horizontal Panning in Photoshop
10:07 17Multiple & Double Exposure in Photoshop
08:48 18Dancing Flower Technique in Photoshop
06:12 19Creating Painterly Image Effects with Software
25:41 20Applying Textures in Photoshop
25:19 21Painterly Photographs Critique
30:49Lesson Info
Selective Focus & Extension Tubes
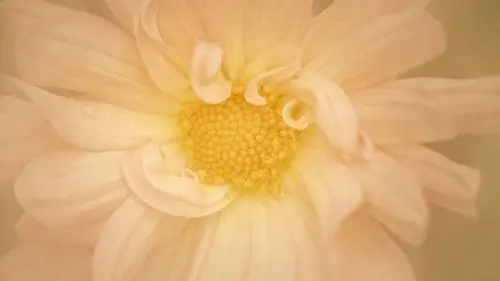
The lenses for selective focus I want you to start with what you have. Don't go buy 180 millimeter lens just 'cause I use it. See what you can do with what you have. I wanted to be able to show you some selective focus with some of the lenses that I don't generally use so I went out into my dahlia patch and shot this with my 70 to 40 millimeter at f/ which is something that I wouldn't use, but I've got some great sharp detail in the center fading off to more and more blur and a well-blurred background so it worked. Tried it with a 24-70, same flower and I kind of liked it. I'm thinking I might be using that lens a little bit more for selective focus. I thought it was beautiful and I liked how it handled it. I've shot a selective focus with my 70 to and can't get really close but that's from Ireland. A poppy against purple and because it was a long lens I got some great background blur as well. The other shot is a 50 millimeter shot. That shot is there because I had a student once say,...
"I can't do what you do. "I don't have a Lensbaby, "I don't have 180 millimeter." And I said, "What do you have?" And he said, "I have a 50 millimeter." I'll get back to you. So, my 50 millimeter one went out in my backyard and there wasn't a whole lot blooming except some Queen Anne's lace but the 50 millimeter you can shoot at 1.4. You just have to pay a lot more attention to your background because you can't get close but you can still do selective focus with that lens. So, experiment, see what you have, see how close you can get. See what you can do with it. That said that you can use anything. Let's talk about my favorite lenses for selective focus because I do have some favorites. A straight lens favorite would be the 180 millimeter. I love the Canon and the Tamron, they're both really good lenses and what I like is that working distance. I don't have to get right up on top of my subjects or I can if I want to, to fill the frame. This was a really large sunflower in my backyard. I grow what I wanna shoot by the way. (chuckles) And especially a reason why I love the longer focal length of the 180 millimeter because if I've gotten really close to this guy he'd be gone. So, my secret with dragonflies is to move really slowly in a little bit at a time and he hung around for quite a while. I actually shot him with three different lenses, I kept running in the house and thinking he's not gonna be there and he was when I came back. Same here, long focal length. Get a nice blurred background and you don't scare away your critters. And there's that scene compression that the 180 millimeter brings to me. The leaves in the background were a good distance away. I could pull them in together, add some interest to the background. Same with these. That's two rudbeckia. I love the look of the second rudbeckia sort of echoing in the background and the compression of that lens allowed me to bring that up close. Not in focus but have it fill the background as an echo and the background blur that it provides. The background here is just, this was also at the Olson house where Andrew Wyeth painted and that yellow is just sunlight on the grass in the morning. I've shot the house a couple of times with my friends and so I brought props at this time because I was right I get bored. And I have this beautiful feather and I just set it on a window sill and used my tripod for this one because I was shooting inside. It was one of my favorite photos from that year. And even a messy background will disappear with that long focal length which is great because columbine don't always grow on really attractive areas either. Very messy backgrounds, very busy but I can make that disappear and that would be a beautiful background space to add a texture to because there's not a whole lot going on. So, I can go with that 180 millimeter with this kind of a background to that shot. Shot that just last week. It's very easy to hide a messy background. That long focal length of the 180 millimeter allows me to do something called shooting through which we're going to do a whole lesson on and video on later as well. There's also no light interference with a long lens so there's space if I have to add a diffuser or reflect light. If I'm with a 100 millimeter lens and I'm this far from a calla and I need to reflect light, how am I gonna do it? Can't do it. The longer focal length allows me to do that to diffuse or to bounce a little light or to add a, sorry, a diffuser to soften the light as well. And there's room to bounce light if I need it as well with a reflector into this, this was quite a dark dahlia. It was on an overcast day so, I needed the space to be able to bounce the light in there. Or to allow the natural light to shine without interference. If I had gotten in close I would have ruined the beautiful light and it was the light that drew my eye, it was the light that I wanted to capture here. So, this shot is from the gard shoot that we did at Dunn Gardens here in Seattle and this was my favorite shot from this shoot and let's show you the video. I'm here at Dunn Gardens in Seattle on a beautiful day. Got some really nice soft light in this area of the garden and I wanna talk to you about how I do selective focus or shallow depth of field with my 180 millimeter. I've chosen this subject, it's some sort of a hydrangea that I've never seen before and I'm attracted to it because of all the tiny blossoms in different stages. There are a lot of small ones, a lot of large ones surrounding a center area. It's a beautiful, beautiful subject and the hard part is gonna be deciding which flower that I wanna shoot. I've chosen the 180 millimeter for this because I'm going to want the compression that that brings. I want some good background blur and I only want a small amount in focus. So the three things that I'm thinking about when I'm shooting for selective focus are how much I wanna focus, where I'm going to place the point of focus and the angle of view. So, I have chosen this blossom right here but as I'm looking at it now, the light has changed and there's some pretty bright light on it. It might not look like really harsh light but those whites are probably going to blow out so I'm going to move over to another blossom which is similar in angle, and the foliage is a little close behind it so I'm gonna see if I can blur that. I'm gonna try shooting at f/3.5 to start so let me see what I can do. And I'm shooting on aperture priority which I generally do for selective focus because it's the aperture that's my main consideration and I'm shooting on manual focus which I encourage you to do for selective focus. (shutter clicks) Okay, I've got some really beautiful background blur with that. I'm also gonna try it at a different angle. I'm gonna shoot a little bit lower. (shutter clicks) And I'll try a slightly different angle. (shutter clicks) And some of you have noticed probably that I'm not using a tripod. I rarely do for flower photography. I have a pretty steady hand, as I get older I know that will probably change, probably soon, (laughs) and then I will definitely be using a tripod. But for now it works for me. If you are not steady then don't mess around, use your tripod. You need a really steady hand or to be on a tripod for selective focus. We had a wonderful time at Dunn Gardens. We spent a whole morning there. If you are in the Seattle area you might wanna make an appointment to have a tour. Can't just go and visit on your own but it's spectacular. It's a very zen feeling to the place and there are just beautiful plants, very well taken care of and do a lot of weddings. Wanna get married, it's a beautiful spot but we loved it and you'll see all of our videos were shot there. You saw me take three other shots there and here are three more. So, it was a beautiful subject. I just varied where I wanted the area in focus and slightly different angles. Kathleen, I have a question for you and as you were sort of going through and talking about all the different lens choices as well, and you just explained here that you took these three different shots. When you're out there in the field are you generally switching between different lenses, trying all sorts of things until you like know that you got it? Or and in terms of like the different focal length combination with different apertures, are you out there kind of trying all those different combinations? Not as much now as when I was a little bit younger, (laughs) less experienced. The 180 millimeter now is so intuitive for me that I know how close I need to be, I know what the aperture is going to look like. That said, there'll be some subjects that I wanted that are so fabulous. If we've been there longer I would have shot that with my Lensbaby, with the Velvet. I would have done a lot of different things with it but that comes with experience, getting to know your equipment. And I have a botanical garden about an hour from my house and I try and go at least twice a month. And there's one area that I usually start at and there are these winding paths and amazing flowers, and I'll go through with my 180, turn around, put the Lensbaby on and go back through. More often than not when I get home, it's the Lensbaby stuff that I like best and I'm like, why did you do that? And for things like shooting through you can't use a Lensbaby, so different techniques and some of the flowers aren't close, so then I would need a longer focal length. So it varies but generally at this point I can look at my subjects and know the aperture that I want and visualize the lens that I want, but that doesn't mean I don't shoot with both, sometimes two. Thank you. Sure. And here again, there is the finished shot that I showed you that was my favorite from the shoot. Just a very small amount in focus and that's all I wanted, and the background blur worked really well. So, I would like, here's the answer to your question. Get to know your gear. Find out how close you can get. If you don't know the minimum focus distance of all of your lenses, you need to. It's either in your manual, if you don't have your manual Google it but it comes with the lens. You need to know just how close you can get. So, if you have a lens that doesn't allow you to get close like the 50 millimeter that I talked about, think about a set of extension tubes. I'll show you mine. Mine are by Kenko and it's a set of three and they are just hollow glass rings or hollow glassless rings. No glass involved. There's a skinny one, a medium one and a long one. 12 millimeter, 20 millimeter and 36 millimeter and you can use them individually or you can combine them. So, that gives you seven different options to get close which is really nice instead of buying a macro lens to try using extension tubes. So, with my 50 millimeter and no extension tubes, I shot this poppy at f/ and then I put all three tubes on, and I got that. So you can do a very painterly, soft look with the 50 millimeter lens. You don't have to buy a new equipment. I want you to try what you have and extension tubes are a nice, inexpensive choice. These are also with the 50 millimeter and my extension tubes. This is lupine in my yard, the first shot on the left is without tubes and then I put the small tube on, and then the second and then the third. I didn't do all three because the depth of field would have been so, so slim you really wouldn't have even seen the shape. But notice how much, two things I want you to notice, how much close I'm able to get each time and also look at the loss of depth of field. I shot them all at the same aperture but I would definitely be having to stop down with the three tubes. Makes focusing a little bit different and a little bit harder because of that reduction in depth of field. Sometimes if I have a tube on I will pre-focus and then just move myself to find that area and focus. Here again. Here's that 50 millimeter lens at 1. with the medium size 20 millimeter tube. And I just shot this for this presentation and I really liked it, so I think I'm going to be using my 50 millimeter and tubes a little bit more. It's not anything I usually keep in my bag for flowers but I like to get away with seeing just how very little I can have in focus and that worked for me.
Class Materials
Bonus Materials with Purchase
Ratings and Reviews
user-7773bc
Wow. I really loved this class. I took her other class, "The Art of Flower Photography" as well. She is very thorough, explains concepts clearly and is professional, yet kind. I have been doing photography for decades, but flower photography is a little bit of a different animal. I have found it to be extraordinarily challenging - which is also invigorating! At the same time, using Kathleen's principles, I feel like I now have basic rules and tools under my belt which I did not have before. This is a little humbling as I have been doing photography for so long and was surprised there were a few basic concepts I didn't "get the memo" on. haha. This class will save me heaps of trial and error time. I will be much better able to zero in on what I really need to work on. I actually recommend taking both her Creative Live courses. Yes, there is a bit of overlap - but that little bit of repetition is actually helpful. They are not the same class. Oh, and one more "perk"...you get to view some of the most stunning flower photography ever created. Masterful. Thank you, Kathleen.
Donna Macri Stevens
As I've been watching this class, I have literally been sitting at my computer and saying aloud, "Wow....WOW!" This is an absolutely amazing class!!! I began watching it while it streamed, but had to buy it. Kathleen is an amazing instructor, and she is SO generous with her tips and techniques. I love that she supplemented her instruction with on-site videos, in class photo manipulation and so much more. If you love flower photography or want amazing tips on how to make your photos more painterly, CLICK BUY NOW! I'm just blown away! This is a GREAT, GREAT class!
TypicalCheryl
Kathleen's images have a very artistic and painterly character, so she is a great presenter for this subject. In this class she openly shares many of her methods of shooting to create in-camera artistic images (even with your phone) as well as post-processing techniques. She presents this material with her open, calm, strong and passionate manner that gives you an "artistic license" to experiment and discover "What happens if?" I have admired her work for a long time and am so excited that she shares the secrets of creating her enchanting images here. If you are interested in capturing images that go beyond what you see to incorporate how you feel about a subject, you will love this class!