Shoot: Combine White Light and Color Gels
Lesson 10 from: Creating Impact with Color GelsAlexis Cuarezma
Shoot: Combine White Light and Color Gels
Lesson 10 from: Creating Impact with Color GelsAlexis Cuarezma
Lesson Info
10. Shoot: Combine White Light and Color Gels
Lessons
Class Introduction
01:22 2Why Use Manual Mode?
07:52 3Shoot: Manual Model with Gels
05:36 4Importance of Details Shooting with Color Gels
03:02 5Different Between CTO & CTB Gels
03:45 6Shoot: CTO & CTB Gels
07:06 7How to Use Gels to Create Impact
05:21 8Shoot: Creatively Use Gels
19:56Lesson Info
Shoot: Combine White Light and Color Gels
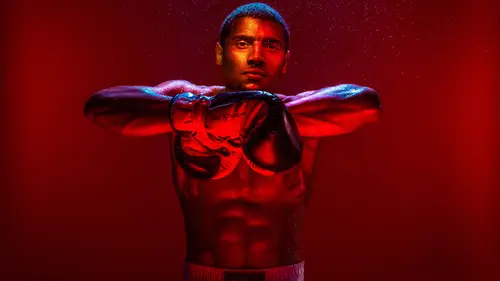
The one thing we did different here is we just swapped the red gel here with a blue gel. So if you look, I can look at this all day too, I'm just really easily amused. So, like a CTB light looks blue right? But if you put it versus a tungsten light, it balances it out, so it turns it neutral. So if you look at this light it's yellow, but it looks like regular, 'cause it has a full CTB on it. 'Cause it's the mono light that's going in there, but when the light pops, it's daylight balanced, so it's gonna be a little bit more blue. And we're gonna actually probably exaggerate that a little bit with a Kelvin sentence, but we'll see how it looks right off the bat. So come up a little bit, Rod make sure that light, is that light off? It's off right? I'm gonna turn it off, let's see, hold on. Don't look at it, I'm gonna blink real fast. (light beeps) Oh the model light's off, I'm gonna turn it on. There you go. I'm gonna go over right here. So I'll keep right there, and let's just do a ni...
ce, give me a like a nice harrowing pose, cross your arms. There you go, just like that, that's perfect. So we'll do a quick test. So you could actually see here in the modeling lights, this light here is red, and when it looks neutral right here right? It's gonna look blue. So keep it just like that. So keep turning your body more, and your feet too, there you go like that, and you're gonna actually look off kind of more to the side. There you go, just like that. So you bring it here, so we'll just see how this looks. (light beeps) (clicks tongue) There you go, it's lookin' a little bit better, so I am gonna make this look a little bit more dramatic. So I'm gonna go from 5,500 to 4,500 Kelvin because I want the blues to look more blue, 'cause we kind of look a little bit neutral right now, but can you bring it here like that. So if we go down right here. (light beeps) There you go, now we're getting there a little bit more. So actually you know what I'm gonna do too as well? Where's all my electricity? What was that? (Rod mumbles) Yeah I'm gonna turn it down a little bit, and I'm gonna get in closer to him, literally right underneath here like this. Go like that. So there you go, the main difference between this now it's closer, now I'm getting those highlights on his eye sockets right here. So depending on how the power's set on this, it should look different, and should look pretty cool. Keep right here. (light beeps) Let's see. There you go, now it's looking better like that. Figure board here. There you go, and then now face forward, directly, keep right here, and then just have kind of like you're on straight now, there you go, you can show off the six pack. There you go, and then just face me square, actually straight this way, keep like that, and I'm probably blocking this light right here. But if you look right here, go like that. Let me back up. (light beeps) There you go, this should look really nice. And there you go, now we're getting slightly, if you could see right here when it shows up, some nice blue highlights, right? Highlighting him right there in the abs and it's kind of mixing up right here, and that looks beautiful with the two colors combined. And then the reason why I backed up is 'cause I went with the zoom lens and I kind of zoomed it in as much as I could, almost close to 105 to flatten out the background and get it nice and flat. So this is actually what I like calling the Floyd Mayweather lighting, it's how I lit Floyd and Manny Pacquiao. That was just done with two lights, it was done with a soft box a little bit smaller than this one, and then just a 20 degree grid overhead. This is obviously more lights than that because we're lighting the background. They were with a black background, so I wanted that to go all black, so I didn't need to light that obviously, and I didn't have room for a boom, 'cause again that shoot their time was a little precious, and you don't get a lot of time with them. But this is lighting like that that I love doing. Although you shoot at F16- Well right now, I'm at F11. Okay, so but in that range, do the gels ever make the photos slightly out of focus? Do they, is there any focus issues with gels? No, they won't do anything like that. All it's changing is the temperature of the lighting. So the only thing it's gonna affect is the intensity of the light, that's something you've gotta be aware. Great. Fills out on the ends. Yeah. Right, the gel's not, well right directly on the camera, but to that point, Mark Agares asked do you ever use a combination of gels on the lights, and then a color filter on the lens itself? Not with digital because you don't need to, and you could change the balance inside the camera. I do shoot film, and film is generally daylight balanced, and what they have is they have blue filters that you can put in front of it, so it'll turn everything that's daylight into tungsten lighting, and that's when you do that. But again, on there you still lose a stop of light because you're putting the filter in the lens, so if you have ISO 400 film, it turns into 200 film, 'cause you're losing that stop of light. So I do that when I deal with the film cameras that I shoot, but with digital, I've never had to do that. Just a practical question from David online, can you melt the gels by accident when they're wrapped around the lights? What kind of safety concerns are there with gels? Yeah, I have done that, I've messed up every possible single way you could think of. You can, so generally when you have them on a soft box, you wanna have a little bit of space between the, you can only melt it if you leave the modeling light on for too long and it's right next to each other. But this one I think might be okay, because the grid soaks up a lot of the light, but if you have it directly on there, if you leave it on, they will melt. I've melted them before in front of a five degree grid, and they melt into the grid. So you gotta be aware of that. Right there, yup. And then we do have another question from Phoenix who's saying, I'm planning to use color gels but using speed lights, but if you put them inside the soft box, is the color still gonna go through the soft box or not? Is it different using speed lights? No, it's the same thing using speed lights, the only not problem with speed lights, is that you run into is the speed light is only generally around 70 watts or 75 watts, so if you put it in a full CTO, you gotta remember that you lose a stop of light on that. So you're losing a lot of light, so it might not let you modify your light as much. So if you put a speed light in the soft box, with the soft box you lose light, and then with the gel in front of it, you're gonna lose more light. So it's not, you're gonna be limited a little bit on what your exposure could be. So you're not gonna be at ISO 100 or 200, you might have to be at a higher ISO, and open up more aperture. And that's just straight creative choice if you wanna do that, if you like shooting wide open, that could be your decision to do it. I don't like to shoot wide open, 'cause like I said, if I was photographing him, and I only have not a lot of time, like 30 seconds with him, I could actually, here, let me run through the entire shoot.
Class Materials
Bonus Materials with RSVP
Ratings and Reviews
Barrie
This is a great class on the use of gels although I don't like the abrupt editing between segments as it always leaves the impression something valuable has been missed. The photographer has a simple approach to gels that produces outstanding images (although he could use imprecise language like 'this' etc a little less). As a teacher, I have viewed many of the CC Live classes and almost all are well produced with great information. (It is admirable and worthy of support that many of these are presented for free.) This class is one of the best and is a great investment if you want to give your photography extra impact. By way of coincidence, I was watching the movie Marshall the other day (the story of the great Supreme Court jurist Thurgood Marshall) and was struck by the use of color in almost every scene. A great inspiration for using it in still photographs. Get this class, it is outstanding.
JennMercille
Alexis Cuarezma is hilarious, very talented, and a creatively energetic instructor and artist! If I hadn't been attending Photo Week, I wouldn't have chosen this course, but boy am I glad I was in it! Gels have been an enigma to me for years (in the way that studio strobes used to be), and I was surprised at how easy and useful they were when Cuarezma explained and demonstrated them. His creative process is a joy to watch and learn from. I highly recommend this course to ALL photographers!
Xavier Finch
This class is still super impactful 1 1/2 years later!! I really hope to see more of Alexis at CreativeLive. He has so much insight and is an excellent teacher. His explanations are clear and concise with ample context.