Lessons
Class Introduction
01:22 2Why Use Manual Mode?
07:52 3Shoot: Manual Model with Gels
05:36 4Importance of Details Shooting with Color Gels
03:02 5Different Between CTO & CTB Gels
03:45 6Shoot: CTO & CTB Gels
07:06 7How to Use Gels to Create Impact
05:21 8Shoot: Creatively Use Gels
19:56Lesson Info
How to Use Gels to Create Impact
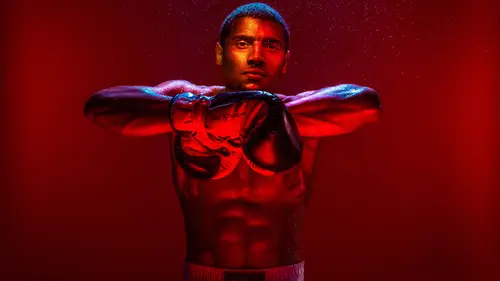
On our next one is, we're gonna have fun with this one. Using gels for color and creating impact. So this is kinda when I get down to really planning stuff and doing more than just two lights. I literally, I'll sit down and I'll light and I'll draw a lighting diagram and the reason why I do this is to know how many gels I need to buy and what lights to gel. So like, this is the lighting diagram that I did for that boxing image in the intro. So I actually literally laid everything down and this is kinda like the overall color scheme that I wanted with the gels. I wanted it to be primarily red 'cause red's a powerful color and I was gonna photograph boxers. And I actually titled this Portraits of Power. I just gave my lighting setups a name and I wanted a complimentary color to red which is the opposite, which is blue, right? So I wanted a little bit of blue there so the blue was gonna be on the highlight of the boxers and then I wanted a little splash of yellow because red and a little ...
bit of yellow goes well together. That's the color palette, that actually Ferrari uses a lot if you have the Ferrari red and add the little yellow on the horse in the rim 'cause a little bit of yellow with a lot of red goes really well together. So this is a test shot that I did. I was shooting tethered wirelessly to iPad and before I got the boxers all kinda ready to go, I just did a quick test with 'em to make sure everything was well and that's how it looks straight from the camera. And this is the setup right here which is done like this and to save yourself trouble, right, in using less gels, use a red background and just light it with regular lights with no gels and you're gonna have red right there. Right? And that's the setup right here and then the yellow is done here with what's called optical zoom spot or Profoto calls it a small spot which is, basically right here, it's a modifier that has a lens on it and it has a gobo in it. So the gobo in it, you can put that has a yellow gel in there and then you could put anything in there to kinda shape the light and the way it's shaped is for a little sliver of light and then with this lens right here, it has a lens that you could focus back and forth like that, so you could make the light really harsh and sharp or you could blur it out. On this one I wanted a little sliver of light on him for the little splash of yellow you see there and then I threw it out of focus. And it kinda throws a little splash of yellow and you have that. And it's kinda really like well focused and concentrated light and you could see there on the shoulder. On the next shot, it's still hitting him a little bit right there. On this one it worked out perfectly. We might be able to do this. I know we got some spray bottles. So a lot of people think that that's sand or I don't know why people think it's sand, it's not. It's mist. So it's water. I usually have an assistant behind him and I spray the bottles behind him and since the hair light is blue, it'll turn the mist blue as well too. Yeah? Just a quick question Alexis for people that aren't as familiar with the term gobo. Can you explain a little bit more what that is? Yeah, no problem. The click, cookies too right? Yeah cookies, yeah sorry. So what it is, is you just go right here and they have little things usually, we kinda made this one with, with cinefoil but they usually have premade stuff right here and you could put it in there and with this you could focus it like they have ones that are great and they have like really corny ones too that are like windows or like trees or whatever you could make it look and then you'll project it on the screen, on the wall. And you could throw it out of focus or make it really sharp. On this one I'm just using it to shape the light and kinda just made like a little cutout so you could see the little bit of light coming in. Cool, thank you. Yeah. But this is one of my favorite modifiers 'cause you control the light so specifically and I personally love it. This one is for Profoto but there's also one that you could use for video lights called a joleko light which you put on the Joker-Bug and that's amazing too 'cause you could flag off the light, you could do really small slivers of light, similar things to this. The thing that's better, not better necessarily with this one, but the thing with this one is you could use it with a strobe, the other one's done for video lights. So this is that, this color palette right here and these are other color palettes that you could use too as well to create visual impact. This is a client of mine that I have in San Francisco. This should look a little bit more green, it kinda looks more blue in the screen but this is more green and red. And these are marketing photos for a cosmetic surgeon in San Francisco. He actually saw my behind the scene videos I did for the Men's Soccer Team. And they were like, oh wow you do awesome stuff with light. Can you do 'em reckoning photos? And I was like yeah absolutely and then he just gave me full creative control. So this is really, really fun kind of campaign to work on and these are all using strictly color. Like if you look, these are all shot literally like at f/16 and they're tight, there's like nothing blurred or out of focus 'cause it's straight using color to give the image visual impact and do it like this. So again, this is real fun to do. It's just picking the same exact thing I did kinda with the boxers. So you just kinda gotta plan it out and pick your color layout. Make sure that it looks well together. Once you have that well together, you kinda just pick the element on how you wanna light your subject and create the image and execute it.
Class Materials
Bonus Materials with RSVP
Ratings and Reviews
Barrie
This is a great class on the use of gels although I don't like the abrupt editing between segments as it always leaves the impression something valuable has been missed. The photographer has a simple approach to gels that produces outstanding images (although he could use imprecise language like 'this' etc a little less). As a teacher, I have viewed many of the CC Live classes and almost all are well produced with great information. (It is admirable and worthy of support that many of these are presented for free.) This class is one of the best and is a great investment if you want to give your photography extra impact. By way of coincidence, I was watching the movie Marshall the other day (the story of the great Supreme Court jurist Thurgood Marshall) and was struck by the use of color in almost every scene. A great inspiration for using it in still photographs. Get this class, it is outstanding.
JennMercille
Alexis Cuarezma is hilarious, very talented, and a creatively energetic instructor and artist! If I hadn't been attending Photo Week, I wouldn't have chosen this course, but boy am I glad I was in it! Gels have been an enigma to me for years (in the way that studio strobes used to be), and I was surprised at how easy and useful they were when Cuarezma explained and demonstrated them. His creative process is a joy to watch and learn from. I highly recommend this course to ALL photographers!
Xavier Finch
This class is still super impactful 1 1/2 years later!! I really hope to see more of Alexis at CreativeLive. He has so much insight and is an excellent teacher. His explanations are clear and concise with ample context.