Lessons
Lesson Info
Collaging the Pages
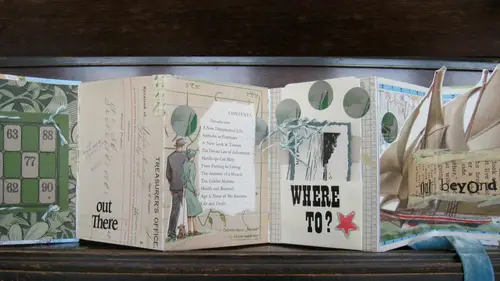
Before we even talk about the actual collage of the book, I want to tell you a little little of hint that you want to do when you're creating something like this oftentimes you get going and all your materials air out things are all facing a different way and you end up believe it or not forgetting which is the top half of your book which is the bottom which is the front and which is the back so a good idea just the very beginning is to market you can mark it on the page is that you're using because it will eventually all be covered up anyway I like to draw a little arrow to show myself as I go collage ing that this is the top and then here where it's going to be glued into your covers? I give myself a note that this is the front of the book, so if I get really excited and I'm collage in each page and I go and collage the back as well it would be a kn error for me to collage this because in the end when we attach our covers, you won't see this so you want to make a little mark on the f...
ront a little mark for which way is up and a little mark in the back and that way you'll remember which are your front and back covers and which way is up so just keeps your collage being able to flow and going really straight, so we're going to talk a little bit about the basics of collage if you've never collage anything before it's nice to gather materials that you might want to use I'm a big proponent of using original so whether that's an original letter from the eighteen hundreds or an original book page from an old french dictionary or even something like this this is theory jinna ll page from a french child's workbook I love these little images that they've drawn here now I could take a xerox of each one of these and that would be fine as well if you wanted to save, but if you can part with it, I always suggest using the original it gives everything a richer, deeper feel and that's what we're going to do today, we're going to use the originals of all these either ums including photographs as well photographs are a great way to really pop out your collage, so we're going to be using photographs of this young girl that I have it all different stages, but uh something a little bit different that we're going to do is use this as a frame for her photos, so this is a strange, unusual looking thing it actually was for dentistry x rays so when you have your teeth x rayed and your little individual shots they went in each one of these pockets one of the things when you're thinking about what to collage is see things slightly differently so I had seen a stack of these I had no idea what I was going to use them for, but eventually I've ended up using them many times for little frames, individual frames so I'd cut off the top where it says the item about dentistry and then I'm just gonna have the rest of it, which is its own frame and all those little photographs that were going to use of that little girl, we're going to go in each one of those pockets any time you're collage in anything it's about looking at something that might be pretty common and looking at it slightly differently, I had this piece of twine that was wrapped around something else, and when I was thinking about doing this book on this little girl, I started to see this and it's not and I thought, oh, well, that's perfect cause in girl scouts, you learn how to make knots and you have to learn how to use this kind of twine, so we'll end up cutting this out, probably using washi tape to put it down but have this as if it was a project that this young girl that were collage in about created something like this um it wasn't mine, but I collect these old ribbons he's old award ribbons and so I have a bunch of these swim meet ribbons I also have a lot of old horse ribbons and these air really fun to use because you can't recreate the this kind of thing and so that's a fun original piece that you can use it's always a good idea to have lots of kind of mixed letters around I collect letters from anything you can find them from old signs or individually from if you punch out stencils once you punch out stencils you might have these are all these all came from punched out stencils you end up keeping those insides of those letters and then you have those letters to use on another project as well as using the stencils to expand it envelopes are always fun it's great because you could have little pop outs from the envelopes will end up putting this ribbon into that envelope and then it's able to stay loose and weaken pop that out of the envelope from the book any kind of wallpaper you might like it's fun to use book pages are great thing to collage with and then it's always kind of great to add in some real bold color if you use a new paper pad and so this has white on one side which is great because we'll just glue that down but we have a really great bold pop I'm gonna use marbled paper as well and will will mix those colors together layering layering lane to get a really great pop of color okay let's get into that so knowing that I'm starting with the top of my book this way I'm gonna actually collage this page first so I can keep my eye on that arrow and I will eventually collage that page but I'm going to college this page first in the first thing I'm going to use is this marble paper so we're going to have this paper go over both of these pages and I need to make sure that I leave a little room for that fold so when I do full the accordion book again it's going to need a little bit of room so we want to go just beyond that that fold in our other page so we had so we can leave some room there and then I'm gonna take my ruler and go down the other line of the page and make a light mark where I'm going to cut knowing that I'm also going to cut along the bottom it's got my page up a little bit so I don't miss any of that paper and I'm gonna run along the bottom as well, so now I'll have a measurement from which to cut my paper I don't make really straight lines because perfection is boring so I tend tio just roll with mistakes and sometimes they end up being the best thing that I created out there so we're going to move our book aside making sure we don't cut our book at all and then using our non glide ruler I'm going to cut this paper out and this is going to be our first two pages of our collage one and two and when you would hear in these books you'll probably be switching adhesives quite a bit depending on the paper you're using is going to depend on the pieces you want to use so for something like this which has a little bit more strength in the paper I can use a double stick tape and still get the same results I can also use a glue stick and also have the same thing so I'm actually going to use both of those because of what I want to do which is go through the fold of the page I'm going to use a double stick tape on one end to really had here the paper here and then I'm going to use a glue stick on the rest of it so when I fold the page up I'll be able to move the paper with it um well so a little double stick tape on this side a little double stick tape over here which is actually gonna adhere thie page really tightly to this side and I moved my paper right in there, and then I'm going to use glue stick for the other part of it, so when I fold, I'll have room to move that's where my fold wants to be and again with anything that you're using it he sits with, you want to make sure you kind of measure play around, get it where you want it before, you actually it here, because once you're, he says, come on, its quite a bit more difficult to go backwards from that he sits. If you use adhesives that have a movement to them like a glue stick or a dot runner, then you have an easier time removing if you need tio, so we're going to do the glue adhesive, the glue stick adhesive on these two pages and then I'm gonna lay the paper down, and the great thing about the glue stick is it won't be so hard on there and I can fold. So though the glue is on there, I'll still be able to fold and because I used glue stick instead of double sided tape, it will move with me until I get it right where I want it and then I'm going to use bone folder or the rare and make sure it's nice and tight on there so that's just two pages that will have done in that color and then we're gonna layer on top of that, I have a little room here have a tiny bit of room, which I think for now just to hang on to it. Well, just fold it there if we need that to go underneath tio follow into the first page we can and it can think of it it's a continuous kind of story, so you're going to be creating a collage that goes all the way across and it could be page by page sure, it could be a story that the same paper goes throughout the whole book just make sure that's on there we're going to keep that little fold. So now we're gonna layer one of the basics of collages layering it's a great way to have your imagery kind of pop out at you. I always like starting with a color a bright kind of color, which eventually by the end we may not see as much of that as we do in the beginning. But it's a great later pop the images that you do want to show. I found this fun little image of this girl who is dressed as a scout, and I thought this would be perfect for our book about this girl that is leaving this counts so again, this is the original book page and the feel of it and the scent of it and thie actual texture you just can't get from a copy, so I like to be able to use the originals I love using old magazines I love using old books and the people that you can cut out whether they're drawings or photographs I think they're a really fun component of when you're collage ing they they make your book come alive because it's someone sort of laying out an introduction to your things so we're going to use her and she looks great against this blue and I love this kind of official looking stamps above her, so I'm actually going to cut out this a line that's drawn for me here using this gorgeous old paper and put her against the blue so when you're measuring you don't even have to cut especially in things like this you can just do a fold and tear, which leaves some great texture ing in your book so just fold and tear the paper and then knowing that I'm going to go right there with that image and then there with that image because this is older paper I want to be sure to use a glue stick something that's not so intense again if you're using different adhesives and you find well the glue stick isn't sticky enough for me or I really love using elmer's that's fine you khun you can change appeared, he says at any point you just want to use everything pretty lightly, a glue sticks. The only thing you can go deep on any other liquid basic. He sivs it gets messy, so I'm going to put that right in there and were v it can get word view in their liquid base, and I'm going to put her right at the bottom, so I'm going to use dot runner for her papers a little stronger, but not so strong that I could use a double stick tape. This is a double stick soft tape called a dot runner. So she's gonna go right there? I'm gonna actually cut this out, so I know where my page is ending and then we'll have a clear idea what? Where we're going and again, ripping is great if you don't mind potentially losing some of your paper or you like how the way the edges look, ripping the fun way to do it. So that's just starting eventually it's going to fold like this? We're just starting with her and I ended up using that as the frame the multi frames for her other pictures. So I think what we'll do with this, this is kind of a fun three d item will have this be a movement like this let's, use let's, just do the second page we'll do the second page with her swim meet ribbon using this envelope, which you can use an old lunch bag you can use, uh, great old glass non below. You can make this out of paper. We'll put this on our second page here, and then we're going to include her photographs in the middle. Here. Uh, this is going to need a little bit stronger adhesive, because it's gonna be holding something heavier, like this swim ribbon. So I'm going to use the double stick tape on the back of this envelope, and I'm not gluing the ribbon and it all, but I'm going to glue just the envelope in there like that. Just kind of going back and checking at all times that you're going the right direction and everything's flowing.
Ratings and Reviews
Nola Passmore
I really loved this course. So many creative ideas that sparked my imagination. Molly's instructions are really clear, and I loved that things didn't need to be perfect to work well. I applied what I learned immediately to make a concertina book for a friend's 50th birthday. I'll definitely be doing more of these. A great way to make gifts or use for your own memorabilia.
mary gabriola
This was a really fun class. I’ve made a few concertina books in the past, but I’ve never added other elements like pop-ups and inserted tabs. I got lots of ideas for new things to try, and a really good demonstration of the basics. I especially appreciated the discussion of all the alternatives - things like different kinds of adhesives, and when you might use each one.
Rachel Lyons
thank you thank you! i have sooo many greeting cards that i can't bear to throw away...now i don't have to! great ideas and easy to follow.