Shoot: One Side Light Beauty Shot Part 1
Lesson 4 from: Commercial Photography: From Start to FinishJoel Grimes
Shoot: One Side Light Beauty Shot Part 1
Lesson 4 from: Commercial Photography: From Start to FinishJoel Grimes
Lesson Info
4. Shoot: One Side Light Beauty Shot Part 1
Lessons
Day 1
1Ten Things That Spell Disaster for a Photographer Part 1
25:08 2Ten Things That Spell Disaster for a Photographer Part 2
30:44 3Ten Things You Need to Know about Branding
31:12 4Shoot: One Side Light Beauty Shot Part 1
26:25 5Shoot: One Side Light Beauty Shot Part 2
19:20 6Shoot: One Overhead Light Headshot
14:06 7Shoot: Edgy Three Light Setup Part 1
26:21Shoot: Edgy Three Light Setup Part 2
16:41 9Shoot: High Fashion with Cross Light
24:57 10Lighting Q&A
11:25 11Compositing Fashion Shoot Part 1
40:21 12Compositing Fashion Shoot Part 2
29:19 13Recap with Q&A
12:43Day 2
14Understanding the Bidding Process
29:17 15The Art of Negotiation
35:55 16Money vs Art
19:19 17Shoot: Harley Man with Three Light Setup
33:28 18Shoot: Harley Man with One Light Setup
29:33 19Shoot: Capturing Athletic Intensity
33:55 20Shoot: Capturing Atlethic Movement
22:39 21Shoot: Athletic Portrait
25:10 22HDR Backgrounds
25:16 23Compositing Harley Man
33:54 24Compositing Athlete
10:23 25Retouching Q&A
13:55Day 3
26So You Want to Make a Living
12:18 27The Reality of Making a Living as a Photographer
28:53 28The Road to Becoming Pro
41:32 29Shoot: One Speedlite Beauty Shot
18:11 30Shoot: Three Light Beauty Shot
26:59 31Shoot: Blown Out Beauty Shot
19:25 32Shoot: Steampunk with Crosslight
30:26 33Shoot: Steampunk with Three Lights
37:12 34Compositing Steampunk Shoot Part 1
35:03 35Compositing Steampunk Shoot Part 2
20:01 36Compositing Blown Out Beauty Shoot
27:36Lesson Info
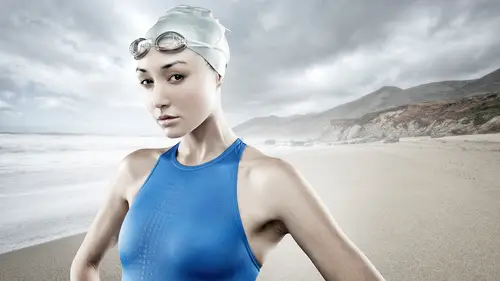
Shoot: One Side Light Beauty Shot Part 1
Let's bring ashland are beautiful model out because without her that's what be possible so come on out and here's a little tip get beautiful models because they make you look really good so thank you for coming out for this so I had not actually seen her or a picture of her until well actually john tried to push one in front of me this morning like don't show me and so you just walked in right so we're gonna try to do is we're gonna start with a cross light it's sort of the rembrandt and I say that sort of rembrandt because not too long ago I posted an image that said cross like rembrandt and I got all sorts of slack from that from people said well this is really what rembrandt lighting is and blah blah blah so let's just say I'm going to use cross light and we'll let the rembrandt just kind of fade off the side here but really it's the idea is to have beautiful cross like what that does is it builds depth in the face and the tones in the shadows and all that so I started doing this ba...
ck in the eighties actually in nineteen eighty one and um stuck with it for a long time until I started doing my three light kind of grungy look s so I'm gonna bring it back but we're gonna do this segment we're going to try to do everything with one light so I'm gonna try cross light here with the big seven foot westcott octa box and then we're going to try a smaller three foot modifier and then we're gonna if we have time we're going to try just a regular strobe on top of a a stand way back so it's a ruse small modifier so hopefully it to all three of those and we'll see the difference but my goal is to what create an image that I wanna hang on my wall so let's do that so with this I've got a background that's just a piece of candy is that I kind of cut from another background that I had s oh I could just kind of bring it and travel with it and it's kind of the old ninety's background been around uh but what I'm gonna do is I'm gonna add some texture to it in photo shop if we if we end up with this scenario so I'm going to change that background up so what I could do is actually shoot it on gray and it had texture so because of photo shop and the digital world we live in I could do things later I couldn't do in the old days so I'm not really worried about my background that much I want it dark I want her to pop I want some texture it now this background got a couple little kind of lines that I don't really like been photoshopped I take him out if they bother me so my goal here is to place her about at the edge of the I call it a bank but it's really my source now usually what I do is use a horrors are ah box that's a rectangular box but this works great. And also I can use the seven foot umbrella with a diffusion on it produced the same light. The only problem is that light source is right here it's shooting in coming out so I sometimes that can be a little you know, it's not really in the way, but I'm just saying this lights shooting through a baffle and then the diffusion so I want the light to come across her like this and then I'm gonna have a phil card over here. I try to minimize the use of this still card, uh, until I really need it and that would just maybe bring in a little bit of bounce, but less basically we're going to shoot without it, so let me just kind of turn it so it's not influencing the scene at all, and if I a studio and have a white wall over here, this is going to bounce it's like back in, so I used to carry with me always black, black cloth, black foam core something toe absorb it if I had to, but let's do this. I'm gonna start horizontal now, but hopefully I'll go to vertical and we're tethered here. I've got this pen tex six forty five z with a ninety millimeter lens and I'm going to try right now just kind of a real quick wait, you know, just by about from here up and just kind of test my lighting so let's, take a look here we'll make sure it's cameras on and focused. Here we go. All right, so I can't see back here because we're tethered, but we'll take a look here. So the first thing I notice is what I'm gonna look for is where does my rembrandt I say rembrandt or the light value on the opposite side of the cheek fall there it is right there that to me is the most important thing that I'm gonna look for right off the bat. Obviously I don't want to blow out this so at the justin exposure accordingly, what I normally do is I set my f stop at a fixed, say, seven point one. In this case meaning format, I'm probably going to go toe maybe f nine ish because as a general rule your meeting format depth, the fields going to be less than a full frame and a full frame is going to be less than a crop sensor so at f seven point one on a full frame which is normally what I do in a studio it gives me plenty of depth of field for a portrait like this in this case I want a little extra now I may want to run it really shallow that may be what I want and that could be kind of a cool look too. Now that's narrow at the really para power down but here I got a little texture in the background and so let's do this I want you to bring that right shoulder toward me a little bit and then let's just do another shot let's take a look at that and then I might bring my phil card in case I wanna focus and then remember this that my life sources here so bring your chan right straight down try that right there ready? So we focus remember to keep going here. So that brings that shoulder forward looks pretty good. I would say even a little bit more, so bring it, just bring it a little more that they're ok try that one so we take a look at that that helps a little bit more and then even even maybe kind of like you're just yeah, just give me a little bit more of a right there and I may not want to go horizontal on this because I'm just got a lot it's a dead space on the right and left but I'm kind of getting my ah feel now that's kind of pixelated right now is that because it's not rendering fast enough I don't know it's kind of weird how it's smoother here than here can you guys see that well we'll see it's just this is a big monitor normally I'm looking at the back of this but all right so let's do this I'm gonna bring in a little bit of phil and I don't want to over fill it right because I want that dark side on her uh her face a little bit so this is about two feet maybe two and a half feet so let's see what happens ready one two and I'm gonna flip my camera here in a minute all right so that's a little smoother sea that just brought in a little bit of value on the cider cheek and I also know this in photo shop if I want to darken it it's going digital has a hard time getting detail in the shadow areas that's a bit death bed death falls in your highlights more than in your shadows so as a general rule I would want to fill it a little bit mohr in camera and then later I can darken it down does that make sense such as a general rule that go by so let's flip this because I've got a lot of debt space of my composition wise I'm going to go and make sure I got this little tether tool thing here I want to make sure I don't pinch that and I'm on a really write a write stuff ball head and tripod this is absolutely beautiful dream to use okay so now I'm gonna be able to go down just about to her jeans and let me focus okay? We're focused and I got this one feather flying coming out that's kind of cool don't leave it there I'm just going to see what this does ready all right? So one too three right there take a look at this that should oh, this is gonna be a challenge uh we didn't run through this before so we got running this way but maybe in the camera we can weaken switch that around look look at that magic it just happens I just speak the word and so now I think composition wise that's much better than what I just did before, right? So now I've got some dead space around here but this little feather is kind of cool and so now in terms of a portfolios shot we'll start working now I got my lighting I got my my oh my phil cards about right uh, let me do one thing I wanted to show you if I don't have enough light on this cheek opposite, I have, um really, what the option is to bring my light toward me, so don't move and I'm going to slide this about five inches and what that does that allows this part of the modifier to reach around her a bit more. So let me fire another one off like that ready one, two, three it's going to be subtle, but that'll fill a little bit more of her cheek, and if I say that's too much light, then I would push this light toward the background cheese stays still and that's gonna be a little more contrast. That means it's going to be less light on the opposite side of the light source let's, try one like that again. I don't want to go too much in there, but I want to make sure that you guys see what I'm doing there, so that is actually doesn't look too bad, but it would soften it probably if I go back to kind of where it wass right about there, and like I said, that's, usually right at about the edge of my source is right about here it's a good starting spot, right? This is the bank coming around and pushing light on the opposite of cheek. Okay, so now we've got our lighting. We've got everything let's kind of work it. So one of things I don't like about this kind of angle so let's say you're the camera, right? See? So she doesn't have his arm showing at all. So what I normally do is bring that up somehow or do something with that other hand. And plus she's got a really cool, um, kind of ah bracelets on there and want to make sure that maybe that show's so let's slide it. Maybe it will slide a little bit. Okay, so we just maybe up that's gonna be, can you take it up? All right. So let's see if we can bring that and maybe not too much, but just something that comes it comes across, it could even be down. Whatever just whatever feels natural and so here's. What I do when I when I tryto coach a model number one, I don't really know what I want in terms of she knows what she she has a sense of what her body does and what feels natural to her. I don't want her to do this, you know, like you start posing someone like this. I want to be natural so what happens is I'll usually watch her so I'm kind of like, oh, it bring your hand up and maybe it doesn't look right, but all of a sudden she moves and she'll do something that's real natural to her I know I've got it, so I don't want to coach it too much, but I say move this do that but that really I want you to kind of just move around and let let the your natural intuition take over. Can I try that? Okay, just keep going here and I'm just gonna fire some off here. Can you guys see the screen behind me? Kind of blocking it, huh? Okay, don't do that look down like that. Look down. So a lot of times by looking down, it's kind of cool or maybe you actually swing your chin a little bit toward the bank of the light and just look off like that there, take a look at that one beautiful, beautiful, okay, so that looks really good. I like that. So even more swing your chin off like you're just kind of out there, you know, excellent, excellent. So now what I'm noticing the right here is I love to get her hand in there, so I'm just going to back this up and because it's not a zoom lens right so I'm kind of limited there so let's just see what happens that I do this right here make sure I focus because I don't know autofocus picture doesn't do me much good does it so that's working pretty good but maybe I I ke let's try coming back in here and a little tighter so I don't have to choose to try to get their hands because that might be too much so let's try right about here actually focus on her face her eyeball right there beautiful gorgeous see that start to happen so let's take a look um maybe either take it may do si do that just something that we hand was a little bit okay now I'm that feathers going off no no leave it there but just step that way just a fraction toward that little thing yeah so so you're back in kind of the frame of the backdrop okay ready here we go focus all right so I'm just gonna have you start moving you just kind of do your thing I'm gonna follow you now make sure your hands and they're they're perfect perfect perfect, perfect beautiful yes so I'm just gonna watch her and I know that there's going to be something that she does that's just gonna be like oh my goodness and I'll ask her to repeat it so he's gonna keep doing this here so like I said, my goal is to get something I want to hang on the wall so I'm going to keep watching her until I feel like I've got it so now let me think about something here that looks pretty good you guys see that there that's kind of working but let's just try that where you look toward the bank a little bit so if you have to spend your body that way it's okay but let's just get let's get you to swing toward the light source a little bit see what happens now do this where you're almost like it's it's this that little bit of an innocent kind of just and then and then yet and then look down look down look down look down on the ground like right there. Yeah. All right, so you wear the cannon ten here we go. Well, I like that now I got to make a choice when she drops her hand down all of a sudden my frame is right here I got either go down here, go up here I can't go down here right? That just there's a problem I could never slide it up or something but let's just you know, stay right where you're at and I got a zoom lens now right? But now the only problem is my background is going to show up at the bottom it's it's it's just out of frame and but it's not it's not coming up right away here or is it? Oh, I see it's just a little tight so it's down there but on my frame itself I was I was getting a white band on the bottom here so let's see what happens here? No, I never shoot tether except I've been using the cam ranger which has its own hot spot that transmits to my iphone or ipad or a computer and it's a really amazing tool that's the only thing ideo typically that's the best and it's working great for most of my you know, teaching scenarios or the cameras you're also takes over the camera and I could do a whole bunch of crazy stuff with it long exposures and aya so bracketing all that but so let's see what happens here see if we can get it to come up one, two, three to see if it comes up come on, baby the light now when she spun into the light actually it's got a different look so now she's more lit but that that rap is going to go from highlight too dark right that's what I want I want that rap highlight to dark highlight the dark and this is happening all along her body and her face and everything so that's my goal um so when she spun into the light actual looks pretty good I'll keep shooting your seat that keeps coming up here ready? One, two, three let me actually had to re focus because again, how many times have you had your perfect picture and was out of focus? Right? Always make sure your focus is is I used back focus back focused button it's hard to say back focus button not on the finger and so it's set up and most cameras will do this and it's set up so that either here or here is my focus button so I go and I compose focus, focus and I can just start shooting up above and is not going you you it was all over the place that's the worst thing for me is when it's zipping around, I can't uh, why don't we just kind of go over your settings where you start? A lot of people ask setting questions and I know we're not really getting into that this time, but since we have a minute you mind talking about how you set your white balance just basic settings that uses start with everything on daylight. I'm colorblind, so I don't worry about fine tuning my white balance right? To me that means nothing um when I go into photoshopped, I'm gonna be working in a daylight environment, right um and I'm gonna I'm gonna ply the joel grimes photoshopped look to it, which is a d saturated look. So any little shifts, I have it's gone. And then, um normally, like I said, I meant f ten here that's because I went from the medium format, but normally seven point one. So how do I adjust that? Always changing the power output of my light up and down, up and down. So and here's, why do this think about this when you have, say, two or three lights and if you are going and changing your s stop, that means it changes the value on yet three sources. So to me, what happens is it's like a teeter totter, right? You've got your just this. You gotta just this? Well, if you're adjusting three light sources in a camera, that's four variables. So what I do is I keep my camera variable constant some point one f ate somewhere round there, then I'm fine tuning my lights by going to the power up in tower down. That means I don't touch my camera, so it makes sense so much easier for me. Plus, I know my sweet spot of the lens, and I know that at seven point one, my depth of field is plenty what I want so that's a good place for me to do it so that's kind of my settings in terms of you know how I work and you'll watch me I usually am running back and forth to my cat my my uh my life and changing now these are the the einstein policy buff einstein's they do have a cyber commander that you can actually put on top your camera and just up and down I don't use that because usually the lights right there you have a boom that's a different thing but but I'm just going back and forth and these are all set up. So is that good? Oh, well, then I'm gonna hand holding folks oh, no, I don't know how to do that. I'm breaking all my rules. Okay, so let's, go back to that. I want you guys to do a test sometime. Okay think about this. You gotta model hand, hold it, then shoot one on a tripod blow it up two hundred percent look at the difference. I'll guarantee the corners especially are going to be softer because that's where you're weakest part of the lenses the corner's always sharp around tripod I don't care how much money has been for your lens always sharper on a tripod so let's do this now you see this dance here that's the photo stance is like a boxing right teo started you can hear actually probably doing this we better care ready let's see what happens so I'm a little dark so what happened? Um I'm on oh my I s o got bumped here it went to fifty have no idea how that happened so let's go backto one hundred were at f ten one twenty fifth of a second fine but we could go up tio two hundred because that's my son think of my careless try this much better so here comes all right so now we got our exposure correct I think we got everything there so let's just start snapping away so here I am let the rock and roll began ready right in here right there you know with a zoom lens I've got a little bit more flexibility I had with that fixed lens but um I'm just gonna come in here like this so you're the little audible that's telling me it's focused I mean when I know that I'm good to go right they're ready okay so my focus point is dead center mike in my do you find her so all I do is go I can change it and move it up top but I just go to your eyeball and then down set makes sense that's why that back focus is so important so let's flip horizontal see what happens here oh I still have to go look over here now so I should probably let them know if I'm going horizontal vertical is that correct? Doesn't matter okay, so I'm gonna move in now you notice that a lot of times I crossed the top of the heads. Does anybody notice that I get emails all the time now? Why? Why don't I do that? My intuition just let me do that now some people say I never cropped the top of a head I could get away with it I also center a lot I was taught the rule of thirds, right? But I don't mind centering things first of all, how far is she away from us? And we can't we see from your modifier roughly two two t two feet, but but don't go by that so here's here's here's the biggest problem lighting is when you try to match when you try to match a particular light by distance, so you say, oh, jules got two and a half inches or twenty feet from the subject to defeat I'm going to that that might be a good starting point, but every time you get a model in their skin tones of bone structure, everything would be different so you can't go by distance as a magical formula as a good starting point, yes, but not don't get caught up into it so that's why I don't really like schematics that's a oh here's two and a half feet here four feet here output here racial hate ratios why don't hate ratios because every skin is different so if I say one two four ratio or one to eight rachel one to two ratio what does that mean? What does that tell you? It tells you it's a mathematical formula which what happens there? Do you think now photography's a mathematical process it's not you know you know what photography is intuition intuition is the single greatest thing that you've ever used to solve a creative decision so memory I used that word creative throw that in there it's a creative process it's not a technical process. Yes, we have techniques but it's not about tech it's not about the technical f stop whatever that really matters. Once I get my basic lighting it's all about what's gonna happen between I mean her in terms of making it happen and creative side of things. So using this as a reference point on lee and then it's going to be a lot better it's going to be here's what's happened I'm looking at my monitor going is it working or not working too much light? None of life's too much shadow you know, to move the light this way and it's a lot of it experience that makes me able to do those decisions quickly
Ratings and Reviews
OneMoreArtist
Joel Grimes reflects the true meaning of a passionate modern artist. Seamlessly blending his old school film techniques in todays ever-changing digital world with such amazing realistic results. Not only in his own body of work, but achieving the same outcome while teaching LIVE, even when things don’t always run smoothly, much like the real world. Thank you Joel for sharing your hard work and talents, your struggles, most importantly, your honest open teaching style with such detail in every segment. Much appreciate CREATIVE LIVE for keeping it real with good talent, on and off screen showcasing common humanity in us all. Indeed, a revolutionary company. Manny DaCunha.
a Creativelive Student
As an editorial and photographic professional it's refreshing to find new cerebral information that goes beyond simple instruction. It was motivating to see Joel, a highly respected professional who is successful in "real-life", display his thought process, points to be successful, and insights into his art. When you have been in the industry, working full time, you need those moments to relax, visualize and re-energize so you can look at projects with a renewed vision and passion. Joel and his Commercial Photography course did that and more for me. If my schedule allowed, I would certainly join Joel at one of his workshops. Only thing better than this CreativeLive would be attending live. Thank you Joel.
Student Work
Related Classes
Commercial