Compositing Blown Out Beauty Shoot
Lesson 36 from: Commercial Photography: From Start to FinishJoel Grimes
Compositing Blown Out Beauty Shoot
Lesson 36 from: Commercial Photography: From Start to FinishJoel Grimes
Lesson Info
36. Compositing Blown Out Beauty Shoot
Lessons
Day 1
1Ten Things That Spell Disaster for a Photographer Part 1
25:08 2Ten Things That Spell Disaster for a Photographer Part 2
30:44 3Ten Things You Need to Know about Branding
31:12 4Shoot: One Side Light Beauty Shot Part 1
26:25 5Shoot: One Side Light Beauty Shot Part 2
19:20 6Shoot: One Overhead Light Headshot
14:06 7Shoot: Edgy Three Light Setup Part 1
26:21Shoot: Edgy Three Light Setup Part 2
16:41 9Shoot: High Fashion with Cross Light
24:57 10Lighting Q&A
11:25 11Compositing Fashion Shoot Part 1
40:21 12Compositing Fashion Shoot Part 2
29:19 13Recap with Q&A
12:43Day 2
14Understanding the Bidding Process
29:17 15The Art of Negotiation
35:55 16Money vs Art
19:19 17Shoot: Harley Man with Three Light Setup
33:28 18Shoot: Harley Man with One Light Setup
29:33 19Shoot: Capturing Athletic Intensity
33:55 20Shoot: Capturing Atlethic Movement
22:39 21Shoot: Athletic Portrait
25:10 22HDR Backgrounds
25:16 23Compositing Harley Man
33:54 24Compositing Athlete
10:23 25Retouching Q&A
13:55Day 3
26So You Want to Make a Living
12:18 27The Reality of Making a Living as a Photographer
28:53 28The Road to Becoming Pro
41:32 29Shoot: One Speedlite Beauty Shot
18:11 30Shoot: Three Light Beauty Shot
26:59 31Shoot: Blown Out Beauty Shot
19:25 32Shoot: Steampunk with Crosslight
30:26 33Shoot: Steampunk with Three Lights
37:12 34Compositing Steampunk Shoot Part 1
35:03 35Compositing Steampunk Shoot Part 2
20:01 36Compositing Blown Out Beauty Shoot
27:36Lesson Info
Compositing Blown Out Beauty Shoot
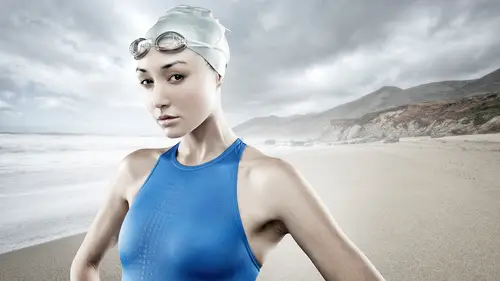
And I could tell you what image I am really drawn to that one I don't know why but that's kind of cool kind of cool I like that one two that's kind of cool tube I love this shot so let's do this okay command are brings me too raw now I got my little blink he's on well blinky is or the indicator that shows where I have no detail in the highlights look at her shirt it's pretty darn good there's a little bit of problem right on this shoulder which tells me that light might have been a little bit too bright but watch what happens when I do highlights bone no problems whatsoever is telling me I have detail here so let's go in shadow detail I don't think there's really much uh to pull out because it's really um not an issue clarity I don't want to do too much clarity on here because it's kind of a soft look right so let's just leave that zero contrast wiese's pull a little bit of contrast out and then um exposure wise so I was pretty close to my exposure but let's see we blow it out a little...
bit we're going to be able to fix that we're gonna add we're going we're going too give it the clean air the blowout look a little bit later anyways but let me show you right here I'm sorry my masking tool I'm asking but burn and we're going to just go along what did I just do here? And I will I'm gonna go along here and let me look at my exposure that's a minus ten so we can bring this down just a little bit if I want well that's what happened? I thought I was losing a little bit of that let's just go here and do this whole thing and then we'll bring it back I think I've gone too far here now watch what I can do here. I'm gonna go outside of my outside of my area we're going to hit a race look what happens didn't do it using when you cross over here it shows up show mask there's my problem so now I'd come back here is taking his time in it never seen them do that it's like something oh, you was probably still saving in the background that's what's happening it's still saving that one file but it's just like not wanting toe react to my but you see what I'm doing I'm erasing the the the uh bern um let's take this off now holds my whole system up just give a second because it's saving in the background it's got too many things going on that one file was huge and plus I had the other image open another image is just sitting there open and that's something you don't want to dio I usually when close everything up while you're working so let's just see how long this thing decides to hose up on me if I could go over here we'll get out of it you won't even get out of it sorry this is photoshopped folks I had one time I was teaching a class and every single thing that could possibly go wrong went wrong in with that one hour session I mean, it was almost a comedy show. Okay, so why's that one little spot not disappearing there it goes. All right, I think we're caught up now but you see what I did I can come along here davey, come on and fix it there to sew on ly that basically what I was trying to dio is on ly the cloth was getting hit with that burning let it catch up again any questions, cliff? You gotta have a question just to kill some time here umm how about when you were talking about shooting the back from shots? Well, if you have a blond you're using black behind are you do you use that to cut out that would take that from another frame yeah, bring it over as a mask and just drop it right on her hair and then just painted it painted in okay and it should be a perfect a perfect cut out and there's another little little thing that I learned and that is that bridge ends up um taking a huge amount of cash aram and so you know, it's always good to clear your cash out of your um out of your bridge I'm going to say don't save on this and that when I'm gonna leave actually I think I just get out of it so let's just see if we back into here will it let me go yes so there was something there going on so that should give me a chance to bring it over it probably my little burn job wasn't is terrible it was a terrible job let's go back open it up what I can do is go over here to my, um brush we can just get rid of this one it's gone actually let's do this way delete let's try it again really carefully let's just paint in and if this bothers me I'm goingto scream there goes look how easy that's how it's supposed to work folks so I come around here clean that up clean that up clean that up okay, now I've got the showing mask let's take that off and I know I went way too far so let's go back to about here we pulled the highlights back contrast back clarity is too much so basically they pulling the highlight slider is really what kind of brought brought that down in value a little bit so let's say okay, because we're tied to raw I could go back a hundred times, right there went a lot cleaner, so let's do this let's move on we're gonna get to the really the jewel of the whole process is right here, right click new smart object via copies were making duper copping that separate double click it this is it folks hit the the h s l slash grayscale convert to black and white and here's the magic right here pull her skin tones to the right the orange on this one and the same with the yellow does the yellow doesn't care a little bit it would make poor little bit red not a whole lot happening there, but it's really the orange so now I am smoothing out her skin, but I don't want to lose all the detail so let's see what happens? I'm not locked into it, right? So I had okay, nolan could make it bigger and now let's go to luminosity and then we make another duplicate copy and go to soft light and there is the magic of that look right there and were darker here on screen too, so I have to keep that consideration but I'm gonna pull down that a little bit and pulled down the luminosity a little bit. Oh, my gosh. This looks so good on here on the screen. Okay, so now if I commit to this, I'm locked in so I will be careful. I would say yes, I think I'm pretty good with my skin tones I'm gonna flatten this and then let's take um and I can do a duplicate copy and here's a little trick to if I want to go to screen uh, go down to zero and if I want to just pop the highlights just a little bit now again on my on my monitor looks a lot better. This is blowing out a little bit, but I could just smooth at the skins that a little bit the overall look to me on here, it looks pretty darn good. And then, um, if I take this, go take a look here. I want to make sure you guys can see what I'm doing here. Why don't we do this let's hold off on that? Because right now I can see it's it's really blown out on this monitor. So let's, hold up on that. But what I want to dio because I want to bring white around everything, right, so if I take a white brush and pure white is going to be two white back there, so I want to do it to one of two ways one is I can just do my dropper and go click and then come in here and hopefully has got a hundred percent hopefully that cleans up to see what happens down here, so I don't want that because I want that separation and the shoulder so here's what I normally do, I actually take the stamp tool and I just stamp across so I'm picking up the same value all the way down, same over here, some stamping and then I have a nice clean background and I might want to punch my blacks up just a little bit. So one way to do that and I haven't even done my d saturation yet, so let's do that let's go to de saturation, we're gonna pull it over a little bit. I know you're saying, why do you do this on every single emits joel? Because I'm completely nervous being colorblind that I've got some funky little cast to it this takes it clean cleans it up, but I want to take and I'm going to take a black and white layer here I'm going to set that to ah blending mode of soft light and then I'm gonna run my opacity down to about twenty five percent so let's take it off so that gives me a little de saturated too but also punches the blacks just a little bit maybe even bring it up a little bit more so that looks pretty good let's blow it up look at her eyes here, miller good. That looks just absolutely amazing and I haven't even done any retouching on her skin yet so I see a little bit here what I would do oh is that would make a blank layer filled with gray. Okay, so let's go over to my dodge and let's go about six percent on this I think I get away with it and I'm just going to smooth out right along that transition right here just move it out just a little bit dodge six percent yes. And then there's a little bit of a dark patch right here with clean that up clean that up and that's about all I'm gonna probably need to do on this whole retouching on her skin clean that up maybe a little bit right along here a little bit right along here I love this that looks amazing and because it's a little bit dark or light light on there let's just darken it for you guys to make sure you can see it let's take it I want to talkto tab an amazing wow I would spend more time on this I might bring her eyes out a little bit darken it down just a little bit maybe put a little pull pull little color out of it. But that's that's amazing! I love that shot. So that's, how I do the blowout look not hard, not difficult, but again and you can make maybe experiment. So, like I said, I had a little screen and like you said, the screens let's go back to tab here. So basically I do here is I duplicate the layer and then go to overlay, go to screen and then go to my capacity and for me again, I probably only do about ten. Fifteen percent, but that just goes gives me a little bit extra punch and the whole thing's smoothed it out. I have a question from luis matos, who wanted to know if you change anything on the black and white layer or did you just change the blending mode? Okay, you can't just you got a whole pallet there of sliders and you can adjust the sliders but a twenty five percent if you change the orange or the reds or what our yellows it's going to just do a little teeny bit, but yes, absolutely you can change the sliders and adjust the skin tones, just like I did in raw let's talk about how your computer like are you usually heading on a laptop? No, so you have your home computer so this laptops a really good like I'm telling you it's just that when you start opening four gig files so where do you store all these files when these massive, massive very good eye have a sin ology raid system in my office technology technology and it's thirty two terabytes? And it has all my files stored on there, and then I back that up with another set of hard drives that are off site. So um, that's and that's what I'm working off of and that's that's wireless so I'm working on it, and so I can I can take my laptop and go straight and work off that hard drive and never could be connected and same same, you know, house or office, but yes, file management is you really are I mean, you really have to know a lot and I don't I'm not an expert, but having the sin ology system is great, I can actually ask access those files on the road but it's big files, right? You're gonna download a five gig file that's a lot of downloading so you have a really good internet connection, but it's possible, the client calls me and says, I need that image and go find it and you downloaded, upload it and get it to the client but yes, that's all nothing. So no, I use I have ah, I'm ac it's uh, you know, their latest best, whatever and that it seems to work really well, but this laptop should I think what happened was I saved that big file and I started asking it to do something wrong and just said, whoa, hold the horses and I think what happens if we get very impatient? I'm very impatient and so when I get to go into fast things happen and like you said, save it every chance you get because nothing's worse than spending two hours on image and forgetting to save it and then you lose it all I'm joel a question to come about blown out back grounds do you have a collection of those as well for a blown out images? I'd never put backgrounds in them you do? I do, but I make him so I take a regular hd are right and then I go like that tree with jessica, the one of the trees in my portfolio. Um I could probably find it if it's on my hard drive somewhere here, but I made that background blown out and how I do that as I take the screen duplicated make a screen maybe thirty percent that's that's a good start, then I take a blank layer just command ship command and and I did my white brush and I go fall at about thirty percent are you know the opacity and flow go I just spray paint the whole background and I fog it in and so like with jessica here if I dropped her in the background let's say there was a bunch of pillars in the background was like in greece or something I could make that background fog and I wouldn't even cut her out I would just literally paid in the back so that she just fits right in it and that's what I do with the tree I never actually cut her out so you wouldn't have any of that in between layer like you do and it's like all in between later won big blow out but I've done that if you look at my website you'll see a couple images that I've done that too and I've done the background by just basically taking a candidate's white spray paint and going over the whole you like my sound effects and then that's fogs it up so I don't specifically shoot ah blown out background you could I guess but I'm actually create it later after the fact great well we're winding down joel so would you like to do you have anything out any more editing or should we? Well, I would say that the only thing we had another shot of her let's take a look I really like this shot and jessica said she liked it too so let's real quick and you know what we should do let's save this when we have to say that have way save as and of all my preaching I haven't saved it have I see because I'm a hypocrite and we're gonna put her here and that's just going to say that but what I want to do is before I open this one up but this is the one jessica light let's add that texture background okay and then we'll call it a day in terms of my retouching so let's before it's forty two percent so let's not do anything because I'll screw it up there it is it's gone we get rid of it it's off the board let's open up this one command are and then we're going to go open shadows take two highlights down a little bit have I done this before? Take the contrast away a little bit and then let's go open and let's bring this over here we're going to go to right click new smart object be a copy same old thing joel when you going to move on right well when I'm ready so let's just kind of just those a little bit and we're not going to do all the reading skin retouching on this one because, um we don't have time but to show you my um the technique with the texture let's grab the texture which was I think just off my desktop here okay, here it is we're gonna bring it over so I grabbed it v tool or drop it onto the top of the layer command t allows me to free transform it to fit the size and I'm gonna go to overlay bone now I'm gonna add the levels why a mask we're going to have a mass to it we're also going to put a levels above it that's gonna be clipping path to it so let's clip it think and then we're gonna increase the contrast a little bit on the background right about there now we're going to knock out her or not knock her out but paint her out because we don't want to do a mass come this we don't need teo so I'm gonna be on the black mask um let's make sure it's a soft brush which it wasn't and you can go like maybe a little less opacity so that you can build it up a little bit but basically we don't want it on her skin on her arms here and I'm just cleaning up it doesn't have to be exact right? So I just go along here like this and there's that texture background is that not cool? Just a plain old gray come on wow you're textured backgrounds things you've shot most of us this is I'll tell you where it's on my web site I believe I just did uh and now I'm going to be drawn a blank. You're asking me where I got this backdrop? Well, in general, like you're usually shooting your own texture backdrop. Yes, and I'm really apologized. I I'll try to maybe get you guys a link it's a guy who sells them uh just so bad. Um it might be on the name let's see if it is artistic selections. Thirty eight artistic selections. You know what? I really apologize and I get in trouble because I'm just terrible with names, but he has a selection of background and I just thought I'd try and I ordered men ever expensive at all. But I've shot hundreds of backgrounds and most of the stuff you see in my sight I've used with my own backgrounds, but I had that one on the desktop they're basically yes, I just wanted to say because we're running out of time well, first I wanted to say how much I love this image this whole siri's of her on this desk was absolutely colors everything about it texture blew me away and that's before that's before any retouching, but I wanted to just say because we are running out of time andi we could do this all day long watch you watch you do this and go on to the next picture if we could just kind of talked to you a little bit more and just kind of wrap this up get some final thoughts from you go you know, go back full circle to where we started to be any of the workshop and we'll go back to the big picture from today the goal was what my goal was that I get you encouraged to go out and create images that fit you as an artist and you go out and rock the world with it that's my goal, my goal is not for you to copy me I want influence you to the point where hopefully you're an artist that's my goal copy me on that I'm a hard worker and I encourage you to be hard worker copy mean that but don't copy me exactly what I do you can it's like going back to that whole idea is that it's easier to be you than be mean it's hard enough to be me but you know and I can't be you so so that's the goal is to encourage you to go out and create images, so if you're fired up, then I've done my job and if you go out and say I'm gonna go and do one self assignment a week for the next year or maybe you did too soft assignments a week for the next year I don't know, but whatever it is you set a goal and all sudden remember how many portfolio pictures do you have pictures even a portfolio thirty to fifty so in theory you could create a portfolio year but you can't do it by sitting on the couch eating chips, watching a football game so that's my goal get you guys off your butts out in the field or in the studio and creating images and then you step back and say I didn't have that image yesterday or this morning I have it today in that exciting that's a good feeling it it's a really good feeling that's what I do it for the creation of it well, I think that's awesome I really love what you said originally to about creating your own voice I mean, you're repaying that now but and having that and you talked about having a you know, a sophisticated creative individual voice, so I think that is something that we can all strive to accomplished, and I think that as human beings, we all want techniques nothing's wrong with that nothing's wrong going oh there's a cool teddy I can't wait to learn that and that I'm the same way right? But in the end you're gonna have all the techniques and produce boring pictures or do nothing with him and produced nothing. So the goal is. Take those techniques that you learned and apply them to your own vision. And then people will take notice. I'm telling you, if you go back to music and you related to music, pick your favorite or set of favorite musicians, singer, songwriters, whatever you have that you like and think about them and the journey that they got to where they're at, it was not copying someone else. They become their, became their own individual voice, and that's, why you like him, we don't like copycats, so why do you want to become a copycat, right? So and you hear a american idol, or whatever those shows, they always say when something gets up bu, and that takes a risk, but bu, don't be someone else.
Ratings and Reviews
OneMoreArtist
Joel Grimes reflects the true meaning of a passionate modern artist. Seamlessly blending his old school film techniques in todays ever-changing digital world with such amazing realistic results. Not only in his own body of work, but achieving the same outcome while teaching LIVE, even when things don’t always run smoothly, much like the real world. Thank you Joel for sharing your hard work and talents, your struggles, most importantly, your honest open teaching style with such detail in every segment. Much appreciate CREATIVE LIVE for keeping it real with good talent, on and off screen showcasing common humanity in us all. Indeed, a revolutionary company. Manny DaCunha.
a Creativelive Student
As an editorial and photographic professional it's refreshing to find new cerebral information that goes beyond simple instruction. It was motivating to see Joel, a highly respected professional who is successful in "real-life", display his thought process, points to be successful, and insights into his art. When you have been in the industry, working full time, you need those moments to relax, visualize and re-energize so you can look at projects with a renewed vision and passion. Joel and his Commercial Photography course did that and more for me. If my schedule allowed, I would certainly join Joel at one of his workshops. Only thing better than this CreativeLive would be attending live. Thank you Joel.
Student Work
Related Classes
Commercial