Lesson Info
6. Advanced Layer Operations in Photoshop
Lessons
Lesson Info
Advanced Layer Operations in Photoshop
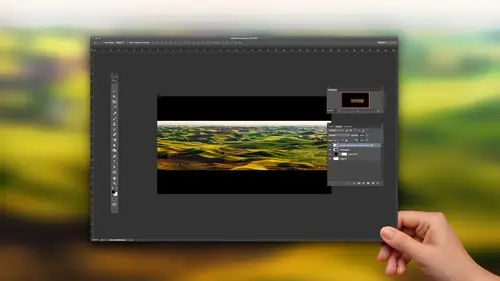
all right, So let's look at now, thinking, Maura, about layers. It's a bunch of things we can do relating to layers, and we're just gonna look at kind of a random collection of stuff. But first, let's start off with something that can annoy me. And that is, sometimes I stitch a panorama, and when I'm done, it's not a perfect rectangle, and I don't feel like cropping into the image to make it a rectangle because it was too tightly cropped in camera to do that. And there are some newer features that can try to do some of that automatically. But the problem I'm going to run into here is a problem that doesn't Onley apply to panoramas. That's why I'm gonna use it on a panoramic image, because it applies to all sorts of other things, too. I want to fill the empty parts of this layer, but when I do it, I want to do it in a non destructive fashion in a way that's not permanent. So therefore, when it fills in the empty parts, I wanted to be on its own layer. So first, let me show you how to do...
it without layers, so you know the process. Then let's try to do it with layers, and that's when we're going to run into a problem, you know, if you remember or not. But when we had a picture of a tree weeded trick were, somehow we got a selection of the tree where it selected everything except for the checkerboard and the way we did it is we moved our mouths on top of the little thumbnail image of that. Later in our layers panel held on the command key control on windows and clicked, which I just did to my image that selected everything that's in this document that doesn't look like a checkerboard. Then I want to get the opposite of that. So go the select menu and choose inverse to get the opposite. He and that's the area would like to fill in, but in order to get it to properly fill in, I actually need my selection toe overlap the image itself, but just one pixel if I don't have it overlap than the very edge of that is what's known as anti alias. It means it's slightly fades out just by like one pixel, and we can end up with a weird edge. So I'm gonna go to the select menu, choose modifying, and there's a choice called expand. And it just means take my selection, keep it the same shape and just act like it's a balloon. You blow a little bit of extra Aaron. It just gets bigger. So when I choose Expanded last me for a number, the number ones Fine. So that just made my selection one pixel bigger on all sides and that made it encroach into the image by just one pixel. Now, to fill that area, I could go to the edit menu. I could choose Phil. And the default setting is usually content aware. But we used this earlier. We use the setting called History, so we have to change back. I'm gonna use content aware. I'm just gonna click, OK, and I'm gonna hope it looks OK when it tries to fill in the empty parts. I'm not going to have find too in the end result here, because that's not what I'm trying to get to. I'm trying to get to showing you how to do this on its own layer. And that's where you run into difficulties. But you see how it didn't do a bad job of just inventing content to put in there. Great. I'm gonna choose. Undo, though I want that to be done on its own layer. So I'm gonna create a brand new empty layer. Then I'll go over here to edit Phil, and I'll use that exact same choice of content aware and you'd think it just be that easy. If it works, don't laugh. No, you always get this message for the most part, unless you're trying to fill in area likes of one pixel in size or something, it will give you this error messages if it just can't do it. And that's because it needs the rest of the image to be on the same layer in order to successfully do this. So now let's see. How can we trick Photoshopped force it to do it anyway? Because technically, it should be able to do it. Um, So let's find out. What I'm going to do is duplicate the bottom layer. I'll just drag it down to the little new Layer icon so we have two of them, and then I'm gonna work on that middle layer. And I'm just going to choose Phil content aware which it should work because the waterfall itself is on that layer, so it will find it, and it will be able to fill it in. When I'm done, we still have the selection sitting there, right? All I'm going to do his type command J. That means jump it to a new layer or copy it to a new layer. And now I can throw away that middle layer that had the edges filled in. And I have the end result. I want there's an empty layer on top we don't need cause that was from when we're playing before. But all I ended up doing is I worked on I might have thrown away the wrong one. Yeah, throughout the middle. But all I ended up doing was, um, make a copy of the layer and fill it and then say Okay, fine. Take that area that selected it's still selected and put it on its own layer threw away the one that that it had filled it on. And so now I have the exact same end result. But when I look at my layers panel, I have the surround area that has been filled in, and then down here I have the original that doesn't have it filled in. So if I turn off the eyeball in the top layer, you can see it's built in there. If I turn off the eyeball in the layer below, you can see it's on a separate layer. But why? Photoshopped can't do that all by itself. It's such a simple thing. Um, I can't really tell you, because if I could make it happen that easily, then doesn't make sense to me. So if you want to see it again, just because it could be deceptively, deceptively simple, here's what ISS we were at this point when we had a selection of the area We want Phil, and that's when I wanted to just create a new layer and then tell it to fill. But that wouldn't work. So I duplicated the layer that contains my original picture. And then I chose Phil. It successfully filled it in Kim, Um, sometimes he which you could just pull it. And then, um, I can either copy this to its own layer and then throw away the middle layer or as an alternative, just select in verse and hit the leap to delete the middle chunk of the image. Either either method doesn't matter. But now I have that on one layer in that on the other. And therefore I could do it nondestructive, which is the way I like it, because oftentimes I come in and I notice and later on that this ah didn't do a good job. And it's sometimes hard to figure out exactly where did you stop doing the artificial filling? But this way, just turn off and on and easily tell where that started and stopped. All right, um, let's talk a little bit about masks attached to layers. This is a picture I took in Iceland, and this is not what the original looked like. The original is sitting at the bottom here, and if I hide all the layers on top, you can see that just this guy was a little less interesting. And in fact, the original didn't look like that. If I double click on that bottom layer, it's a raw file. I'll show you that the default was Yeah, that. So I just in Camerata get it somewhat close and then I was doing more to it. Here, Um, I want to show you a few ideas when you are working in camera raw. So let's find a raw file. Begin with. There's not one in here, so let's find one up here, okay? When you have a raw file, anyone, the open image button is usually down here, and that opens. It is a normal image, just like is. If you open to J. Peg or anything else, there's nothing special about if you hold down the shift key when you're in camera raw, watch what happens to the button that is currently labeled open image. It changes to the choice of open object. An open object means it will become what's known as a smart object. I did that when I opened this image. I opened it as a smart object, and when I did the only thing that wasn't here to tell me that that was the case was this little icon sitting on top of the layer. That means this has been opened as a smart object when you open a raw file is a smart object. If you double click on the thumb now for the layer. It will send you right back in the camera where you can modify the settings so they're not permanent. After doing that, I decided I wanted to optimize the image in different areas. Eso There's some changes I made, and I'm just gonna kind of build up what's already in my layers panel here again so you can ignore those layers. For now, I want to use different raw settings for only the bottom portion of the image where this grasses well, I can duplicate this layer. If I just typed command J, it's gonna duplicate it. And so now I have two identical layers. But here's the problem. If I double click on that upper layer sends me in the camera and I do something, I'll just do something radical. So it's easy to tell that the image has changed. I'll make it black and white when I click on OK, watch what happens to those bottom two layers. Did you see that? Both of them changed? So I'll throw away that I'll actually choose undo, and I'll throw away that copy of Mein. I wanted to be able tohave a layer on top that had different camera settings. And right now, when you just duplicate the layer, if you make a change to it, it thinks of them is two instances of the exact same file, then any change to make toe one affects the other two. Well, I could go to the layer menu. There's an area called Smart Objects, and that's where I'm gonna find something called New Smart Object via copy. That means the key is the word new. It doesn't mean a copy of the smart option. It means a brand new smart object that is independent of the other one. So I choose that and it looks like just a copy. But if I double click on the layer, can I get into camera? And now I'm going to do something to maybe make the grass look the way I'd like. Maybe I come in here and bring up a little clarity here. Maybe I make the brightest part of the image a little bit brighter there. Make that come out and I click. OK, the layer below will not have changed because when I said new smart object for you, copy its independent of the other one, make any sense now. I wanted that toe on Lee effect where the grass is. So I'm gonna add a layer mask to this, and I'm in a paint on that layer mask with black black is gonna prevent that adjustment from plying wherever I paint. So I'll just paint across the sky cause I didn't want it there. So now if I hide that layer, here's before and after you see the grass looks a little bit more enhanced because that's a separate interpretation of it. Then I'm going to start building up some adjustments. If I come down here and I say it want to use, let's say, a curves adjustment layer and not sure how familiar are with curves. But you can click on this little hand icon, and if you do, you can move your mouse on top of the image. And I could click on one area like let's say, this bright area in kind of lock in how bright it is just by clicking. Then I can come to this slightly darker area, click and then dragged down. It's like having a dimmer switch in my hand. I can darken things up like that, all right, and then I don't want that to affect the entire image. I think the very top area where the the clouds are the very top bank is a little much. So I'll come over there with my paint brush tool, pain with black and say, Get off of that because I'm just putting on the mask that's attached to the adjustment layer. But then I noticed that the building here is something that I really don't like, what's happening to the building with this adjustment? So I want to somehow get the building out of there. I don't want to do it on the same mask, though, because I want to be able to move things around and all that. So before I showed you that you could create a folder, remember, it's called a group, and if you just click on it, you get an empty folder. If you shift click on it, it takes whatever layer is active and puts it in the folder so I could add a mask to that, and I could paint where the building is, or I could come over here and use something like the quick selection tool. Get that selected and then I can go to my mask and I hit either paint with black to get it out of there. Or sometimes I just typed command. I command. That means invert, giving the opposite of what's there. So if there's white in the mass command, I would make it black so you can see how you can build this up. The main thing is, often times I end up using those folders, which are known as groups, and put masks on those to make them so they're separate, so you can easily create more of them in reposition them whenever you would like. But let me get into some other stuff related to layers. Let's get into some kind of weird settings that you might not originally be able to figure out what you'd use them for, and then I'll show you what that could be used for. Take me a moment here. I need to realign a few layers. Okay, one last thing. So here I have a picture of my wife doing yoga. If we take pictures of my wife doing yoga all over the world and all sorts of interesting things, if you'd like to see those visit on on Instagram. The world is my yoga mat. That's our account. You can see a lot of this. Ah, but I'm gonna take a layer and double click on the layer. I'm not gonna double click on the thumbnail image. I'm not gonna double click on the name. I'm in a double click out here with us. Nothing. And when I do that, you get to this. In here there are a whole bunch of settings. But there is something here that I find that people rarely use, but I find to be very useful. So let me introduce you to a few of them. First you see here what's his channels are G b? Remember in the past and other classes I had, I said, Your images are made out of red, green and blue. That's what that stands for. And let's see what we can do with those. I'm gonna duplicate this image so that we have a total three copies of it or three total. So command J Command J, you can see in my layers now have three of them. Double click on the top one, and I'm gonna make that Onley affect the Red Channel. Then I'm going to double click on the middle one. I'm gonna make that only affect the green, Then double click on the bottom one. And guess what? Making Onley effect the blue. Does it make sense that each layer is using a different one of the choices? Now watch what happens when I move those layers. Grab the middle there behind the scenes, your images made out of red, green and blue And now I've made it. So we have a different image contributing to each one of those pieces, which can be kind of a weird experience. But what's nice about this in some ways is I use this a lot for educating people about how color works. If you want to see an example, what I'll do is add a layer underneath all this that's full of black. This is a solid color layer. Put it underneath and I'm gonna end up using my crop tool to just have space to this document. So now we have this big black expanse. We'll watch what happens when I used Move Tool. Now I can describe that your images behind the scenes are made out of red green in this case, not much blue, but there's a little hint of blue and that that's behind the scenes how your image is made up. And if I move these so they line up again. Just not always easy. But you can usually get it to happen. It goes back to the full color image, which makes it people's brain kind of go a little bit. Wait a minute. It must be true that it's made out of red, green and blue, and I can separate it. Uh, and so that's one illustration for educational purposes. But how can I use this now to do some fancy tricks in photo shop? Open a couple images here here. I used it in a weird way. I don't know that the end result is that interesting, but I was taking three pictures of my wife, Karen, and what it was is Here's one. You see her leg, the position of it. Here's another her legs in a slightly different position. In Here's 1/3 where her legs in a completely different position, since the images in general identical out here and all three of those pictures when those add up to red, green and blue. Those areas I'll look normal, but only where there's motion in the picture. So I get a little interesting bit of color. But that still feels like one of those weird instances when when the heck is that actually useful? Well, let's do something that is otherwise that's so impossible. And that is, if you do a workflow where you need a print on a printing press and you want to print this graphic. If you make your graphic in RGB mode, you can run into a problem. And here's what the problem is. The shadow that's underneath this bus is in this layer that I'm training on and off right now. If I double click on the left side of it, I can see what it's made out of what color is in there. And it tells me how much ink will be used if this is printed in seeing why came out and you see all these different colors of ink being used. The problem is, if that's printed on a printing press in the magenta in cause printing a little bit too heavy, then it should be that Shadow is gonna look pinkish If the science is printing a little bit too dark than it should be, that shadow is going to shift and look slightly bluish. If yellow and so on, it's gonna be able to shift around in color. So a lot of the times people that will end up creating what's known as black only shadows where the shadow is only printed with black ink. And if you do that, there's no way the color of the shadow can shift around on you. It doesn't matter of science is printing too heavy. There's no scientific in the shadows, so it can't shift in color. Does that make any sense? So you might think you could just come in here and say I want no scion. I want no magenta, no yellow and you might have to add a little extra black in there because you took away the other stuff. You might think that that would work. You just dial it in and click OK, but it's not gonna work, because if I come back in there again and double click, this image is an RGB mode, and that means it's totally ignoring those numbers I typed in and it's just using it as a calculator to figure out what the's number equivalents would be. And in the end, it's only recording what's here because I'm in RGB mode. But somehow I want a shadow that will print with black ink. But I need to work in RGB mode because they're certain features and Photoshopped the only work in RGB mode. So how can I cheat? Well, here goes. Let's g I'm gonna take this layer contains the shadow and I'm going to duplicate it. But I'm gonna duplicate in an unusual way I'm gonna hold down the option key Ultima Windows When I drag it down to the new layer icon, why am I holding option? Because only if you hold option will you get this a question? It asks it asked, What document do you want to duplicate it into? And I'm going to tell it to duplicate it into a brand new document, and I'll call it You can name it CME or else call it K only meaning black only shadow. I just clicked, okay. And what I just got was a brand new document exactly the same size as the other one that contains the contents of that layer. It's just a duplicate of the layer in a brand new document. I'm going to then change the mode of it to see him like a I'll ignore the little warning. Okay, it's insane. Why came out now and I'm gonna double click on the layer, then And remember those check boxes. Will they reflect what mode your pictures in? So when I was an RGB, Modi choices red, green and blue. Here I'm in seeing why came out and I want to make this layer So we on Lee contributes the black. It won't have any information in science. Magenta Oreo Click. OK, now, when you take away, though with all the ink and the other channels that's gonna lighten things up. There's a lot less ink being used so I can double click on the left side of the layer and just make it a little bit darker to compensate for taking away all those other colors of ink. But now, if I just copy this and put it back into the other document, all that stuff we did would be undone. I need to do something where somehow this will magically get back into the state if I ever convert my document to see and what came out and here, So I'm gonna do it. Convert for smart filters is going to turn this layer into a smart object. The smart object is like a Ziploc bag that protects whatever's inside of it. I just took a seem like a document and put it in a little baggy, unzipped it shut so nothing can get inside to actually change its contents. It's in a little rapper called a Smart Object. Now I'm gonna put it back into that RGB document. I'll just hold on option, and I'll drag it back down to the layer icon to duplicate it. This time, I'll say, Go put it back in the, um, the original document. I think that was the name of the original Ah, click. OK, oh, close this document. And now over here I have a layer called K only Shadow, and I'll throw away my original shadow so that now this layer here it's weird. But if I ever convert this image, which is an RGB image to seem like a mode, that layer will have a black only shadow minute, and that's otherwise, as far as I know, impossible to do if you're in an RGB document and you want to somehow make it so when you convert to see and why came out that piece ends up is black only we contest it If I open up the info panel and I end up putting my mouse here on the shadow, if you look at the seem like a numbers that are in the info panel, it's not black. Only I have to get rid of this background first because I didn't do black only on it. But it's not black only can you see the numbers. But if I do this to convert document and now put it there, can you see the numbers in the info panel? It is black only, so we can really get around and do tricky things in photo shop, all depending on what features we know how to use. So remember, this is advanced tips and tricks. I don't expect them to be, you know, uh, simple things necessarily. But they're things where if you ever need to do black only shadows and you need to use features that Onley work in RGB mode. This is a way to kind of get around it. The key is, it was a smart object in the smart object cannot change what's inside of that little rapper. What was inside that rapper was in seeing why came out, and it was set to only affect the black in that document. And it's only when it gets back into a seem like a document that it could be made out of science magenta, yellow and black. But it will retain that quality. And so I think it's pretty special. So those were quite a few advanced tips and tricks. We could go on for hours. I mean, in hours. But do we have questions? Comments, another questions In here, people are saying they love, love what they're learning. Yeah, yeah, well, maybe some day we'll do hold down just that, because I think it would be talk about a little overwhelming if it was an entire day, right? I was just curious. Back when you're Iceland image, you overexpose it. Was there any reason for that? Or do you get less noise overexposing than maybe Sometimes you just press the button and don't think about what settings were there when you come back later. Your oh, man, that things so bright. You know, I think I've heard that if you overexpose, you get a little less noise. And if you were under exposing trying when you in general the digital cameras as you get into the darker and darker parts of the image, that's where the noise is hanging out. So the main thing is, you don't want to habitually under expose because if you dio, you're gonna end up brightening all your images. And if you're taking anything that's in a dark area in making it a normal area, you're gonna see noise in there, so you'll have to at least new noise reduction. You can still fix a lot of images like that, but it's something where you just don't want to do it out of habit. I would rather have my images be a little bit too bright as long as the highlights still have detail.
Ratings and Reviews
Frank Lombard
Ben, THANKS, you always make your classes a pleasure and informative opportunity, Keep them coming !!!
user-1c9a21
Ben is fantastic as always. Has a way of getting directly to the point and packs a lot of information in each of his classes. He's my favorite instructor.
Terri
Watched this cass live during Photoshop week. I think I'm going to have to buy it. Amazing stuff here.