Shoot: Top 5 Bridal Portrait Tips
Lesson 26 from: The Complete Wedding Photographer ExperienceJasmine Star
Shoot: Top 5 Bridal Portrait Tips
Lesson 26 from: The Complete Wedding Photographer ExperienceJasmine Star
Lesson Info
26. Shoot: Top 5 Bridal Portrait Tips
Lessons
SETTING YOURSELF UP FOR SUCCESS
1Jasmine’s Background and Wedding Photography Inspiration
1:10:37 2How to Define Your Photography Style
46:10 3Shooting with Intent: Romantic + Editorial Wedding Photography
1:11:18 4Shooting with Intent: Natural Wedding Photography + Fun Photos
47:50 5Overcoming Shyness to Find Success as a Wedding Photographer
56:21CLIENT ENGAGEMENT SESSIONS
6The Best Wedding Photography Marketing
53:06How to Conduct a Wedding Photography Consultation
1:01:17 8Engagement Session Tips
44:30 9Shoot: The Knot Couple’s Engagement Session
58:48 10How to Deliver and Choose the Best Engagement Photos
1:07:23PREPARING FOR THE BIG DAY
11Shoot: Wedding Ceremony Photography
37:11 12Shoot: How to Photograph Reception Details
40:00 13Prepare with a Wedding Photography Checklist
53:52 14The Best Lens for Wedding Photography
44:03WEDDING WORKFLOW
15The Knot Wedding: Wedding Photography Checklist for Photographers
1:21:41 16The Knot Wedding: Wedding Party Group Photos
57:14 17The Knot Wedding: Wedding Ceremony Photos
26:09 18The Knot Wedding: Bride and Groom Photos
30:52 19The Knot Wedding: Reception
49:09POST WORKFLOW
20Reflecting on The Knot Wedding: Q&A
54:42 21Post Wedding Photography Workflow
1:05:14 22How to Market Your Photography
59:08 23Wedding Albums for Photographers
32:50 24How Much to Charge for a Wedding Photography Package
38:40SHOOTING TIPS AND TRICKS
25Shoot: How to Shoot in Bad Light
1:09:54 26Shoot: Top 5 Bridal Portrait Tips
47:19 27Posing Curvy Brides
59:44 28Shoot: How to Shoot Tall and Short Couples
1:04:06 29Countdown to the Start of Something
1:03:17 30How to Start a Wedding Photography Business
41:46 31How to Do Social Media Marketing Q&A
1:00:22 32Periscope Online Q&A
50:49 33Check-In Q&A
55:49 34Check-In Q&A Part 2
1:05:13Lesson Info
Shoot: Top 5 Bridal Portrait Tips
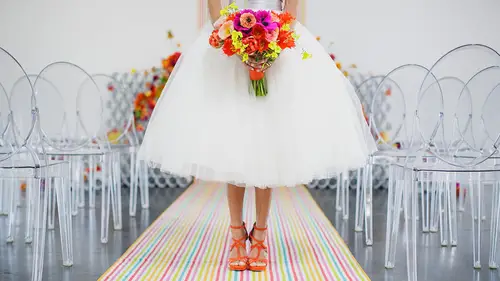
Today we are going to be talking about my tips and tricks for how to shoot a perfect, beautiful, amazing bridal portrait that you are excited to share with everyone. Now, a wedding day is dedicated to both the bride and the groom but as history has shown, especially in my business of me going almost as 10 years, there's a heavier emphasis placed on capturing more photos of the bride. Now I definitely balance it between the bride and groom but I have a little bit more fun with the bride. Now this could be perhaps because of tradition or culture or just a penchant on my end but either way, we know that this has to be done on a wedding day so the key is for you to become very comfortable so that then you can give the directions that you need to give to your clients to make them just as comfortable in front of the camera. So what you're going to see in today's lesson is a pattern of how I shoot a bride. You will see a ton of footage that feels, seemingly like the same thing but please note...
that it is being presented with intentionality. I believe that the more you see something and the more you hear something, it becomes ingrained in the back of your mind so that when you go out onto a shoot, you will then start following the same pattern. A pattern that you have created for yourself. Now the strength of the shoot from an educational perspective is that you are getting a front row seat to how I work with a bride over and over and over again. What I'm gonna do is I'm gonna show you that video and we're gonna get into it a little bit later. Looking down at the bouquet. Lovely, look over your right shoulder. Can I have your eyes here? Beautiful, good. Can I have you take the bouquet in your left hand? Good, and then we're gonna take your, there's two parts to the veil. The shorter end and the longer end. Can you get the shorter end with your, gorgeous. That's exactly it. And hold it or? So what I want you to do is I wanna create movement so that it doesn't feel like it's fake, oh and then the wind comes and it's so beautiful. I can't even deal, I can't even, good. So what we're gonna do is just gonna give you that motion for you to do that. So your hand will start down and then you're gonna come, you're gonna get it, you're gonna drag it on in and you're gonna be looking at me. Yes, but you're gonna have, you're gonna drag it on in looking down and then glance up at me and we are going to look back at the veil, beautiful. Have your hands and we're gonna start that motion, gorgeous. Beautiful. (camera shutter clicks) Beautiful, I'm gonna have you do that just one more time, you can relax your hands to the side. Beautiful, can you get your hair on your right shoulder and just wrap it behind your shoulder so I can get a nice, clean shot, that's beautiful. Good, beautiful. You're gonna take a deep breath for me, good, gorgeous. Beautiful, wrap it around you, beautiful. Eyes here, good. I want you to do the same thing, now we're gonna relax the smile this time. Good. So one thing that I'm noticing as I'm shooting backlight that's like really important is I want to make sure that I'm putting some sort of structure in front of the sun, in front of that center point nucleus of the sun so I'm gonna be, right now using this tree. So I'm gonna position my body so that the sun is, the main center of the sun is covered by the tree but I get this gorgeous light behind her. If the tree was not blocking the sun what would happen was I would get too much light into my camera. So now I'm just getting the afterglow of the sun and not necessarily the light, the sun directly pointing into my camera. So now what I'm gonna have you do is I'm gonna have you do. This is just too pretty with this wind. Beautiful, we're gonna let your hair go, it's absolutely stunning. Look down at your bouquet, beautiful. Now bring that, we're gonna do that little movement. You're gonna bring your hand, gorgeous, you know it, beautiful. (camera shutter clicks) Gorgeous, gorgeous, gorgeous. I mean everything was so perfect, I'm gonna make a couple small adjustments. Everything's great, you just go with it, I'll shoot it. No pressure, beautiful. (camera shutter clicks) Beautiful, okay. So I'm gonna have you turn around. So Jack I'm gonna get a detail shot of this veil and then do the dress out from the bottom and we'll kind of this and like just shoot it kind of from the. (alarm goes off) So Erica, can you put the bouquet in your right hand? Gorgeous, so I'm gonna see if I can crop out those clamps. Okay. Gorgeous, just like turn over your right shoulder. There you go. Hold on, the other one? No yeah, you're right. Good, so what I'm gonna try to do right now is just get a little bit of motion and movement as the bride is walking so that the veil and the dress are trailing her from behind. So I'm gonna have you start with your right foot and you're gonna walk in a cadence of one, two, three and I'll be talking you through it, but not too fast, not too slow. I'll be talking through it with you the entire time. Okay. So starting in three, two, one. One, two, three. One, two, three. Gorgeous, thank you. So you're gonna relax the bouquet. And you're gonna look down at the bouquet. (camera shutter clicks) Wow, wow, wow, wow. So my settings right now are at a 2.0, 250 ISO and 1000th of a second. I'm shooting specifically at a 2.0 because I could still get a lot of beautiful details but kind of blur out the foliage in the background. We get some nice, beautiful boca at this. And we have some nice, natural wind going that I'm just loving. My focal point is on the bride's right eye. Chin towards me. Good. (stream water runs) That was bisecting your forehead which would make it like a disaster in Photoshop later. I could go through each little hair. Oh the hair in Photoshop is no good. That's like my nemesis. I know, I don't like doing it either, it hard. Good, so now we're gonna have you just kind of roll back again, take a deep breath. JD, oh I'm sorry. Could I get you to give me a little bit of a wind with that board? I really like the way that it looked. What do you mean roll back? So this is you. Okay. So you're just gonna roll it on back that way. Okay. Good, great. Okay, so I'm gonna have you give me a little bit of wind from this side. Now the thing is when I talk to my brides and I say roll back, Erica just asked me, what did you mean by that specifically and I think it's a really good point 'cause when I say roll back, I don't want them to turn. I don't want them to turn, I want them to actually, to open up their shoulders and roll back. What we do is we're creating angles within the body. That's, not that's taken up good. Look down at the bouquet. (camera shutter clicks) Beautiful. Now I'm gonna step in and I'm gonna have to change, I'm gonna have to compensate for the light a little bit. Now I'm still having this tree behind blocking the sun. From behind the bride but I wanna make sure that the light is still coming through but not the nucleus of the sun. I'm gonna switch, I'm gonna to aperture 1.2, I'm gonna compensate using my shutter speed and I'm gonna change that to two thousandth of a second. Eyes down, here at my hand. Lower your eyes a little bit more. Lower your chin a little bit more. Take a deep breath with your shoulders, beautiful. Can you close your eyes for one second, take a deep breath. Beautiful, bring your eyes here. Relax your head again, look down. Beautiful and then we're gonna have you, when I ask you to bring your eyes towards me, I actually want you to bring your chin towards me. So looking down and three, two, one. Look up at me. (camera shutter clicks) Heck yes. What I'm gonna do right now is I'm gonna have the bride walk towards me, create a little bit of movement but I'm gonna coach her on the type of cadence that I want. So I'm gonna have you hold your bouquet but because the veil is on this side, hold your bouquet in your right hand. Beautiful, now you can lift up, yes, gorgeous. Beautiful, now I'm gonna have you walk in a cadence of one two, three and as you're doing that, don't feel any pressure to keep eye contact with me the whole time. So we're looking down, relax the bouquet down, pointing the head of the bouquet down. Resting it along your side, beautiful. Can you tilt your wrist out toward me. I'm sorry, the front of your, there you go. Good, good. Take a deep breath, we're smiling. Keeping the face nice and light, gorgeous. In three, two, one. Walking, looking down. Looking to the side, beautiful. Chin up, gorgeous. Look off to the side a little bit more. Gorgeous, slight smile. Looking off that way. (camera shutter clicks) Eyes here. Heck yeah, heck yes. Okay, we're good. (camera shutter clicks) Like that? Yeah. Sorry. Bless you. Great, so as the sun is dropping, I'm still shooting in the same area but I am gonna use some like, natural faux light. This is a foam board that I picked up from a photo store for like $20. My settings are gonna be roughly the same, I'm at F2.0 but instead of being at a thousandth of a second I'm at 800th of a second. Still at 250 ISO. I want you to take a deep breath. Now what I want to make sure that you're doing is keeping your fingers connected, very much like a Disney princess. So your middle and ring finger are connected. The other two are just laying down next to it, beautiful. Gorgeous, beautiful. So look down at the bouquet. Look over your left shoulder a tiny bit. Good, now what I want you to do is can you flip the direction of the bouquet? Hold it with your left hand. Scoot it back down in your lap a little bit. A little bit more, a little bit more. (stream water runs) That's good, now what I'm gonna have you do is I'm gonna have you use your right hand and you're going to bring your right hand to your hair, you're just gonna look up. As if you're just sitting by a creek. Now I don't want you bringing the hand up to your face, I want you to bring your hand just here. Like light, ear and lower but don't palm the hair. I just kind of want you to adjust the hair like that. So you're gonna be bringing your hands in. I'll walk you through it. Things that work I'll let you know, things that don't work I'll let you know as well. So in three, all looking down like that. Darling, two and one. Hand down, have you do that one more time but I want you to look up as if I had just called you like you're sitting by a creek and you're just like, your hair and I say Erica, oh what? That type of thing, okay here we go. In three, two and one. Hair, hands to hair. Eyes here, I just called you, gorgeous. (camera shutter clicks) (stream water runs) Eyes here, chin towards me. Oh and that wind is coming, gorgeous. I'm gonna step in. (camera shutter clicks) Eyes here. Chin here, gorgeous, chin down. Take a deep breath, relax the shoulders, gorgeous. Eyes here. (camera shutter clicks) Atta girl. Can you look down at your bouquet? Beautiful. (camera shutter clicks) So my focal point will always be on the bride's eye in this particular situation since her left eye is closest to me, that's where my focal point is. Even though I'm kind of shooting with the intention of focusing on the bouquet I really just want to make sure her eye is in focus. So when I call for her, I'll already be ready. Erica, can you look here at me, chin towards me. Beautiful. (camera shutter clicks) Now in this case, when her head was down, I was just focusing on her left eye but since her eye became symmetrical to me I shifted my camera and I put my focal point on her right eye. Eyes down. Beautiful. Take a deep breath, look down at the bouquet. Relax that right shoulder, atta girl. Good. Now what I want you to do is take a deep breath and when I call for you I actually want you to look at back at me as if an old, you haven't seen an old friend in awhile. That's a little ambiguous but don't worry, I'll make it work. In three, two, one, Erica look back. (camera shutter clicks) Good, good. So I'm gonna a little bit of the clamp but I might have to just Photoshop that out later and then we'll just deal with it. Look back, look back towards the river and three, two, one, Erica hey. Hello, good, good okay great. Tilt your head this way, atta girl, good. So I'm gonna have you tilt your head this way and then I'm gonna call for you to bring your chin towards me. Okay. That little guy's heart. (camera shutter clicks) Beautiful, now bring your chin towards me. Ooh, got this little wind action going on. Beautiful, give me your side. Then what I want you to do with your left hand is with the veil you're gonna bring it up and just kinda hold it a little bit. Yes, but I don't want it to be like. Like a mess? Yeah like. Yes, that's beautiful, that's good. (camera shutter clicks) Beautiful, now as you bring it, as you bring it across I don't want you to come with it. I want you to always keep your face out towards me. Yes, that's exactly where I want you to end. So bring it back, looking to the side and I'm ready for you in three, two, one. (camera shutter clicks) Chin towards me, chin towards me, chin towards me. Eyes down towards your, yes. (camera shutter clicks) Eyes here, now and don't scrunch with the forehead. Eyes down at your left hand. Beautiful, chin up towards me. Atta girl, looking down that way. Good. I was commissioned to shoot The New Lookbook for My Olivia Nelson. My Olivia Nelson is run by a very dear and wonderful creative in Los Angeles by the name of Jacqueline. Now she does hair accessories but then she decided to diversify her portfolio by making wedding veils. So what she had arranged was for me to work with two different brides. Now each bride was going to be wearing a total of six different veils. So with every veil what I did was I created a pattern and then instructed them to follow that pattern in order for me to get the desired result. So let's dig in to what you will see throughout the shoot and make sure that you follow the following tips and tricks to shooting a bridal portrait. First up, give specific instructions. So what's going on now is I'm moving my position because the light is shifting and because the light is shifting and we're getting later in the afternoon and we're shooting in a really dense tree shaded area I'm gonna try to use a whiteboard to compensate for light. I don't like to use traditional reflector because they kind of have like an iridescent quality so I wanna make sure that the white board that we're using, I got this white board for like 20 or $ at a photography shop here Orange County and they cut it out for me and I'm just gonna have JD hold it for me. I might not use something like this on a wedding day but if shooting bridal portraits for say, like are fantastic. When you have time and have an assistant to do this, this'll be great. So I wanna make sure that I'm not getting too much of the green tones and a lot of like the dark imagery. So I think this should be pretty good. So JD's just using the white board to reflecting the sun that's coming through trees. It's gonna be diffusing the light for me exactly the way that I want it. So she is backlit but not so strongly by the sun. Looking towards the, the river. If that's a river, I don't know. River, flowing water. The bouquet down is down in your right hand and you're gonna have the veil and you're just kind of doing, zhuzhing the veil. Kind of just looking down. (camera shutter clicks) That's so beautiful, I love everything that's going on Erica. Beautiful, I want you to do the same thing, I'm just shifting my light. Gorgeous, looking down at your hand. Bring the hand closer to your body. Good, I'm gonna shift in a little bit. Ah, this is so pretty, beautiful. So what I'll sometimes do is I'll use my hand to block the sun and then crop my hand from the frame, if I can't use a tree to block out when I'm shooting backlit. So all I'm basically doing is I'm shifting and recomposing and then I just find a little spot that I know will definitely work for me. Now shift your shoulders more towards me Erica. Now bring the bouquet, the veil in front of you. Drop the bouquet down, beautiful. But in front, a little bit. But not center of the legs, yeah there you go. (camera shutter clicks) Looking toward to the river. I know it's not a river, sorry whatever the creek? Eyes here. Everything you're doing is so fantastical right now. (camera shutter clicks) Hang out, woo. This, good good good, good good good, beautiful. Eyes down. (camera shutter clicks) Beautiful, so I was just asked why I don't use a lens hood when I shoot and I choose to use my hand to block out the sun and part of the reason is just aesthetics and it probably sounds ridiculous but when I'm shooting and I have a bag, I don't like to switch my, I like to switch my lenses rather quickly and they just become a little bit more clunky in the bag and I actually just like the mobility. Like instead having to screw on a hood and screw off a hood, just having my hand in front of it is fine, it's worked for me. I haven't really used a hood in years with the exception of the 7200 during ceremony shots but for my fixed lenses, when I'm shooting in a pinch I always just use my hand. Erica, can I have you look over your left shoulder? There we go, actually just look down at the bouquet so I'm getting more profile, more profile, more profile, turn your abdomen towards the whiteboard, there we go, oh no. A little less, so I don't see the clips, gorgeous. (camera shutter clicks) Turn back around and then when I call for you I want you to do it one more time. In three, two, one. (camera shutter clicks) Put your bouquet to the side. Looking down at the bouquet. (camera shutter clicks) Hang on, there it is. There it is, heck yes, thank you. So I arrived early with JD to kinda scope the property but I understood that from when we got here which was about 1:30 in the afternoon and it is January, I knew that the light was going to shift so dramatically, it's about 3:15, right about now and the light has shifted. But we kind of anticipated. When you look at the sun in the sky and you could see that it's going to be falling towards the sunset line, we determined that we wanted to save this particular location for the 3, 3:30 time mark and this is what we're getting. We're getting the sun coming in through these gorgeous, gnarled trees, there are no leaves on it but part of the good thing about it is that it's kind of reflecting this nice, warm, orange light, versus spring light. If we were shooting this in the spring all of this would be covered in green and we get a lot of green undertones. What we're getting just truly now is the sun through the, through the trees, reflecting nice beautiful light from the orange and brown leaves around it. So right now can you just look towards your right wrist? Beautiful, gorgeous. Bring the eyes here. Chin here, beautiful, roll your left shoulder back, gorgeous. I wanna see a little bit of your left wrist, there you go, gorgeous. Beautiful. Eyes down like that is fantastic, eyes down like that is fantastic. (camera shutter clicks) Beautiful, eyes here. Looking up towards the sound of the river. Gorgeous, relaxing that right shoulder, atta girl. Beautiful, eyes here. Chin here. So what I wanna make sure that I'm doing is I'm shooting a horizontal photo and a vertical photo. So the vertical photo will get more of like the dome-like features of this gnarled tree and the horizontal photo will work really well in getting a lot of negative space but I have to temper that negative space with a lot of darkness on the right side of my frame. So we'll kind of work through that in posed. Your sides at times. Relax it, beautiful. Right hand up on the bridge, gorgeous. Fantastic, eyes down at the bouquet. I'm gonna shoot through these gnarled trees. Kinda just create a little bit of distraction in the foreground, beautiful. Eyes here Rebecca, chin here. JD, can I borrow you for a second? I just need you to hold a hand real quick. Now your assistant can actually see exactly where the light is coming through in the lens. Beautiful Rebecca, stunning. Can you look out towards the water, gorgeous. (camera shutter clicks) Beautiful, eyes here. Chin here. (camera shutter clicks) Fantastic, I'm gonna come up a little. Can you scooch your body in a little bit. Fantastic, fantastic. So I'm gonna be changing my aperture from a 2.0 to a 1.2 and part of the reason why I'm doing that is I wanna blur out these kind of like wooden chairs behind the scene 'cause they're gonna be distracting. Ugh, I can't even. My settings right now are 1.2, 1600th of a second and 250 ISO. Roll that left shoulder out towards me, beautiful. Beautiful, take a deep breath, bring the shoulders on up, shake it out. There you go, beautiful. Now fall back in to whatever your body naturally falls into and if I have to amend, beautiful. Eyes towards the water. I'm gonna step in a little closer and as I get in closer, my scene's getting darker so I need to compensate. I'm gonna drop it down to 1250th of a second. This beautiful light behind her. It's beautiful, can I have your eyes here. Chin here, relax your shoulders. Atta girl, that's it. (camera shutter clicks) Can you look down at your bouquet? (assistants talk in the background) I'm gonna shoot nice and tight now. So now you can just kind of relax, I'm just getting the upper, that's so freaking beautiful. Chin towards me, good. Alright, fix a couple things. There we go. (camera shutter clicks) Want me to leave that little bit of real on the top of her head? Chin down a tiny bit. Great, that's fantastical. I mean, just fantastical, right over here. Beautiful Erica, I mean Rebecca, chin towards me, there we go. I'm only asking that because your hair, I don't want it to compete with your eyes, that's gorgeous. (camera shutter clicks) Ugh, this is beautiful. Slight smile Rebecca, eyes here. JD, peel back a tiny bit, thank you. JD peel back, that right hand peel it back if possible. Uh, I'm still getting haze. It's my fault, you stay there with Rebecca. I'll hang out here, good. Open your right shoulder more towards me, there you go. I'm just worried about the clamps, it's great Rebecca. I just wanna get one shot of you and the bouquet, just turn towards me. And then yes, that. Now I want you just to hold the bouquet here. Yeah, that's perfect. Yes, absolutely, bring. Tip the bouquet up towards your belly. Mm-hmm, that's it. (camera shutter clicks) Great, I want to take a second to point out a couple things in the footage that was just shown. Firstly, what you will see is you saw JD, my husband and second shooter hold a large white board or what it was actually, was two medium sized boards that he held up together. Now I normally do not use white reflectors of this nature but I want to take a step back and in previous lessons I have spoken about how to find natural reflectors when shooting in difficult light but in this particular scenario I knew that the location I was going to was not going to provide the level of natural reflectors that I needed. So because of this, I brought these boards as I've mentioned in the video, they are actually foam boards that I bought for about $25 from a photo store. We brought these with us to compensate for the light and I'm very thankful that we did. Now this kind of begs the question of do we bring them on a wedding day? Well, in really tough situations I might but in the course of nine or 10 years I have not done so. I have the latitude and the luxury when shooting these types of styled shoots to bring that but generally, as a rule of thumb I don't but if you are experimenting with a shoot on your own for creativity's sake what I want you to do is spend a little bit extra something, get something that reflects light in a natural way that you prefer and then leverage it that way. Secondly, what I want to point out was that Erica, the beautiful red-headed bride was extremely stiff at the beginning of the shoot. You see this so evidently in the way that she walked and the way that she smiled or the non-smile that she was giving me and so in my best efforts I, what I had to do was kind of give her an idea and you saw me do this about two or three times in what we just saw. I had to give her a story in a way to actually break her out from being so overthinking and present in that moment. It was, I want you to look over the shoulder as if someone's calling your name. That's different than giving an instruction of I want you to look over your shoulder 'cause, because she was so stiff it would turn like this. But, in my hopes I had said, look over your shoulder as if somebody's calling your name and that kind of shifted her face, shifted her shoulders ever so slightly and I would take that over not getting that at all. I also said, can you walk towards me as if you're running down the aisle or running away from the church? Now is that kind of like a ridiculous story and sentiment? Perhaps, but if I can relax her a tiny little bit, these are the things that I would definitely do. Now sometimes asking for a bride to be part of the story will help you. So those are the two things that I wanted to point out and what we're gonna move in now is a few tips and tricks. I want you to pay attention to various photo variations. So tip number four is to shoot for options. I'm gonna walk through a list of the types of bridal portraits I take and I'm gonna walk you through what it looks like for me during each session. What I want to do is a full body horizontal shot. And then I want a half body horizontal shot. Then what I want is a headshot or otherwise known as a beauty shot, horizontal. I want a full body vertical shot. Let me make sure that I'm keeping up with the keynote. A full body vertical shot and then a half body vertical shot and then I want a headshot which is otherwise known as the beauty shot so I'm staying in line with my list and then I want a full body shot from behind. Specifically if a bride is wearing a long dress, those, that photo is definitely something her mom would want as well as magazine editors. So tip number five. I want you to plan in advance. You have seen how I have changed locations a few times but one location was such a dramatic change that I would not have known to make that change had I not arrived earlier. So we got to the venue and I noticed where the sun was in the sky and I said okay. The sun is falling in this direction so by the time the sun falls in about 45 minutes, I know that it's going to be hitting me in the shrub-like area in a way that I'm going to find very favorable. I would not have known how to do that had I not been there in advance. What I want you to do is tip six. Is to work every angle. It's important to learn how to shoot in the same location in a variation of ways because a lot of times on a wedding day, we're not afforded the luxury of working in a big field of wheat or in a forest or in an urban area. Sometimes we can a small little area to shoot. So what I want to do is I wanna show you how I challenge myself to get 10 different poses in a really small area. The area was so small that we were working with in this shoot, it was about five feet by five feet. But given that I was able to shoot the brides differently in that same section to make it look like there's a lot more diversity to the portfolio and I'm gonna show you how that happens in a shoot now. So I'm gonna be staying in the same location but I'm gonna actually be moving one of the brides into a slightly different location. So we're gonna be about five feet from where we originally were. Because the light is still so good in this particular location. However, I don't wanna shoot two brides in the same location so I'm gonna show you how in just a matter of five feet I could shoot a photo entirely differently. We're gonna do that right about now. So five feet, two different looks and probably 10 to 15 different poses and the same thing could be emulated on a wedding day. So here we go. Beautiful, relax your shoulders. Look down at the bouquet. So what I'm trying to do is look, we have these really weird seating arrangements behind the bride so I'm gonna be shooting this at a 1.2. She has a veil covering both her eyes so while it's important that her eye is in focus it's not completely paramount to the quality of the photo because we're gonna be focusing on the veil, shooting at a 1.2, these beautiful rhinestones in the front, it's going to look fantastic. Can you look out towards the water with your chin? Atta girl, good. (camera shutter clicks) And can I have your eyes here? Nice, and then look down at your bouquet. Good, I'm gonna ultimately have you walk toward me but right now, I'm just gonna get a couple standard shots and what I'm gonna try to do is there's some tress and foliage. I'm gonna put that in the foreground and totally blur them out, but it'll still kind of add as like a voyeuristic appeal to the photograph. Beautiful, look down towards your bouquet. Lift the chin a tiny bit, there it is. Now what I want you to do. The shoulder on my left is longer than the one on my right. I think we're okay right now. I'll pin it before you start walking. Eyes here. I wanna make sure that's good, atta girl. Now what I want you to do is I want you to walk towards me, taking as much time as you need. Beautiful, can you look up to the right real quick? Sorry, your other right. Good, yeah, sorry my fault. Good, heck yeah. When the model was down by the water I was shooting at a 1.2, 500th of a second and 250 ISO but as she walked up from the dark parts of the water, she walked into this beautiful light, so I had to make sure that I was compensating ri. Because I shoot manually, we shifted from 500th of a second to 800th of a second. So keeping that in the back of your mind will save so much time in post-processing and really having to like lift different levels and lighting in raw after. Sometimes photographers will change their aperture if they want to manipulate light. I prefer to kind of set my aperture and just kind of play around with the shutter speed in order to get the kind of light that I want. So I started here at 1000th of a second. I'm shooting at a 2.0, 250th of a second and I'm gonna have to change that because that's much too dark. So I'm gonna drop down to a 500th of a second and that's exactly where I want it. Beautiful. Beautiful, I'm gonna change to 640, 640th of a second. Now I'm pulled quite far away from the bride but I'm gonna have to make sure that I'm shooting this both ways. I'm making sure that there's a tree blocking the sun. One thing to take into consideration is what I'm exposing for. My number one priority is exposing for the skin. I wanna make sure that the skin looks beautiful and flawless. Secondly, I'm exposing for the dress. I wanna make sure that I'm not loosing any information in it and then afterwards, ancillary, far off is for the background, it's a personal choice and preference but for me, skin, dress and then the background and in that order. Can I have looked, I actually like how the veil is over your wrist. Can you look down at your wrist, beautiful. (camera shutter clicks) Good. (stream water runs) This is really pretty Rebecca. Can you look over where Jacqueline is? Yes, gorgeous. Can you shift your right hip towards me a little? Your right, bring it towards me, there we go. I was like I think it's (laughs). Now with your right hand, can you get your veil and just kind of play with it a little bit in the front, leaving your left hand draped the way it was, beautiful. Now I want your hand down and then from the count of three you'll bring it up and you'll just kinda play with it. There's not gonna be a right or wrong. So I'll have it all the way down. Do you want me to? Like do you wanna? Yeah, more that way. I just have to be careful for the clamps in the back. But right now, it's perfect. In three, in two, in one. Beautiful, looking down at your hand. That's it, that's stunning. (camera shutter clicks) Can you look over where Jacqueline is? Gorgeous, that, thank you. Beautiful. One more angle and then I think we're going to be good. Well actually, this light is not very good. So part of why I'm not gonna shoot this is because she's so strongly backlit and there's nothing in this area that's going to reflect light back on her face unless I wanted to use an artificial reflector or some sort of speed light and I don't wanna do that. So instead of trying to make this fight to make it work, I'm simply going to step towards her, but I'm gonna step towards her in a way that there's something gonna be on the floor that's gonna push light back onto Rebecca's face. Yes. Come on momma. Beautiful. (camera shutter clicks) Oh that's so beautiful. Beautiful, beautiful, shift that left shoulder toward me. Beautiful. So I need you, I'll just place you and then scoop it down 'cause we're losing light so. Beautiful, can you look towards the white board? I know, with your chin, there we go. And then with your right hand kinda touch the bottom of your hair. Hang out there. Beautiful. For photographers who are vertically challenged like myself on a good day I stand at about 5'4", I try to wear heels sometimes on a shoot but when worse case comes to worst case I will stand on things that I find. So it could be a log, it could be a rock or it could be a bench. I'm gonna kind of show you the dimensions in which I stand on a bench, shooting down on a bride. Now if she was standing with her groom, I would have the both of them with their eyes facing each other but in this case, I'm really focusing on her headpiece. So I wanna be standing a little bit higher, shooting down on her. Can you shift your head toward me this way? Eyes down. One step out that way and then one step in towards me, there it is, right there. (camera shutter clicks) Beautiful, looking down at your hand. There we go. Other hand here and like that. Beautiful, shift your face here. Beautiful. Hang out. Beautiful, take a deep breath. Relax your shoulder. Eyes here, chin down. Eyes to the floor. Now to the right of you. Take a deep breath, relax. Great, okay we're good. Good. Beautiful. Looking down at your right hand, beautiful. And then you could just relax your right hand against your body. (woman speaks in background) Yeah. (camera shutter clicks) Look down towards the water. (camera shutter clicks) Good, we'll give her the bouquet, thank you. That's good, that's great Rebecca. (camera shutter clicks) Can you look down at the bouquet? Beautiful. I'm just getting a white board photo like kind of like a cork flum board. I'm gonna turn it towards the model. I don't need anybody to hold it towards me but I'm not gonna lean it directly against the body, I'm gonna put it at a slight angle so that the light, because where it is in the sky, will pop down and up at her. Not exactly campfire lighting, but something a little closer to that than not. So Rebecca can you get this thing and you can kinda just tuck it back, yeah. That's beautiful. You don't ask me, what was that for? That's beautiful. (camera shutter clicks) And then with your right hand, just kinda come up at yes. Can you look down at your bouquet, beautiful. Slight smile, relax, take a deep breath. Relax your shoulders. Good, I'm gonna step in a bit closer. Love the look, it's great. Oh, darling okay now we're on fire. Here we go, looking down at the bouquet. Relaxing the arms a little bit. Atta girl, Erica can I have you zhuzh her veil? Her dress too. (camera shutter clicks) Beautiful, beautiful. Can you grab the side of the veil? Yes. Bring it closer to you. Money shot right there. Money shot. I have the peanut gallery behind me and they approve. No pressure right now. Relax that front shoulder, relax the front shoulder. You guys I love it, what are you guys talking about? I'm just amusing myself. Eyes here, eyes here. Gorgeous, chin here. Roll that shoulder back. Oh yeah, yeah, I like that. Hell yes. Are you taking a taking a picture of the back then? I always take a picture of the back but maybe. Looking down at your left hand. You look gorgeous. Shift your body so that I see less of the clamp. Here we go, I know it's hard. That's nice, that's nice. That is good. Beautiful, eyes down. Relax the shoulders take a deep breath. Beautiful, eyes here, good. Good, can you look down so I can get more of like a side profile so I can get the back of it too. Can you look over your, down the hill to your right. Sorry. (camera shutter clicks) Can you look over your left shoulder? Erica too, your left shoulder. Actually your right shoulder, I liked it right better, there we go. (camera shutter clicks) Great. Barefoot next by the river and right now. So we're working with the model. She's getting, now this is. We had actually set this up right when we got here but the light was so strong that I made an editorial decision to say, I'm going to keep on pushing it back, pushing it back, pushing it back. So we'll probably be ending the shoot with this shot and I'm so glad we did because the light is just gorgeous. I don't have to fight the sun. We have sun reflecting off the trees in the sky but just pouring this nice gorgeous light. Evening lit, I don't have to fight for it. It should be smooth sailing from here. So right now since you don't have a bouquet we're gonna kinda cruise on through this. I'm at a 2.5, 200th of a second, 250 ISO. Gorgeous, so Rebecca you just kinda doing your thing right now. I wanna give you full freedom to kind of move. I'll start telling you what's working, what could be improved on but this right here is gorgeous. Beautiful, so Jasmine wanted a few photos, kind of like a good honest hearty laugh which is difficult I know. Right? I know, I know. It's my job (laughs), that's really cute. Good, good. Now what I want you to do is look towards the water. Gorgeous, beautiful. Bouquet, bouquet, bouquet. Beautiful, good. Beautiful, adjust your hair and kinda give a light laugh towards the water, adjust your hair and beautiful. Beautiful, eyes here, kinda laugh toward, that's it thank you darling. Face towards me and there it is, great bouquet. We're sorry, nailed it I know right? Now it's gonna be even better with that bouquet. Beautiful, good. So now what I want you to do is drop the bouquet a little bit low, shift the weight from side to side. As you kind of go through the poses and moves. Beautiful, I love it. Relax the shoulders, take a deep breath. Slight smile. Beautiful, eyes here. Chin here, nice kinda like ahahaha, good. Oh, Jacqueline's gonna love you for that. Looking over towards the water. Oh my gosh, I feel good. (camera shutter clicks) Eyes here. Chin here. Good, now what I wanna do is I wanna get a side, a side photo. So I'm gonna need her clamps, turn this way. This is the side. Look over your right shoulder then, beautiful. Now keep your face there but turn your eyes towards the bouquet, beautiful. Relax that front right shoulder. Relax it, there it is. Gorgeous, roll that right shoulder back and then chin towards me. Atta girl, that's beautiful. That's gorgeous. I love what's going on here. I would not be surprised if at this point in the presentation you are so sick of hearing my voice because it is my voice and I am sick of hearing it. I wouldn't also be surprised if you head my voice in your dreams tonight but the thing that I still maintain is that if you hear something over and over again, it will recalibrate your approach. Now, I want you to know what something as well is I gave virtually the same instructions to two different brides but it impacted them differently. Now my approach will be the same, as I shoot not just these two brides but any bride but what I have to do is I have to be intuitive enough to read their body language and then recraft how I speak to them to get the desired result. So I hope that you saw those distinctions so when you work with two different brides in the future, you will be able to emulate the same yourself. One thing I wanna point out is that you might have noticed, as I did that Erica started off the session like uptight and a little bit tense and then as the shoot progressed, what happened? She relaxed a little bit more. She bloomed a little bit more. So what I wanted to make sure that I paid specific attention on how I spoke to her again and again throughout the shoot and then I saw her blossom and then it made me happy. So the last tip that I wanna get into is to make editorial decisions. And by this, I'm trying to tell you and remind you to think like an editor. We spoke about this in a previous lesson when I interviewed the photo editor of The Knot Magazine, Rebecca Crumley. If you are shooting in an that is not going to give you the desired result, don't shoot there. Have enough fortitude and wherewithal to turn to your team and say, now is not the time. You saw this happen when they asked me to photograph the veils and what may or may not have appeared or have been heard on the camera was they really wanted it at a specific time but I kept on saying, no it's not time. No it's not time, no it's not time. Because I knew if I had to fight so hard to photo, it was not going to reflect the thing that I really wanted. So what I want you to say, is say something. Say anything to defend your decision and if they push forward with it, that's fine but they're making that decision. I think it's easy to feel intimidated by not being able to articulate or do the things that somebody has asked you to. Like oh, shoot this right now. But I want to encourage you to find your voice. That's one of the things that I wish I had, somebody had told me earlier. That it is okay to have an opinion, and it is okay to have your voice shine. And on that note, what I want you to do is I want you to defend your professional opinion because you know as a lead photographer that you're the only person there on that shoot who could deliver what they need and lastly, this will help you provide a photo. It will allow you to give a photo that you're very proud of and overall will benefit everybody's portfolio as a result. We want them to love our work. So in light of that, I wanna head into our homework now. First assignment, is I want you to make a list of bridal portraits. I have given you a wonderful start. Now what I would love for you to do is to add poses that push your brand forward. That kind of lend itself to your style of photography. Then what I want you to do is I want you to create a pattern. It is not enough to simply have the list, what I want you to do is I want you to memorize the list. I want you to hold that list. I want you to go in saying that every pattern will be the same. The results will be different, but the pattern will be the same. Then what I want you to do is I want you to practice your pattern. If this is happening on a wedding day, fantastic but what I would hope you would do is to create the pattern inside and outside of being paid commissioned shoots. Now you can learn how to pose a body if she's wearing a wedding dress or not. So if you have a friend and you're out to brunch and it's a Sunday and you guys are waiting for the table, take her into the side alley and say, can I just work with you with my iPhone. So take a great photo for her Instagram account, but what you're actually doing is teaching yourself how to talk to her and ease her into that. Lastly what I want you to do is I want you to arrive early and plan your photo map. Know what the light is going to do. Find your natural reflectors. Be so confident that when somebody asks you to shoot a photo that you don't think is a right time, you can defend it professionally and I look forward to see how you shoot your bridal tips and how, 'scuse me. I look forward to seeing you shoot bridal portraits and use these tips to strengthen your portfolio, thanks.
Class Materials
Bonus Materials: Shooting Guides
Bonus Material: Syllabus
Ratings and Reviews
user-eee241
Do not just watch this video. Eat it up, live it and breathe it. I am a recent Jasmine Star convert (a.k.a. evangelist) and a newbie photographer. I was looking for inspiration online and her name had come up before in conversations with another photographer and I am SO GLAD I stumbled upon her blog, her store and her Creative Live classes. I have to say that in the 9 months now that my business has been in operation, she's been with me every step of the way (in internet spirit) and although I've never spoken to or corresponded with her, her online presence has served as a guide for many steps in my business. I am not a high-end photographer or teaching my own classes, like I said I'm brand-spanking new to the industry, but her blog and this class has helped me develop a clear vision and plan for my business, and to me that is half the battle. If you want to feel good about your business, know what you stand for, your style of photography…if you want to know your 2-minute why-hire-me speech in an elevator full of brides or whoever your audience is, listen, really listen to what she has to say. Then DO DO DO what you need to do for yourself a successful business takes a lot of work. But if you love it and it's a passion of yours, then you can make your business what you want it to be. Thank you, Jasmine Star and JD for being an amazing beacon of light to many photographers around the world and for being my wedding day warriors who amp me up on the mornings of my professional shoots! All the best from Ohio, Donna May
user-0dde51
Remember when Magicians kept all their secrets to themseves ? Well its as if Jasmine said enough is enough I'm doing a 30 day class on the A to Z of Wedding Photography and I'm not holding anything back baby!! I'm even going to wear a mic and speak my thoughts out loud! Is this really happening? Creative live said its free the first time around? Am I dreaming? Jasmine your giving us a wealth of knowlege and I cannot thank you enough I love and look forward to your teaching everyday Talk about step by step! Jasmine your the Tony Robbins of Wedding Photography, You've inspired me to pick up my camera once again Thank you so much for doing this course for us and explaining everything so clearly and sharing every tip you know with us I feel like i'm shadowing you on the shoots :) Thanks to creative live and JD too An awesome class that I will be buying Highly recommend!
Charlie Ketchen
WOW! So inspiring! This course really shook things up for me! I've never seen a live wedding, meeting, engagement/bridal shoot before and it was so valuable. Edited nicely, easy to follow and so relatable. It's been truly inspiring to watch this over the past few weeks. I purchased the course and I am so glad I did, the course materials saved me making 1,000s of notes, but I still had documents open to make notes because EVERYTHING she says is helpful/moving/game-changing. Don't skip the Q&A's at the end of each session, or the last sessions as she either recalls and compounds what we learned over the 30+ lessons and there is value in all of it! I can't be thankful enough for Jasmine, JD & the CL team for bringing this to us in a shiny, clean format for us to enjoy. For bearing all, for wearing your hearts on your sleeves and pulling back the curtain on how the J* brand operates and came about. So so so so inspiring. BUY IT!!!
Student Work
Related Classes
Wedding Photography