Lessons
Day 1
1Class
1:11:27 2Q&A
35:31Day 2
3Basic Introduction
04:30 4Paint and Paint Properties
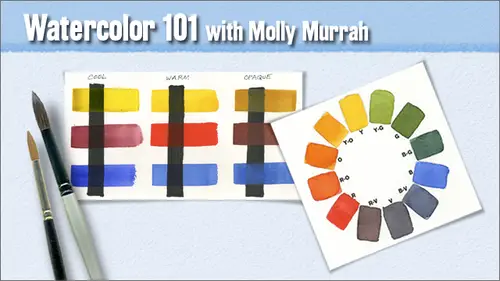
35:33 5Understanding Color
08:06 6Hue: The Color Wheel
14:16Mixing Colors
15:56 8Other Color Terms
17:07 9Light and Shadows
03:14 10Layering and Glazing
06:19 11Homework
07:47 12Q&A
08:15Day 3
13Watercolor Papers
23:36 14Paper Characteristics
34:12 15Watercolor Brushes
19:15 16Basic Brush Techniques
32:32 17Putting It All Together
09:28 18Q&A
07:08Day 4
19Drawing for Painting
1:03:45 20Proportion and Perspective
06:41 21Good Composition
29:16 22Last Class Preparation
05:40 23Q&A
09:10Day 5
24Introduction
06:29 25Creating Textures
19:45 26Other Fun Techniques
33:13 27Reserving Whites and Lifting
53:13 28Things to Remember
21:54Lesson Info
Homework
I'm sorry I've taken so much time we're supposed to really almost be done by now we haven't even gotten a q and a yet, but at various times your painting can look pretty scary thiss one I mean, I did everything with this one. I put salt on it, I had opaque colors in it, I dropped little beads of alcohol throughout it I dropped painted yellow paint in to push everything else out of the way. I really liked the texture this was a field up in skagit valley, but if you build your layers and you add your colors and stages and you do some glazing, you start to see that magic begins to happen if you add rich color, a few strong values and a few strokes in the right places that makes all the difference. This top area here was supposed to be a mountain range, which means it was supposed to be a smooth flowing sort of crusty kind of thing, and I did a technique using packers tape that you're supposed to be able to put that down, you know that really thin tape that you can see through and I used a...
n exacto very sharp exactly to cut through the packers tape, and I thought, well, okay, then I can paint and I don't have to worry about maintaining this line I can just yeah completely bled under whom I didn't use the right tape or I didn't press it down hard enough it just bled under and then I went through trees exactly that's okay that looks like trees so while the paint was still wet I dropped water in in these white areas here and the water created blooms pushed the paint out of out of the way then I dropped green in along the bottom along the horizon line there and I let that happen then when it was dry I went back in and I put in just a few of these choice strokes here in the trees look what I ended up with I love this painting I'm gonna absolutely try so have faith and don't give up you know it may look like a disaster at some point but just don't give up okay so these are our suggested exercises use your scrubber brush to go back in on your transparency test which is this one take your scrubber brush now make sure it's really dry and you can tell when something is really dry by testing it with the back of your hand don't test it with your fingertips because you get oil and grease and grime from your hands on your paper but if you if you touch the back of your hand to the pain when you think it's dry if it's even remotely cool then it's not dry yet okay so make sure that your paper is dry and then using your scrubber brush go back in and scrub out little channels and that's why there's more paint on this side than there is on the left side of the black line so that you get you can use the right side to be use your scrubber have a have this with you you put your scrubber in water this being a paper towel yes no I'm sorry something to block uh you know put your scrubber in the water like I showed you last week and scrape away and then blocked the pain and you'll see which of these paints lift back almost to pure white and which ones don't so do that uh try a ten value scale I'm telling you I'm not gonna be easy but try it you might want to master your five value scale for really yeah, but try it equal it's a piece of paper uh then fill in the blank colors on your warm color wheel we only did six of those colors today there's six more to fill in so go ahead and fill in those and do cool and opaque versions if you want print that little thing out again or uh printed out and trace it under your watercolor paper and do gulan opaque versions to see what happens when you do your color wheel using those and then finish your mouse ears exercise all of these air really fun they don't take much time at all to do and you'll learn a lot when you do every one of them now this is a more difficult exercise this's a couple of apples the one on the left I laid down all of my yellows first even had the yellow dropped down into the wet shadow underneath and then I painted the other colors the blues and the reds on top of it the one on the right I I started with the red and then I built the other colors on top of that so I sort of glazed with the yellow after I'd put the red down there's a discernible difference between these two in the actual painting itself it's a little bit hard to see on the screen but you will see how the order in which you put your pains down affects the you know what you get so if you're going to do to color tests layer red down first and then put your yellow on top then lay your yellow down and put your red on top and see what the difference is they look different so you might want to try something like this this was in the exercise files I believe is there a reason why the one on the right looking more reflective is it because of yellows on top? I don't know okay? It could be because I just you know, I went in with my scrubber and I scrubbed out that little you know, my life, the little highlight that maybe all it took. Now these are some really helpful books on color mixing one is called color mixing recipes for water color and the other one's called watercolor painters pocket palate. They don't teach the theory. They just take different colors and mix him up in various intensities in tents and things like that tell you what the colors are so that you can open these books up and you go oh, I love that color what do I have to do? What are the paints? I need to make that color uh, it can help you figure out the paints you want on your palette and you, khun, you know, do some real nice experiments with these two books down on the left or my information and daniel smith, thank you, daniel smith. I can't say it enough and to post your exercises again, go to flicker dot com slash groups slash watercolor one o one and the facebook site for this site, uh, for this class is creative, live watercolor fans. So you can post on either of those two places I'll be checking flicker is probably the best place to post I think that's where most people that's where they've signed the you know, a little agreement, and I'm probably gonna pull all the art that I use in the presentation off the flicker site. So if you don't care about whether I pull it off and put in the presentation and critique it next week, you can do it on facebook, but I won't be using that art in the presentation. Okay, so now I'm going to throw you a curve. This is from sergei bone guard, this famous famous russian painter that my favorite well, one of my favorite teachers, deanna lynley, studied with and he says all students need to know about colors, the basic color wheel and complementary colors. These there are many books on color theory. Do not waste your time and money, so that really is it. If you know your color wheel and you know what complementary colors do when you put them on the paper and how to use them to great effect, you really can be an amazing painter without knowing much else of anything. So that is paint and color. Yeah, thank you, thank you, thank you.
Class Materials
bonus material with purchase
Ratings and Reviews
user-9ba4d8
I would also recommend this class with some hesitation. This course is a broad and sweeping overview of watercolor painting. It is a good reference course and I will probably be treated like a reference book for watercolors. The skills we covered were valuable. It was beneficial to hear about the watercolor artists that Molly enjoyed and to have a list. The exercises were appropriate. I would recommend this course to someone who likes to know all the details of things before getting started. If you are someone that wants to jump right in this may be frustrating. Obviously, I am the latter. A few suggestions from my perspective....limit the product pushing. The references to Daniel Smith were off putting. I will try to avoid purchasing their products at all costs even if they are the best. It was very difficult to get access to the paint colors that she wanted us to have as some of the names are slightly different than what is available to me locally. I have already taken a beginner color watercolor course which I loved!! If I had not taken that course I probably would have been lost here. In that course(also online) we finished a project for every 10 minute lesson. I learned the basic technique's and it was FUN! I wish this class had more projects to practice that can be completed by a beginner and intermediate. Portraits seem like a large undertaking and it would be helpful to build confidence with smaller and simpler projects. I just felt a little discouraged. Molly is very talented and the work she shared was very thoughtful and showed incredible skill! I am very thankful that she took the time to teach the class and share her knowledge.
a Creativelive Student
This course was fabulous. Molly is a great artist/teacher. Her instruction has really unleashed my creativity and given me confidence to create.
jennymak
Looks like a really fun class! I'll take it soon!
Student Work
Related Classes
Mixed Media Art