Lessons
Day 1
1Class
1:11:27 2Q&A
35:31Day 2
3Basic Introduction
04:30 4Paint and Paint Properties
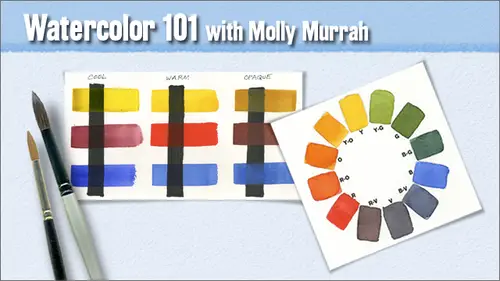
35:33 5Understanding Color
08:06 6Hue: The Color Wheel
14:16Mixing Colors
15:56 8Other Color Terms
17:07 9Light and Shadows
03:14 10Layering and Glazing
06:19 11Homework
07:47 12Q&A
08:15Day 3
13Watercolor Papers
23:36 14Paper Characteristics
34:12 15Watercolor Brushes
19:15 16Basic Brush Techniques
32:32 17Putting It All Together
09:28 18Q&A
07:08Day 4
19Drawing for Painting
1:03:45 20Proportion and Perspective
06:41 21Good Composition
29:16 22Last Class Preparation
05:40 23Q&A
09:10Day 5
24Introduction
06:29 25Creating Textures
19:45 26Other Fun Techniques
33:13 27Reserving Whites and Lifting
53:13 28Things to Remember
21:54Lesson Info
Creating Textures
Okay, so right now we're going to move into creating some textures. Now, this is three use of salt, and salt is a very, very interesting. I mean, when somebody said to me, the very first time that you use salt in watercolor painting went what? Uh, you know, I just couldn't believe it, but salt will absorb paint on the paper in various different ways, and the different kinds of salt that you use absorbed the paint in different ways as well. So along the top is one of the colors on our palate that cerulean blue in the middle list, they love blue that's on our palette as well. The bottom is a color called for deter blue, which I love a lot of beautiful color, and in a few of my men, mixed and quinn burn scarlett with it, just to see what would happen if I mix the paints and then drop the salt in we have sea salt, margarita, kosher and table salt than in class today, and get ready because we're going to start painting and start putting some salt down in class today, we're just gonna go for...
the table in the kosher salt, if you have it, does everybody have table and kosher, because I have some more up here if you don't you know what? Use whatever, really, whatever you've got, just use it and we'll be fine. So what I would suggest doing let's, go let's, just jump right into it, get your one inch brush and just mix up. Uh, mix up a fairly good dark color forgot to, uh, sprained my paints first, I don't know if you've done that, you might want to spray your paints and get them as soft as you can wait on this. No, we're on just a plain old paper get a plain piece of paper, makes kind of it a purple color and makes a fair amount because we want we're gonna do several little sections here, and we're gonna paint little strips, you know, like one one and a half inch strips. Now, the thing about salt is that if you let it drive too much, it doesn't work. You put your salt on just one machine is starting to lose leave paper, so we're going to paint these two squares, then we're going to go down and paint two more, and we're going to drop our salt in the bottom two squares first because they're the wettest. And we're gonna let the ones on top dry a little bit more so I'm going to start off with the table. Salt and machine has not left the paint yet, but that's intentional and that's in these bottom two squares. So that's the table salt and then right next to it I'm gonna put kosher salt. Now take the table salt and drop it in the square on top because that has I had a chance to dry and machine has started to leave for sure on that one and then put your table salt in the other one next to it. Now mine actually under these hot lights probably dried too much because I can tell it's already pretty dry there. Yeah. It's very dry it's very hot. It's very warm in here. So it's trying fast, so I'm gonna mixed just another real batch of color. I'm gonna put some eliza rin and that ultimately get sort of a deeper purple so that you can see if the color itself actually makes a difference not gonna paint another square and I'm painting a big one because I'm gonna put table salt up at the top and I'm going to put kosher salt down at the bottom there's the table salt I'm putting it in immediately now let's just set these aside and let these drive the table salt knees a little bit of time to to soak up the paint and do its thing did that just fall all over your ass? So I'm just going to set this aside and let you do this thing, so we'll go back to the presentation now and this is it just an example of salt in combination with drips and splattering because you could get some pretty interesting uh, things that way does it not going back there with you? You could get some pretty interesting effects that way. Ay ay, ay this is sort of a really abstract painting that I did, and I just was slinging what I called slinging paint. You know, I just threw some paint on and you can see down in the lower right hand corner those little white specks that looked like snowflakes that solved and people use salt a lot when they're painting snow scenes and they want to give the illusion of snow coming down. They will they will do that, and and I did a painting of a lumber yard where I wanted to give the illusion of it being a very, very sort of foggy, snowy night, and I use salt to create that effect drips splatters now see the splatters there in the lower left so here's, what I want you to do take out another piece of paper and mix up another color. But this time I'm gonna go for the viral. Scarlett, get it pretty now, this time take out. I would use, uh, you're number twelve, brush and get a fairly decent amount. Uh, whatever color you just mixed on the brush now, what I do is susan, can we do it over? What I do is, um, I hit the brush against my hand. And when you do that, you get your splatters and it works if you have a pretty good amount of paint on your brush now, obviously, you end up not having a lot of control. I mean, I just splatter paint over this whole desk, but it's uh, it's it's a really great way to get some texture and things. Like, if you're doing a beach scene or you're doing a rock and it's got all sorts of moss and things like that growing on the side and you want to get some texture that way. It's great to do that. Now, if you take a spray bottle and spritz a little area that see what he does. So on the left, we have the straits flattering and on the right we have that same splattering but it's been spritzed with drops of water. And it's a really nice effect. I mean, I I've seen lots of rocks and things like that painted that way and and debris on a beach and that kind of thing do you ever use a toothbrush for that simple? Oh, yeah, absolutely. You can use a toothbrush you could use. Uh, you can actually spray paint you could just put paint in a sprayer and spray the paint itself and, uh, get it on there like that, too. Now I'm gonna wet a section of the pager. Misting control is not well, I have to tell you something. I haven't. I probably haven't a dozen spray bottles at home and only two of them are exactly what I want them to be, you know. So, uh, you know, one of the things about this, this working in this medium in any medium is finding your tape favorite tools and figuring out how to use them. And when you find one you like, try to figure out how you could get him again next time. Work of thumb. Yeah. Now I've wet a section of the paper and now I'm going to splatter again, and that creates a completely different effect like that affect a lot, and if you tilt your paper, they can run to see what's happening when I tell you khun tilt it running in different directions you khun do different colors let's put another color in there until I left the colors run together fireworks yeah that's what it looks like so if I were gonna paint the side of a rock that was sort of a topi colored rock and I wanted it to have some, uh yellow poker and maybe cem cem bert cnn some oranges and maybe some dark grays or blues or things like that and it I'd probably paint the rock wet and get it wet and then I would drop something's in er while it was wet and let them bleed out and run and just, you know, play and interact with each other and then when it was dry I would go back in and splattering again with with more colors and I would probably have uh you know, a double effect there it would have to drive splatters it had the wet splatters and it would have some background color and it would it would just be that it would be a great effect and you will do a great job of painting rocks that way. So this is a uh this is a painting of uh, something that is a splattering, splattering withnegative painting and this is an image that negative painting is when you paint around an object you don't actually paint the object itself, so what even see here is I painted cem it's a wet painting that eyedrops in color in then I splattered it with some green and splattered it with red and I painted a round all of that but the negative painting actually I did first I did the negative painting first and then I splattered in the red and the green to create a sense of leaves and things like that so uh negative painting is when you paint around the object to define an object rather than painting the object itself and you did that with the blue yes I did that with the blue and you can see a couple of those air just drips and so I let that define branches by dripping and then I let other branches and things like that be defined by the negative painting around it did you coulda stenciled to achieve your didn't do any stencils? No, I just uh had a head of a background wash that was a light color had some green and blue and it was just kind of amorphous and then I went in and I use darker colors to paint the negative spaces around where I wanted the branches to be and then I did this flattering and then I did some drips and running runs and things like that came together pretty well I kind of like this little painting I love this kind of abstract and really, at the same time, I was pretty happy with it, so let's take our salt pieces of paper back again and see where they are in their process. Actually, I'm going to use this now when we when you scrape the salt off, usually what you do is you get something that's kind of like a hard edge like a credit card or something like that, and so you just scrape it now you needed to be really dry and I don't know whether he's a really dry enough, but I think we ought to go ahead and finish up on our soul, so I'm gonna try to start scraping this off with my finger, make sure you scrape it on something where you can collect the sold now it's not quite dry yet, it's not quite dry, so let's hold off on that and I thought it might be dry enough, but I don't think it is you have to do that a little bit, okay, so back to the presentation. Okay, now this is my cat cindy, and we've already talked a little bit about dry brush for creating wood grain and things like that, and I thought we would just try to do a little bit of that dry brush painting so I would take your one inch flat way have another blank and you want to mix up pretty good thick color I'm going to mix a little green and with this purple and see if I could get something that's close to brown a little fellow in it so what you want to do is you want to get a pretty dry brush and I would fan out you know, it might not be that easy with this brush I should use you can use a fan brush yeah man in fact, I think I'll use a fan brush too just so people can see but you guys use your one inch and what you would do is you would fan the bristles out like this and try to get the bristles so that they separate see that now these these brushes don't stay that way very well because there they have some synthetic fibres and um but they'll stay that way pretty well see that so I'm gonna use a fan brush though so people can see how that brush might be very useful to get for something like this and you use it pretty dry and you just dip the tip of the brush in your paint and then you drag along and how it is your pain uh it should be kind of like honey it's not very wet because you're looking for a dry brush technique, so if you're trying to get really if you got a lot of water in the brush first of all, the brussels won't fan out, stay fanned out and, uh, it won't leave the paint down the way that you wanted to, but you can really get some nice wood. I'm gonna just put a really odd color in the middle of all that you can go back and you can see that that's really interesting. Now the colors air completely off, obviously, but that's exactly what I did down under the bottom of cindy's feet in the painting I tend to use I tend to go for the fan brush is when I'm doing the wood grain, they just seemed to work better because they're already a fan. You know you don't have to you don't have to make them do that, and they work really well for this. Quite a bit of paint on your brush, right? This is what I'm getting. Not very much. Yeah. Yeah, well, you probably would have been better had you gone with darker color and to begin with and then it see what, um shares doing she's sort of holding the brush apart when she pains, which is unfortunate, but that's what that's what this particular one inch, uh, brush will do because it's, so full of synthetic fibers and those synthetic fibers have a lot more tensile strength to them than the natural fibers if you fan apart and natural fiber brush, it'll it'll stay. Those pieces will stay separated from each other longer and better. So. But then, probably what I would do is go back in with another brush. And I would add some, like some deeper lines in there to create the wood grain. I might add, like a knot in there. So that's a that's, a good way to get going.
Class Materials
bonus material with purchase
Ratings and Reviews
user-9ba4d8
I would also recommend this class with some hesitation. This course is a broad and sweeping overview of watercolor painting. It is a good reference course and I will probably be treated like a reference book for watercolors. The skills we covered were valuable. It was beneficial to hear about the watercolor artists that Molly enjoyed and to have a list. The exercises were appropriate. I would recommend this course to someone who likes to know all the details of things before getting started. If you are someone that wants to jump right in this may be frustrating. Obviously, I am the latter. A few suggestions from my perspective....limit the product pushing. The references to Daniel Smith were off putting. I will try to avoid purchasing their products at all costs even if they are the best. It was very difficult to get access to the paint colors that she wanted us to have as some of the names are slightly different than what is available to me locally. I have already taken a beginner color watercolor course which I loved!! If I had not taken that course I probably would have been lost here. In that course(also online) we finished a project for every 10 minute lesson. I learned the basic technique's and it was FUN! I wish this class had more projects to practice that can be completed by a beginner and intermediate. Portraits seem like a large undertaking and it would be helpful to build confidence with smaller and simpler projects. I just felt a little discouraged. Molly is very talented and the work she shared was very thoughtful and showed incredible skill! I am very thankful that she took the time to teach the class and share her knowledge.
a Creativelive Student
This course was fabulous. Molly is a great artist/teacher. Her instruction has really unleashed my creativity and given me confidence to create.
jennymak
Looks like a really fun class! I'll take it soon!
Student Work
Related Classes
Mixed Media Art