Working With Light
Lesson 39 from: Video Content Creation: Produce and Publish Videos that Get ViewsChris Hau
Working With Light
Lesson 39 from: Video Content Creation: Produce and Publish Videos that Get ViewsChris Hau
Lessons
Chapter 1. Intro
1Class Introduction
02:46Chapter 2. Developing Your Idea
2Chapter 2 Introduction
00:38 3Choosing the Best Platform For Your Vision
02:55 4What is a Project Brief?
01:02 5How to Use a Project Brief
00:47 6Foundational Pre-Production Documents
02:18Unpacking Real World Examples
01:49 8Chapter Two Recap
00:40Chapter 3. The 6 Key Elements of a Great Video
9Intro to Practical Storytelling Components
01:07 10Element One: Content (Visuals & Interviews)
05:08 11Element Two: Graphics/VFX
02:09 12Element Three: Call to Action
01:31 13Element Four: Voice Over
03:37 14Element Five: Sound & Music
02:08 15Element Six: Editing & Color Correction
03:14 16Bringing it Together with an Intro and Outro
02:00 17Chapter Three Recap
00:42Chapter 4. Introduction to Storytelling Tools
18Introduction to Storytelling Tools
00:26 19Introduction to Gear
01:24 20Building Your Kit
00:51 21Choosing Your Camera
04:41 22Supporting Your Camera
02:44 23Lighting Equipment Basics
02:22 24Sound & Microphone Basics
04:13 25Chapter Four Recap
00:30Chapter 5. Introduction to Shooting a Video
26Introduction to Shooting a Video
00:42 27The Camera
00:36 28Exposure Triangle
06:50 29White Balance
02:15 30Frame Rates
01:39 31Framing
04:31 32Basic Lighting
02:00 33Recording Sounds
05:15 34Conducting an Interview
02:49 35Recording Voice Over
01:30 36Chapter Five Recap
00:44Chapter 6. Setting Up to Shoot Your Video
37Setting Up to Shoot Your Video Shoot
02:58 38Framing Your Shots
02:31 39Working With Light
10:28 40Working With Sound
07:34 41Pro Video Tips
02:16Chapter 7. The Art of Editing
42The Art of Editing
00:27 43Understanding Shots and Pacing
02:08 44Seven Step Editing Process
03:15 45Bringing the Elements Together
02:52 46Shooting for Edit and Exporting Tips
03:22 47Using Fiverr Talent for Your Edit
01:49 48Chapter Seven Recap
00:46Chapter 8. Introduction to Video Marketing
49Introduction to Video Marketing
00:48 50How to Get Eyes on Your Videos
04:02 51How to Name Your Video for Conversion
03:01 52Video SEO Explained
01:56 53Email List
01:52 54Chapter Eight Recap
01:26Lesson Info
Working With Light
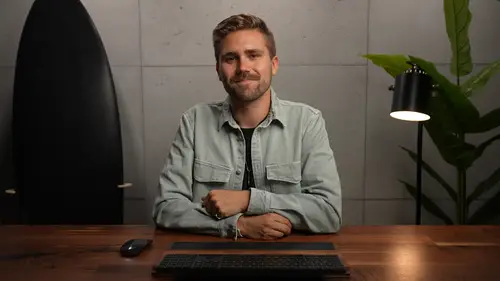
Okay, so now we're gonna move on to lighting. One of the things that you might have noticed while we were filming this BTS video is I'm only being lit by the window. But the issue with being lit by the window is that there's a lot of variables involved. Right now it's a slightly sunny and cloudy day, which means that this light is changing both in color temperature and in intensity in terms of brightness. So, you might have noticed while I was talking, it got kind of dark at one point. That's most likely because a big cloud probably covered the sun, and then it actually got a lot darker in this room. So, you don't wanna rely on window light when you're lighting your subject. Yes, you can do it and it can look really flattering. The thing you always have to keep in mind is that that is outta your control. That is mother nature. You have no idea what's gonna happen. So yes, it's nice to shoot on a cloudy day, but again this is a cloudy and sunny day. So, what we're gonna do, before I act...
ually close these blinds, these blackout curtains behind me, I'm gonna set up a couple lights, so that number one, when you're doing this BTS, you can still see me and it's not fully dark, but number two, I can show you what I would start doing with a typical lighting setup for a situation like this. So, let's go and grab this Aputure light here that I have in the corner that is on wheels. So, this is the Aputure 100D light here. I'm just gonna bring this around here. And it's on a rolling C stand. So, that means that in this office it's really easy to position it anywhere we like. It also has locking casters, so it won't move. And it is on a articulating C stand arm, which means I can do things like this. I can position the light down. I can bring it nice and high. And eventually I can find a spot that I think the light will look really good. Now, when you're lighting a subject, one of the things that we talked about in a previous lesson is Rembrandt lighting. This is when you light a subject basically from the side. So, if I'm the subject, we want to place the light kind of off to a 45 degree angle, so where it's hitting you kind of from the side here, and that creates a more dramatic pleasing look. I prefer to kind of cheat it a little bit forward towards me because for YouTube videos, I like it to mix between Rembrandt and high fashion lighting which means that in high fashion lighting, you're getting a lot more light on the face and not so much shadow on one side. So, if you're using a single light like I like to use for a lot of my YouTube videos, I like to mix the Rembrandt and the high fashion light, which means that it somewhere ends up around 11 o'clock if you were using like a watch to look at it or roughly around like 20 degrees to 35 degrees. If you want your shot to look more dramatic and have more shadow and more dimension on their face, you can move it out to 45 degree angle, pointing down on the face. So, always kind of think the light should kinda go roughly right about there. So, why don't we bring this light in. And knowing that this is at 35 millimeter, my talent is going to end up right here. I can already see that we can probably light this at a 35 degree angle there. Now let me explain a bit more about this light and why we like to use this particular light on this particular stand. Now, this is the Amaran 100D. This is an LED light. So, basically when we take this giant diffusion panel off here, let me just take that off for you. So, I just took off this diffusion panel and what we're gonna do is we're gonna take a quick look at this light here that is on the stand. So, this is the Amaran 100D light from Aputure. And essentially what this does is it blasts a light here, which is a single color temperature. So, that is 5,600 Calvin, which means that it's giving you a daylight color coming out of this little LED light bulb here. Now it does have a Bowens mount right here on the outside. And Bowens is just the name of the type of mount where you can put different types of accessories on the front of this. Now, typically we like to use diffusion, and that's what that giant dome is over here. All right, so we've attached our diffusion light dome on the front of this. And the reason why we do this is that when you normally have the light blasting out of the Amaran 100D, it's similar to the sun as if it was direct sunlight on your face. You can see a lot of like the highlights on your face, it casts different shadows, and it just looks really bright, and people start to, like, kind of squint their eyes. Now think about the difference when we add this. This is like when a cloud goes in front of the sun, and it starts to diffuse it. Well, people's eyes, they look more natural. The light starts to wrap around the face a lot nicer and more even, and it looks more pleasing. So, essentially think of this light dome like a cloud, and the light looks better and is better quality light when you shoot it through some form of diffusion. So, this white paper right here, which is diffusion, so when the light blasts through the diffusion here, it looks better quality. Then I add this grid here. And what this grid does on the front of it is it directs the light. So, when the light goes through the diffusion and the grid, it becomes more directional, and you can control more of the light. So, when it normally just comes outta this without this little grid right here, it starts to spill everywhere. And what this grid does is allows it to be diffused and go in one single direction. And when I say spill, the light, literally think about it like this. If it didn't have this grid, it would spill out everywhere. You would see the light everywhere. And with the grid, it starts to become more directional. So, you get diffused directional light, which means that you have more control of your light source. So, we're gonna put this back up, and we're gonna turn this light on, and I'm gonna show you the difference between no light and light on. Now, this type of light, you can buy lights like this that run off of batteries, but because we're gonna be shooting for almost two days straight, I'm going to plug in AC power to make sure that this light never dies on us, and we don't ruin any future takes. So, we just plug this in because I have a power grommet right there on the desk. And we plug this in like that. And we start to turn that light on. Now, one of the things that I missed, and I will call it out that I missed, is always make sure you put sandbags on your stands. I've had an instance where a light almost fell on one of my crew on a shoot, and you never want to have to deal with liability or someone just getting hurt. Those are two things that you always need to avoid on set. I highly recommend you get something called a sandbag. This is a 25 pound bag of sand that when you put it on your C stand here, your stand will not fall. So, we'll lock these casters here, and we'll put a... And we'll put a sandbag on it, and now we know for sure this will never fall. And one other thing that we have for safety is we have a counterbalanced weight here on this C stand arm. So, we have the weight of the Amaran 100D, and to counterbalance it to make sure that it doesn't fall over, we have this weight right here, and it's also orange so that nobody bonks their head or runs into it. So, that's the reason why it's bright, make sure people are aware of all these things on set, and always, always make sure that safety comes first. So, this is what the shot looks like right now with just the window light. It's not too bad. You could probably get away with it, but I probably wouldn't want this for my final video. Why don't we turn on this light to start to see what this will look like when you actually start taking away light and adding other lights. So, I have the light around 24% right now. It probably looks somewhat a little bit better. Your talent is starting to pop on the screen a bit more. What we'll do is we'll adjust this light to look a touch better 'cause I can see that it's kind of missing me just ever so slightly. We're still gonna do some micro adjustments, but right now the light is more or less in position. Now we're gonna start adding some other lights to this frame to make sure it looks good. Okay, so now we're gonna light our background and try to make sure that that pops on camera. So, the lights I like to use for that are these little Aputure MC lights. These are by color and RGB lights. So, the difference between this light and this light is that this light right here only is one color temperature. It's only 5,600 Calvin and/or daylight. In this instance, these little tiny lights that are run off of lithium batteries means I can turn this to red, blue, purple, green, whatever color I want, and/or I can change it to daylight and/or make it a warmer color. So, it has by color, I can change the Calvin or the color temperature. So, what we're gonna do is we're gonna use three of these lights that are magnetic. And I happen to have a little metal trim right here on the corner, so they literally stick to the roof, which is awesome. So, that's a benefit of this location right here. If you can't do that, just put them on a small stand and/or just tape them to the roof. That type of thing can work. So, what we're gonna do is we're gonna turn these on, and we are going to set them to 5,600, so that it's nice and bright, so the shot looks very pleasing, very corporate, very professional looking. And we are going to place a few of these right above me right here. So, I'm going to place one kind of like in each quadrant right there. So, we got, all of them are the same, just make sure the temperature brightness is, do 75 here. And we will literally put them on the roof right there. And now our background is lit, and it's gonna look really great on camera once we start to close the blinds behind me. Now, this is the difference between adding light to our background where you're gonna see a huge dramatic shift, and when the shot is really gonna come together is when you close the blinds here on the side, and we have a completely controlled lighting situation in this room. So, what we're gonna do now is we're gonna close the curtains over here to make sure that we have the most controlled lighting situation. And you're gonna see the difference between that. So, this is the before where you have the main key light here, but you're still getting a lot of fill light coming in, a splash of light from the windows because they're open. So, let's close those curtains and get more controlled lighting. These are blackout curtains from Ikea. Really cheap, highly suggest. All right, so now the curtains are closed, and we have fully controlled light on this set. So, let's go back into our frame here, and I bet you that's starting to look really good.
Class Materials
Bonus Materials with Purchase
Ratings and Reviews
a Creativelive Student
Ok, I really enjoyed this course but you should know it is a decent overview of what to do and in what order to do them. This is not going to show you HOW to do anything but it will show you WHAT you need to think about and how to approach a production in a professional manner. Chris knows his stuff really well and everything is covered but it is just an overview. Well worth your time, especially if you are new to video but just do not think that he is going to show you how to do everything.