Basic Lighting
Lesson 32 from: Video Content Creation: Produce and Publish Videos that Get ViewsChris Hau
Basic Lighting
Lesson 32 from: Video Content Creation: Produce and Publish Videos that Get ViewsChris Hau
Lessons
Chapter 1. Intro
1Class Introduction
02:46Chapter 2. Developing Your Idea
2Chapter 2 Introduction
00:38 3Choosing the Best Platform For Your Vision
02:55 4What is a Project Brief?
01:02 5How to Use a Project Brief
00:47 6Foundational Pre-Production Documents
02:18Unpacking Real World Examples
01:49 8Chapter Two Recap
00:40Chapter 3. The 6 Key Elements of a Great Video
9Intro to Practical Storytelling Components
01:07 10Element One: Content (Visuals & Interviews)
05:08 11Element Two: Graphics/VFX
02:09 12Element Three: Call to Action
01:31 13Element Four: Voice Over
03:37 14Element Five: Sound & Music
02:08 15Element Six: Editing & Color Correction
03:14 16Bringing it Together with an Intro and Outro
02:00 17Chapter Three Recap
00:42Chapter 4. Introduction to Storytelling Tools
18Introduction to Storytelling Tools
00:26 19Introduction to Gear
01:24 20Building Your Kit
00:51 21Choosing Your Camera
04:41 22Supporting Your Camera
02:44 23Lighting Equipment Basics
02:22 24Sound & Microphone Basics
04:13 25Chapter Four Recap
00:30Chapter 5. Introduction to Shooting a Video
26Introduction to Shooting a Video
00:42 27The Camera
00:36 28Exposure Triangle
06:50 29White Balance
02:15 30Frame Rates
01:39 31Framing
04:31 32Basic Lighting
02:00 33Recording Sounds
05:15 34Conducting an Interview
02:49 35Recording Voice Over
01:30 36Chapter Five Recap
00:44Chapter 6. Setting Up to Shoot Your Video
37Setting Up to Shoot Your Video Shoot
02:58 38Framing Your Shots
02:31 39Working With Light
10:28 40Working With Sound
07:34 41Pro Video Tips
02:16Chapter 7. The Art of Editing
42The Art of Editing
00:27 43Understanding Shots and Pacing
02:08 44Seven Step Editing Process
03:15 45Bringing the Elements Together
02:52 46Shooting for Edit and Exporting Tips
03:22 47Using Fiverr Talent for Your Edit
01:49 48Chapter Seven Recap
00:46Chapter 8. Introduction to Video Marketing
49Introduction to Video Marketing
00:48 50How to Get Eyes on Your Videos
04:02 51How to Name Your Video for Conversion
03:01 52Video SEO Explained
01:56 53Email List
01:52 54Chapter Eight Recap
01:26Lesson Info
Basic Lighting
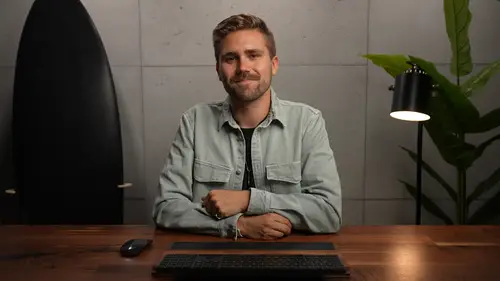
We covered the types of lights that we use in the last chapter. But now let's talk about how to use those lights to enhance the story that you're trying to tell. The standard lighting setup consists of between three to four different lighting sources. Your main light is referred to as your key light. This is the light that provides the majority of the light for your subject and scene. Your key light is often placed above your subject and pointed down at them at a 45 degree angle from your subject. This position will create what is called Rembrandt lighting. This is an example of Rembrandt lighting. This light is placed right here, 45 degrees down. Next is your fill light. It fills the shadows that were created on your subject from the key light. This light will typically be less powerful and bright than your key and it should be placed on the opposite side of your key light. Now alternatively, if you don't have an additional light to fill those shadows, you can use a reflector or a whi...
teboard to reflect the light from the key back onto the subject. Next is your hair light. You'll want to place your hair light on the same side of your subject as your key, but it will be placed behind them down on a 45 degree angle. This creates a highlight along the shoulder and hair of the subject, further separating them from the background. An additional and optional lighting source that you can add to your scene is a practical light. This is a light source that can be seen on camera. Example of this lamp in the background right now. Practical lights add interest to your shot and sometimes we use RGB lights to set the tone and mood for our shots. Now, let me show you how those all come together in this shot right here. I'm only using three of them; a key, this practical light, and kind of like a hair light that's also working as a bit of a background light here. So let me show you turning them all on and off. Okay, so let's turn the key light on. Okay, there we go. Now we have a bit of our hair light and background light. And now I'm gonna turn on our practical light here. Boom. Now, if we wanted to we could kinda fill some extra light here but I like the dramatic look on my face. Again, decide what you like for your shot.
Class Materials
Bonus Materials with Purchase
Ratings and Reviews
a Creativelive Student
Ok, I really enjoyed this course but you should know it is a decent overview of what to do and in what order to do them. This is not going to show you HOW to do anything but it will show you WHAT you need to think about and how to approach a production in a professional manner. Chris knows his stuff really well and everything is covered but it is just an overview. Well worth your time, especially if you are new to video but just do not think that he is going to show you how to do everything.