Lesson Info
2. Updated Masking Options
Lessons
Lesson Info
Updated Masking Options
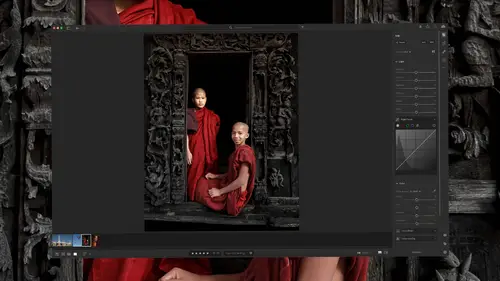
The masking features in Lightroom Classic that allow you to apply adjustments to isolated areas of your image have been upgraded considerably. Let's take a look at what they've done. Here I am in Lightroom's Develop module. And in the upper right I'm gonna click on the mask icon. And when I do, there are a total of four types of masks now that utilize artificial intelligence to isolate areas. So, let's say in this case I want the sky to be less colorful. Just clicking this button for sky is going to isolate the sky as best it can. And then I could come in here and possibly lower my saturation to make the sky less prominent. Therefore, the blue bus can stick out more. But then, what if I would like to isolate another area? Well, all I need to do is click on this plus sign. And in this case, let's see if it can find the subject of this photograph. I'm gonna choose select subject. And yes, it was able to isolate the vehicle. But I didn't want to get the dark area underneath the bus down i...
n this spot to be part of this selection. So, let's see if there's any way I can get rid of things. Well, if you wanna modify an existing mask, you go to the mask and you have these two buttons of add and subtract. And there's actually a third button as well you can access if you hold down the Option key, Alt in Windows. And that's intersect. And so, I'm gonna come in here and tell that I would like to subtract from this and then I'll tell it which choice I'd like to use. And one of the choices I could use here would be objects. And then, I can go on my image and just paint across the area that I'm thinking about and see if Lightroom can recognize that and remove it from the mask. Now, if you wanna do that multiple times, I'm gonna have to come back up here. And again, choose subtract, choose objects once again. And this time let's see if it can get this area down at the bottom, although it might end up getting the wheels or deciding not to recognize certain areas. But this, you'll have to do multiple passes on depending on how complex your image is. And sometimes it'll completely ignore areas that you're thinking of. But other times this can save a tremendous amount of time. Oftentimes it will be easier to work on small areas such as this instead of trying to cover massive areas in a single stroke. But let's see if we can get a little bit of that. Then, I'm gonna come back and just choose subtract brush and I'll clean things up using my brush tool. And for our purposes that'll be good enough. And now, I can make my adjustment of course. In this case, I think I want to lower the contrast of the bus so that the difference between bright and dark isn't so great. And I'll probably bring up the shadow slider to bring out some shadow detail, and maybe adjust my exposure. Adjust the littlest bit darker so it doesn't stand out too much. All right, then I would like to work on the building that's there. So, a couple different ways I can do that. One would be to come up here and one of the choices I have is to select the background. Most of the time that will end up giving you the exact opposite of selecting the subject. So in this case, I should get everything except for the bus. Then, I might want to get to the building by subtracting the sky. And so, by combining these together, we can create more complex shapes. And I'll do one more. I'll subtract using a brush and I'm just gonna get rid of some of this foreground area so that I might just be working on the building. And once I have that isolated, I think that's good enough over there. I've had automask turned on. That's a little check box. You can type the letter A to toggle or manually go up there and toggle it. That tries not to get overspray on things that are different than what's in the center of your brush. And in this case, I might come in here and see if increasing clarity might make that jump out a little bit more, maybe bring up texture a little bit to bring out the fine details. And also I could lower the contrast to get less of a difference between bright and dark. But you can see how I've used quite a few of these masks. Well, let's switch to a different image because this image does not contain any people. Head into the develop module. Go back to our masking tool. And now here we have this section called people. And you notice it's found one person. If I hover over it, it gives me a preview. I'll click on that and you'll see it expand. So, now I can isolate just a portion of the person. And I can isolate things like their clothing, the whites of their eyes, which is what this choice is for. Their lips, their hair, and so on. In this particular case, I think I'm gonna go for her facial skin. I'll hit the create mask button. And to enhance her skin, the moment I move one of these sliders, that green overlay should disappear. And I think what I'll do is lower the contrast on her face a little bit. I might bring up the shadows a little to make the dark areas brighter. Then, I'd like to isolate her shirt. To do so, I'll come up here to the plus sign and I'm gonna tell it that I want to once again select people. Then, when I click on this person to see they other choices, I'll see the choice of clothing and the only thing is it won't allow me to isolate individual pieces of clothing so I'll choose create mask, and then after doing so, I'll tell it to subtract from the mask using my brush. And I'll get a smaller brush and I'll just remove the area where her pants are so that I only have her top because I think this top was black and it actually looks a little bit blue in this image when I was looking at it earlier. So I think what I might end up doing is lowering the saturation just a little bit on her shirt and maybe moving the white balance just a little bit away from blue. And therefore it'll look more like it did in real life. If when working on a masked adjustment, you'd like to see the overlay that you saw when the mask was being created, you can either click this checkbox or just type the letter O all by itself. That simply toggles the checkbox on and off. You can of course change the color by clicking on this little square. It might default to red, but I find I often have red objects in my images. And so, I often will choose something more like a purplish color 'cause that's not as common in my images. And then, if you go to these three little dots to the right of that color, you have additional options for what kind of overlay you'd like. And you can choose color overlay on black and white. Therefore, it makes the overlay stand out a little bit more if it was hard to tell where it was. We have image on black and white, which in this case isn't gonna be very useful because it leaves only the area that has been masked in color. And remember, I was trying to make it look kinda black so that won't work in this case. But I could choose a choice of image on black or image on white that can allow me to see really the edge quality of my mask. Or if you wanna see really all of the details within it, choose black and white and then all you're seeing is the mask itself, and that's when it's easy to tell if you have little overspray in certain areas where you can tell exactly where an edge ends. But the default is color overlay. You'll find those same options in this menu down here. And I like to have this setting over on the right called show edit, pin set to auto. Auto makes it so these little pins that represent other areas that you have isolated and you can click on them to make the various components that make up a mask active, those will go away and become hidden the moment you move your mouse over here where the adjustment sliders are. Therefore, when you're adjusting your image, you never see any icons on top of your image. But when you move your mouse into the image area, you can still access those areas, hover over them to get a preview of what the various elements are doing and switch between them if you need to. Then, let's switch to a different image. And I wanna show you why you might need to update your mask on occasion. If you look at the moment on the right side of my screen where the mask icon is. Do you notice that there's a little red dot there? That's usually an indication that part of one of these masks might be out of date. Well, since we haven't worked with this image before, let me get rid of the mask that's there. I believe it was adjusting the sky. And we'll create a new one and I'll show you why this happens on occasion. So, let's say that I go in here and I wanna mask the sky. So, I choose the choice called sky. And just for illustration purposes I'm gonna make the sky black and white by bringing the saturation slider all the way down, just so there's a visually obvious change. Then, let's switch over to the retouching tools. And what I wanna do within the retouching tools is I'm gonna remove one of these balloons. I'm gonna come over here and do this and that's gonna change what would be considered the sky. Because when this is deleted, you're going to find that sure the balloon disappears but that mask was not updated. It remains in its original state and so therefore, it's thinking about when that balloon was still there. The retouching tool though did its job independent of that mask. It retouched it out and it put in blue sky. And so, now I need to get that mask to update. So, let's go back over to the mask icon. I'm gonna click on the name of the mask and right here you see the one called sky. That's the one that used artificial intelligence. And over here on the right it says, "Adjustments may affect sky 1 changed." And I'm gonna hit the update button and watch what happens. It just re-detected where the sky was and it updates. But then if I go back to the retouching tool, once again, I come back to my tools here and I hit reset. That's gonna remove our retouching. Now we're gonna again have an issue where the sky mask thinks that that balloon wasn't there and you see that the balloon's black and white. And again, we got a red dot underneath the mask icon. If I return to it, I'm gonna once again have to come over here, click on this mask and hit the update button if I wanted to reflect the current contents of the sky. So if you use any of the artificial intelligence masking features and you also afterwards do any retouching, you may find a red dot appearing below it. And if so, it depends on where the retouching was performed. You might need to update your mask. It doesn't mean you absolutely have to though. If I come in here to my retouching tool, I might have just been in here and retouching out some sensor dust specks and getting rid of those. But that little red dot does not pay attention to where the retouching was performed. It's just saying the contents of the image as a whole somewhere changed and therefore any of those artificial intelligence based masks, they were kinda locked in to the moment they were created and if you want them to reflect the image's current reality you'd have to update 'em. In this case, I don't need to update 'em because I was just removing sensor dust specks.
Class Materials
CLASS MATERIALS
Ratings and Reviews
a Creativelive Student
Excellent coverage of all the updates in Lightroom. Ben Wilmore is an amazing instructor.
Petra
What a great class, thank you Ben!!
Eric Baim
Concise, clear, and invaluable. Great information not just on the new features but when and how to use them, and their strengths and weaknesses.