Lesson Info
5. AI Noise Reduction
Lessons
Lesson Info
AI Noise Reduction
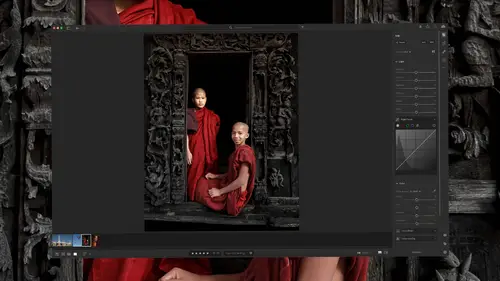
There's a new method for reducing noise in your images. It's a button called Denoise and it uses artificial intelligence to analyze the contents of your picture and to separate it into detail versus noise and it can really kind of recognize the difference between the two and try to eliminate the noise, while retaining a lot more detail than we could have in the past. Here's an image that is rather noisy. The reason why it's noisy is this image was shot at ISO 10,000 in a low light environment. I'm gonna click on the image to zoom up and you can really get a sense for how noisy it is, and just in case it doesn't come over well with compressed video, I'll zoom up a little bit to show you what we have. Then lemme show you what the new Denoise button could do. I have this image, I've already applied Denoise to it and I'm just going to load it and now we are zoomed up on one with Denoise plot. We're not looking at the exact same areas though, but it gives you a general idea of the image. I ...
think before we were looking up here and it still has a hint of noise in it but I think it's much more usable and when you apply the Denoise feature you can control how much. So I could completely smooth this out if I'd like. Here's another image. I've brightened this image considerably and anytime you brighten an image, there is noise lurking always in the dark portion of a picture. The more you brighten that dark portion, the easier it will be to see the noise that's there. And if you go to the right side of your screen in Lightroom's Develop module there is a choice here called Detail. And within detail right here we have manual noise reduction that used to just be called noise reduction and these were the settings that were available. Right now, I've turned them all off to show you how much noise was truly in the file itself. These are not default settings though, so I'm gonna double click on this one slider 'cause it's the one I had to reduce to get away from default settings. With default settings, all it would've done was have this slider up a bit. Now we can attempt to reduce the noise by bringing up this Luminance slider, but by the time you get it high enough to make it so the image starts to really look smooth, you're gonna notice that there's quite a bit of detail that disappears in the process. There is a detail slider and you could always push it higher, but anytime you do, you're also gonna reduce noise reduction a bit, so it's a balance between those two sliders. Well, let me show you the difference between this and what the new noise reduction Denoise button does. I have two versions of this picture. I'm gonna take them both right here and show you them side by side. Therefore we can zoom up on the same areas of each image. And I can tell you just by glancing that the image on the right is the one that has had the Denoise button, the one that uses artificial intelligence applied. And if you take a look at the amount of detail, how sharp the image looks, notice right here there is a separation where there's the the end of the doorway and the beginning of this back window. In here, I can crisply see it, whereas the one on the left, it looks blurry to me. If you look at these stickers that are on the window, especially the one that's right here you can see that this one looked quite blurry. Whereas on the other one I can darn near feel like I could read it. And if I look up here, I can see the little rivets that might hold the roof on. On the other one, they've been blurred away as it tried to get rid of noise. So before though, we really get too excited about this. Let's also look at where it may have messed up. I can see one area already and that is right here on the door. This is distracting. And so is that a little bit, there's a little bit of odd texture that has come through. And if I scroll down here, I noticed that underneath the car, it looks like it didn't really do any noise reduction in that area or on the tire of the car. Whereas on the version on the left, you can see that both of those areas look smooth. And so you do need to be critical of this feature. It is by no means perfect. Over here, I can see an area that just doesn't look right, but on the other version it does. And that's why oftentimes I need to use both. And what I end up doing is stacking two versions of the image, one on top of the other. I actually need to use Photoshop for that. And then I can end up painting on a mask to control where does this version show up and where does the other and therefore I can get the best of both worlds. And in doing so, I would end up getting a very sharp broom that is over here, but I would end up getting the interior of the building from over here where it did a better job of noise reduction. So how does this noise reduction work? How do I get to it? Well, let's take a look. I'm gonna click on an image. This image needs to be a RAW file and if it's a RAW file all I need to do is go to the Develop module and that's where I'll find this button called Denoise You'll see that below that there's some text that explains that this is gonna create a brand new file that's in DNG file format. Well, I'm just gonna click the Denoise button and then over here we get a preview. Right now I can't tell which part of the image I'm looking at, so I'll click this magnifying glass, which will zoom out on the image as a whole and then I'll click up on something that might have some detail. Then, we have simply a mount slider and if I bring it all the way down, it's still applying some enhancement to the image but it's not gonna be trying to really get rid of noise much. Then I can bring it up and it should be relatively interactive in how quickly it updates. That's why we're only seeing a small preview here and I'm just gonna figure out which setting do I think gives me the most natural looking image. Oftentimes if you bring it too high, it's gonna look a little bit cartoony, but let's see. I'm thinking somewhere right about in here. It's a pretty good setting. There's a choice right here called Create Stack. If I turn that on, then it's going to take the original image and stack this newly created version on top of it. So we can easily tell that the two are related to each other. And I'm just gonna click enhance. The length of time it takes here depends on how fast of a video card you have because it uses the graphics processor of that video card to perform this work. And there you see it. We have our end result, that looks much smoother. Now do be critical of it. Here, I've chosen some images that have issues. Most images I find don't have issues, but this happens to be one that I think does. If you look down here where these railings are, you notice that just above the railing it looks like it didn't apply noise reduction. Same within these areas and down here as well. And so be sure to zoom up on your image and don't just accept it based on that tiny little zoomed in preview because you might have areas like these, but you probably don't. And it's only on certain images where you get them. And when you do, what you'll need to do is it's going to take this image. You have your DNG file, you'll have your original RAW file. Just apply normal noise reduction to it until the noise has been reduced to by a similar amount. And then you're gonna stack those two on top of each other in Photoshop and you'll have to mask them. But for most images you don't need to do that. These are some extreme examples that I nitpicked out of all my images to show you where it can have some issues. Here is an example of when it did a very good job and I couldn't find a bad area within the image. And that is much more common. On the left being the before, the right, being the after and down below it gives you a little tip there and that is if you wanna apply this to a large number of images that were shot with a similar ISO setting, so therefore they have a similar amount of noise. Once you've adjusted the first one and you figured out the best Denoise setting to use, then when you select the other images, hold down a Shift key, which is option if you're using Adobe camera RAW. Some people use that instead of Lightroom. And then when you hit Denoise, it won't bring up the dialogue box asking you for an amount setting. It will just start processing the images. But Denoise cannot be applied to everything. Here are some limitations of Denoise. You can't apply to images that you have merged into an HDR or a panorama. You'd have to do it to the individual original, RAW files before merging as a panorama or HDR. It doesn't work on non-RAW files. So if you have a JPEG, a TIFF or any other file format you'll have to use the old school noise reduction sliders that have been in Lightroom for quite some time. It's not gonna work if you're just working on a Smart Preview. Also, if your image is purely black and white, your camera does not capture color, then it will not work. It also won't work if you have scaled down RAW files, where they're not the native resolution of your camera, instead, they're a smaller version. Same is true if you have images where the resolution has been boosted. There's something called pixel shift that can take multiple pictures and combine them together to give you higher resolution and it won't work on those. It only works on RAW files that have not gone through a technical process known as demosaicing. And that's why it doesn't work with all of those other choices. And it also won't work with images from an iPhone that are in Apple Pro RAW format because there's some processing applied to those images that makes it so it it doesn't conform to its requirements.
Class Materials
CLASS MATERIALS
Ratings and Reviews
a Creativelive Student
Excellent coverage of all the updates in Lightroom. Ben Wilmore is an amazing instructor.
Petra
What a great class, thank you Ben!!
Eric Baim
Concise, clear, and invaluable. Great information not just on the new features but when and how to use them, and their strengths and weaknesses.