Lesson Info
10. Specular Highlights
Lessons
Class Overview
05:08 2Getting a Grasp
03:55 3Pop Quiz!
03:57 4Quality of Light
20:41 5The Effective Size of Light
35:07 6Creating Contrast with the Position of Light
24:51 7Controlling Shadows (1+1=2)
06:29 8The Inverse Square Law
22:04Angle of Incidence and Reflection
13:24 10Specular Highlights
26:26 11Parabolic Shapes
18:22 12Dynamic Range
08:54 13Creatively Correct Exposure
12:03 14Metering Is Not An Exact Science
32:21 15Flags and Reflectors
32:05 16Let’s take another look at modifiers
11:12 17Reshoot Challenge
46:44 18Mark’s Favorite Modifiers
40:32 19Pop Quiz Review
14:23 20Class Wrap-up
03:34Lesson Info
Specular Highlights
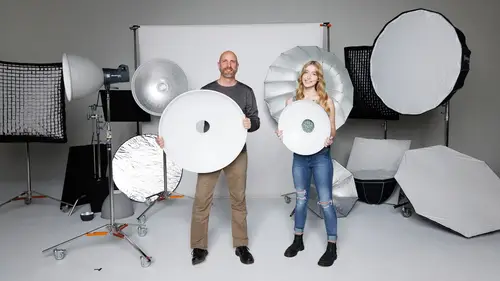
and now it's time for speculate highlights. What the heck you're speculate highlights. We'll speculate highlights are the reflections of the sources of light illuminating your subject. And so there's a great way for us to figure this out. Let me just show you over here, I have a delicious bottle of wine. And so this is highly reflective. This bottle of wine here. And if we look at it closely you can see that there are a couple of dots right here and then there's a couple of dots up here. Those are the reflections of the video lights here in the studio. You can also see look it over here, This stuff right here, that's the reflection of this table and this is a reflection right here of this table, you can see when I move my fingers around it reflects in that bottle. All of those things are called speculum highlights and so they're reflecting the sources of light that are illuminating the subject. Okay, someone move this delicious bottle of wine out of the way. And so what we have way bac...
k here as we have this goofy looking light modifier and it is called a snoot. So I have chosen this intentionally, this light modifier um takes light and it just confines it so it comes out in a circle. Okay, and because of the shape, this finally shape, um you get light bouncing around and it will make a looney tunes kind of a shape of light. And so it's not just a nice, gradual bright point and then going off into darkness, it actually gets distinctly darker as it goes out. I can show you what that looks like by shining it on the back wall here. So I'm gonna put this on here, lock this off, turn on the modeling light now, before we get into this, I would like to show you a couple of other things that I have and so I have a reflector here and it has two sides. The first side is silver, the second side is white. So we're gonna be discovering the differences between these and how that applies to speculate highlights. So I'll set that to the side over here. And then the other thing I have is the most reflective of all reflectors. It is a mirror and notice that this mirror is vertical and it's narrow and it's tall and so this is gonna reflect light in a very specific way. So, what we were trying to accomplish here is we want to understand how different surfaces reflect light because eventually we're gonna do is we're gonna start looking at like modifiers and how their surfaces affect how light is reflected back into the camera. Things like these guys right here notice these look identical, they're basically the same shape and the same size. But if we look inside, well, there's nothing the same. One of them is white very soft. The other one is shiny and silver and so you'll see that when we do the demo of this stuff behind me, you'll start to understand why these have different surfaces on the inside, even though they're the same exact shape and then we have are effective size that's gonna come into play. We got a bunch of stuff. Whoa, I don't want to knock that over. Okay, so what we're gonna do here, let me put that back at the same thing. I thought that was my camera for a second. I'm like, all right, so I'm gonna snap my fingers and the lights are gonna go out. Boom, that was magic. And now look on the back wall here on this uh this seamless paper here, we can see the shape of this light modifier, how it casts light. So notice we have a bright white circle in the center and then it gets darker and darker as it goes out, sort of like the Looney tunes. So it's not a, it's not a gradient, it stops like old school netflix, it doesn't fade out. It's like uh so what I want to do is I'm gonna show you how different reflectors reflect light. So I'm going to now blind you. The light is now shining into the camera and the first thing I'm gonna do is grab the mirror and I will put the mirror over here and notice the shape of the reflected light, notice it mimics the size and shape of the mirror. So if I change the mirror to the side or this way it's going to change that as well. So the shape and size of the reflector matters and then notice you can also see the source of light and it looks pretty much identical to the light itself. So when we showed the light earlier you can see like that looney tunes that gradient of the hot circle and how it faded out. Notice this reflection looks pretty much exactly the same, it's a mirror reflection of the light. And so what we want to do is take a less obvious look at how reflectors work. So I'm gonna put this mirror down and now I'm going to take a real reflector, the silver reflector. Hi fam, I'm gonna put this up so notice I can move the light around and notice that we have our light in the center, so we can see that as a sort of a blob, but notice we also have a hot spot in the center of our reflection, but it is sort of a gradient, it sort of fades out now, it's not exactly the same as it was when it started. And so we've changed those reflections just a little bit. And so this has become what we would call less speculator because the reflection does not look quite the same as the original. So the mirror was more speculator. This is less speculator. Now watch what happens when we go from silver to white, so we get less light being reflected on the background, a lot less light, The shape is pretty much the same, but because of this white reflective surface, sort of uh bounces things around a little bit, it becomes diffused, it's even less speculator than the silver. So white and then silver and then the mirror things change just a little bit. Okay, we're gonna turn the lights back on here in the studio, I'm gonna try not to blind you with that. What we want to do is we want to see if we can figure out how this all works in real life. So we've got the principled explanation and now it's the demonstration. If we look at the image that we just shot of Quinn, you can see. Well there is a reflection in her glasses, that reflection. If you look closely, my camera just timed out. Let me untie mitt out. If we look at this reflection here in her glasses, you can see that is clearly a soft box, it looks like a mirror reflection. That's what we call a speculum highlight. And we can say that that is highly speculator because you can see exactly what is creating that light. You can also see in her other eyeball over here. That is also a speculum highlight. We call that one a catch light because it's catching the light in her eyes and notice that the shape of that catch light is the same as the shape of the reflection in the glass is is just much smaller because of the reflective surface. So we're going to try to figure out how to control all of those things. Also notice on the bridge of her nose and on the chrome here, all of this reflecting light is a reflective, is a speculum highlights. And as we change the direction of our light, those speculate highlights also change notice on the bottom rim of these glasses down here, along that metal surface and along the side here and right there. Those are speculator highlights. And so what we want to do is choose light modifier light modifiers that give us the most pleasing speculate highlights of all. So we're not just looking at hard light and soft light in the direction of light. We are looking at how can we control those reflections of light that are coming off of our subject. And so, to take a look at this Quinn is going to come out. I have asked her to put on an excessive amount of lip gloss. Have you lip glossed up? She's so glossy lip gloss because we want to look at a few things on Quinn. We want to look at how the light reflects off of her lips that are very glossy. We want to look at how the catch lights are showing up in her eyes. We want to look at how the light reflects from her hair. We also want to look at things like her collarbone and her shoulders and her jawline, her cheekbones, all of those things, we want to see how all of this works. So we're gonna have you stand about almost where you are and we're gonna start with the light modifier that I almost never use just for portrait photography, but we have it here, so why not? We're gonna use a snoot and so I'll try not to blind you, but who knows what this will do. Um Poor Quinn is being blinded all day by these really bright lights and to make sure that my laptop is ready to go, Okay, so the other thing is Quinn's gonna meet her all this light for us because well she's a seasoned pro, she knows how to do it, make sure that's good. Okay, there you go. So we want to shoot this around F eight ish. So go ahead and meet her that At 63, somebody take that up just a little bit and then go ahead one more time. Nine. Okay, perfect, just F nine. So I'm gonna set my camera also to F nine. Here we go. And now let's just take a shot, there's gonna look right here right at me gorgeous. And wow, I need to shoot with a snoot more. Look at this, this is the shot we just created. Now notice what we've got going over here. So on her eyes, look at the speculum highlights, the catch lights in our eyes, notice it's round because the light that's illuminating her that is round. Notice that the the reflections in her eyes around here, those are little dots there round again because the source of light is around down here on her lips notice this really sparkly, it looks like a constellation of stars, but probably if I was shooting this for an ad campaign I'd want like a nice solid line of reflection. And so I would probably need to choose a different shape of light modifier, Maybe something that's horizontal or something large. So we want to change that can also look at her skin. So notice that we see all of the different uh textures of her skin because her skin is reflecting that small light source. And so it looks what we would call more speculator. Notice also in her hair right here, as it's coming off these curls, we have this little line of light that is a spectacular highlight, so we can control how her hair looks, how her eyes look, how the reflection of her lips look all by the shape of that light. So what we're gonna do, because we don't normally shoot with a snoot, we're gonna change to some different light modifiers and we're gonna play with this. So what we're gonna do first is we are going to use this guy right here now this is a special shape that we're gonna talk about a little bit and it's a parabolic shape, but inside it's silver and this is made for throwing light a long, long way. Um And it's really efficient. So I'm gonna try not to melt your face. We're gonna take this, we're gonna put it on there. I'm gonna turn the value almost all the way down. There we go. So, I have this light, it's absolute lowest power setting. All right, so now what we're gonna do, let's go ahead and meet her, you again. So go ahead and meet her that please. And I think let's see what we get This is F 11. Whoa. So F 11 from 9 to 11. So, that's almost a stop. That's crazy. And we turned the light all the way down to the absolute lowest power. We're gonna talk about this point. It's really cool. Okay, so speculate highlights is what we're talking about. It's going to take that photo. Ah these look, I love hard light modifiers. Look at this, it's like a 1950s glamour shot. It's so cool. So now let's take a look at her. I so this image is coming into lightroom there it is. Take a look at this light monitor for this uh speculate highlight here. We can almost see the light inside the light itself. So, in fact, let me turn this toward you matt. So you can see that there's a light inside and then there's this reflector, we're seeing the light and the reflector in Quinn's eyeballs, it's really cool. We can see that here in her eyeballs. If we go down here and look at her lips, notice that the lips aren't quite as sparkly as far as like looking like a bunch of little stars. Those speculate highlights have grown a little bit and they're more uniform, which is really cool. Notice the highlight on her nose is round because it's reflecting the source of the light. Notice how her collarbone and her neck, all that stuff, notice how that shines. It's more speculate because it's more reflective and her forehead the same thing you can see. We still see a lot of texture on our forehead because this is speculator. Okay, we're going to change now, we're gonna make a very, very small change, and that is we're gonna go from silver to white. All right now, remember we shot at F and we had some speculator lights. Yeah. All right, there's pretty much the same thing, But check out what happens here. I'm just gonna make this really quickly That went from F 11 to F five. It's just the interior coating that changed that. It's not as reflective. You hold that on it increased the output of this, so go ahead and meet her. That that's F nine will take it just got totally lucky F nine. We're gonna shoot this F nine, and once again, let me do that one more time, because I didn't let my camera focused. So, let's look at the second shot that came in. Okay here we go. Take a look at the speculum highlight. It looks pretty well. Look at the difference, this looks like a solid light. The other one that we shot two shots ago, you could see a distinct center with sort of a halo. So that speculum I light changed because this is more this is softer with that white interior coding. I think we overexposed just a bit, you can see that her forehead we don't have as much reflection, as much speculate highlight. And so the texture there is starting to soften and we can look, her lips look pretty similar to what they did before. But I want to do something with this portrait specifically and that is I'm going to change. Gonna move this really close. Sorry sorry and let me just meet her this really quickly, take the power down just a bit really quickly. Oh 14. It's a little bit bright for me. How's your face? Okay, it's melting off. So F 13, F. 13 is where we are. And so now what I'm gonna do is we're gonna go in and this is awesomeness. Damn. Okay so now I got really really close, I want to look at uh look at look now at the speculum highlight in her eye, you can it's a reflection of the source of the light. You can see that light. So we're just moving that closer, we made that larger but also notice that the reflection on her lip. It's starting to get that bar. They're moving that light closer. Made it a larger source of light. Sorry, Quinn, I'm blinding. You made it a larger source of light. It made that reflection look a little bit larger as we'd like it to. We also soften the light and also look at the background. The background just got dark because of the inverse square law. All of this stuff is adding up. So what we want to do now is we want to change from a hard light modifier to a really soft light modifier. So, what to do because we're not gonna move Quinn at all. You're gonna stay there. I'm gonna go grab one of my favorite light shaping tools. This huge guy. All right. Yeah, that it's a big light modifier. So, this is a light motive direct. We're gonna do a bunch of stuff with the light motives a little bit later. Um I love large light modifiers, like big round light modifiers because they look like outside like the sun. And so this has well, I'm gonna tell you about it later. So, I'm gonna get into it but there's two different levels of diffusion. So this should be really soft light. What we're gonna try to do is see what Quinn looks like with a really big soft source of light really close and so what I'll do is I'm gonna see if I can lower this just a little bit something like that. Think that's as far as I can go and then Julia. I want to try to move that up a little bit more so I'm like did I turn that light on? Okay good. Yeah, I did. All right, so now we can try to do is see what this does now. Just to be fair. Normally I would have this on a boom arm so I could really get it close and over. But just to play I'm gonna just use it as is maybe you move it a little bit down a little bit more. Okay now let's meet her this, we'll see where we are. There you go. What do we get? F. 9? Perfect. F. nine will work. Thank you very much. Okay so now let's look at the speculum highlights with this big soft, beautiful light. F nine. Is what we said, is that right? Yeah. Okay bam. Look at that like a soft ah so soft that light is. And we look at the cat's lights in her eyes. Now you might notice the catch lights in their eyes. They're bigger obviously but notice they're always these are all at the top of her eyes. That's because of the angle of incidence and the angle of reflection. So the light is coming from the top rank is coming out the bottom. So it's always going to be at the top if we want that those catch lights to be in the middle. I need to lower this and get that into the middle, so that looks fantastic. Let's look also see the texture of her skin, how it's becoming a little bit softer and softer as we go, because it's not as spectacular. So we're not seeing all those different things. The transition of the shadows under her chin are just really, really soft. It's really forgiving light. But one of the things I don't like is these speculate highlights on her hair, they've softened so much that if this is a hair or shampoo commercial, something like that, there's not enough there to really show how amazing Quinn's hair is. In fact, let me see if I can go and get back to one of these early shots. Yeah, so we'll go back to this guy right here, look at this particular highlights in the hair here and here and here. Compared to this, there's sort of, and then there's really, no spectacular wham o bam. Oh, this is amazing hair, because our speculate highlights are different. I would prefer the hard light, the smaller light, more speculator light. If this was a hair commercial, then this, this is very soft, it's very beautiful, but it doesn't make her hair look like it's Pantene amazing or whatever the brand is that a brand for. Okay, I haven't washed my hair, I haven't washed my hair, but I haven't had hair care products in a long, long time. Okay, so let's do a couple of other things with this. So, I'm gonna lower this light. Uh like this, I'm gonna make it a little bit more level and I'm gonna do something wacky. I'm gonna bring this back about right here, I'm gonna increase the power quite a bit. Something like that. Okay, let's meet her that I want to get this to about F 10 or F 11, 12 ish. That's eight. What is that? All right, that's f. 13. I'll take f. 13. Okay, now, I want you to observe what I'm about to do. This is a very large light source, I'm just going to stand in front of it, so I'm gonna let it go around me and I'm gonna take a photo of Quinn, So it's big enough. I can do that. So that was f. 13, right, yep, So this is F 13, but I'm blocking some of the light. I should have made it like this. So, I'm gonna just go down by about a third of a stop, look right at me, we'll get a sun tan. That's pretty cool. Okay, now, look what we have, you know how cool is that? So, look at this shot, we've changed the speculator highlights again, so, now look at where those highlights are in her eyes, their direct dead center because of the angle of incidence and the angle of reflection. Can also see me in her eyeballs. I'm standing right there, You can see this little that's my head. Man, I got a small head notice that the the skin is shinier. This is shinier. Her lips are shinier than just the shot that we did right before that. Why is that? Mm Well let me tell you why speculate highlights come from the size and the shape and the color, the reflective surface, all of that stuff. But remember the speculum highlights is the reflection of the light that is illuminating the subject. So if your light is lower, well the angle of incidence and the angle of reflection changes, so you get more of a reflection when you lower the light, it will change the speculator highlights to prove that we are going to do one more thing. I really want you to do this at home so you can try and see these in your own life. Okay, I think that's gonna be. Can you even see that map? This is way up in the air? So it's wave your hands in the air. Okay, so that's way up in the air, We're gonna meet her, this, we're gonna take whatever value it gives us. 11 goes to 11. Okay, So here we go. f. 11. I'm gonna stand underneath this light and we'll take shot and this looks so cool, It looks like a catalog shot, doesn't it? It looks pretty cool. So look at how cool this is the uh the speculum highlights on her eyes smaller because it's a little bit farther away. Higher because the angle of incidence and reflection. And then again, the skin is now looking a little bit softer than it was before, because not as much light as reflecting straight into the camera. Notice we're starting to get contrast on her cheekbones. See what's happening here on this side of her face, were starting to sculpt her face um by elevating the light. That contrast that direction of light is starting to come into play here. Notice we have a nice well defined chin with shadows that fade out because we elevated the light. It's very large. We were able to create that shadow there by the angle of light. And so all of the things that we've been talking about so far are starting to take place. Also noticed the background was white because we're so far away that the inverse square law started toward all of these things work together to create some really neat things. Well, one of the things you may have noticed by the way, if I lower this light, what there we go, lower this down. Look at the shape of this light. See how it's got this very distinct shape. You may have noticed that same shape with this. Notice it also has that same shape. A lot of the lights that we've been seeing have this very distinct shape. Well, that's called a parabolic shaped parabolic modifier. And those do some very special things. That's what we're gonna talk about now.
Class Materials
Bonus Materials with Purchase
Ratings and Reviews
user-a07413
Wow, Impressive with lots of information on light modifiers. Lots of variations of use and the bonus material. Mark is very good as a teacher. Glad I purchased the subscription plan so I can see the other Mark Wallace classes. Now to go to work and use the information.
Paul
I've heard much of this before, but this class really does a good job explaining and demonstrating the principles and techniques it covers. Mark is certainly quite knowledgeable, and he makes the material accessible and easy to grasp. It does cover quite a lot of ground, and while others may go into more detail, I think this class is great for building a good foundation.
Mario Furtado
Mark and his crew did an excellent job in this class. Now I am eager to see Go-To Lighting Setups and Studio Lighting Essentials. Congratulations.
Student Work
Related Classes
Lighting