Constant Light: Standing Pose Headshot with Male Model
Lesson 24 from: The Business of Professional HeadshotsGary Hughes
Constant Light: Standing Pose Headshot with Male Model
Lesson 24 from: The Business of Professional HeadshotsGary Hughes
Lesson Info
24. Constant Light: Standing Pose Headshot with Male Model
Lessons
Class Overview
13:07 2Getting Headshot Clients
27:23 3Headshot Pricing Models for Individuals
24:47 4Headshot Pricing Models for Groups and Companies
13:05 5Payment and Delivery for Groups
20:49 6Six Styles of Business Headshots
38:31 7Headshot Lighting Gear
11:31 8Posing Basics for Headshots
08:03Basic Standing Pose for Headshots
05:10 10Basic Seated Pose for Headshots
03:22 11Head Position for Headshots
04:25 12Expression Sells the Image
06:45 13One-Light High Key Headshot with Male Model
35:42 14One-Light High Key Headshot with Female Model
09:01 15Two-Light High Key Headshot with Male Model
10:08 16Two-Light High Key Headshot with Female Model
04:58 17Two-Light Standing Pose Headshot with Male Model
19:17 18Two-Light Standing Pose Headshot with Female Model
13:47 19One Light Low Key Headshot with Male Model
16:18 20Two Light Low Key Headshot with Female Model
14:55 21General Q&A
11:03 22Constant Light: Low Key Classic Headshot with Male Model
31:47 23Constant Light: Low Key Classic Headshot with Female Model
21:56 24Constant Light: Standing Pose Headshot with Male Model
17:22 25Constant Light: Standing Pose Headshot with Female Model
10:45 26Setting up the Background for Extraction Shoot
10:49 27Shooting for Extraction Headshot with Male Model
12:06 28Shooting for Extraction Headshot with Female Model
13:53 29Shooting Low Key Modern Headshots for Extraction
12:28 30Basic Headshot Facial Retouching Techniques
23:48 31Basic Headshot Eye Retouching Techniques
12:14 32Basic Headshot Retouching Techniques: Dodge and Burn
07:40 33Basic Headshot Retouching Q&A
11:18 34Extracting a Single Subject
20:01 35Creating a Headshot Composite
15:07 36F-Type Headshot Lighting: Equipment and Principle
10:36 37F-Type Headshot Lighting: Execution
21:29 38Shooting Headshots in Volume
18:49Lesson Info
Constant Light: Standing Pose Headshot with Male Model
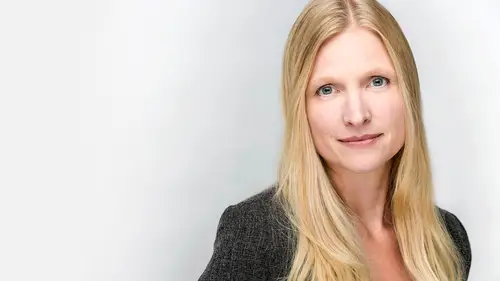
We're gonna go ahead and start with standing. Killer. All right. So where's my other reflector that's on the stand? I'm gonna shoot this exactly the same way on the main light as I did with low-key. Again, 90% of what I'm doing is I'm shooting flat or I'm shooting open directional for most of my business clients, and you'll see that I've got this main light. You want it angled down a little bit if you're gonna use bounce like this. All righty. There we go. So these two lights, and even though it's a reflector, it is a light source. You're gonna look at the side like this, and you're gonna see the angle. That's why we call it clamshell lighting. Okay, cool. All right. Oscar, step on up to the plate. There we go. Yeah, this is gonna be cool. So let's do a (imitates camera click). Again, we got a little more height on this guy. I'm gonna raise it up just a touch. Oh, that one's maxed out, I think. Please don't fall over and hurt me. All righty. There we go. All right. There it is. I know ...
if my wife is watching this, she's chewing her fingernails off thinking I'm gonna trip or knock something over only because she actually knows me. There we go. Cool. All right. So let's see what we got. Yeah, that is perfectly what I wanted. Very cool. Oh, I wanted to talk too a little bit, before we go on too much further, about the color temperature of these lights. That might be a question that somebody wants to know about. These lights, they are fluorescent, but they are balanced pretty close to daylight. I think they're around 5,200 Kelvin, for those of you out there. However, I have noted that there is still a small tint of green in them as compared to regular daylight, so I would recommend that if you're gonna use them, I always do a custom white balance. This is a ColorChecker Passport from X-Rite that I use. I have no particular allegiance to it. I'm sure there are plenty of different kinds out there. I like it because it's really hard to break and it fits in my pocket, especially when I'm on location. It also comes with a little attachment for a lanyard, so if you're a huge nerd, you can wear it around your neck if you like that sort of thing. I thought that would get a bigger laugh. (audience laughs) Also, you can photograph this, and if you're in Lightroom, you can actually create custom color profiles using this thing, so every camera is gonna have a unique color profile. Even the same camera coming off the same line from the same factory in the same day could have slightly different color, so what you could do to save yourself a whole lot of time color balancing is to use in Lightroom or in Camera Raw or whatever comparable software that you use is to create a custom color profile for your camera. I have, in my computer at my office that I edit on, not my laptop that I will be editing on in the third segment today, but I have a custom color profile that's entitled "Studio Constant Lights," and so it's specifically tuned to my camera using these lights in my studio, so I know that when I pull an image into that, I can select a whole batch of images, the whole session. I select that color profile, and the color is perfect right off the bat. You never have to worry about getting the color correct, so that's something you can do. We're not gonna cover that in detail right now, but just to let you know, you can. Okay, did anybody actually ask about color balance? Somebody did. (laughs) Folks had been asking about white balance as well and if you were changing that up. Absolutely. Right now, I'm on a custom white balance that we shot earlier before we started the segment. All right. We got the image up. Man, that looks cool. I really like a background that's not completely white if you want to get something that's got a little bit of a more natural, modern feel to it. There's something almost artificial about complete whiteness, do you know? And so when you're doing your standard professional "Everything's gotta have a white background," that's what you do, but if I'm shooting for my client, I will very often leave the background a little bit on the gray side because I kind of really like the way that looks. So because we're shooting at f4, it doesn't look like I'm getting a ton of detail in that background, but I'm pretty cool with the overall look. All right. So let's change it up, Oscar. I'm gonna have you turn slightly to this side. (laughs) There we go. And point your right foot at the camera. If you want to think of it in terms of being a dancer, it would be sort of like first position if you were a dancer, I don't know if you have dancing experience. All right. Perfect. Shift the weight onto your back foot for me. Good. All right, and I want you to point your upper body this way just a little bit, yeah. Turn your head like so. Tilt a little that way. There we go. Good. And now I want to demonstrate real quick the difference in chin position. I've seen a lot of people be really, really adamant about bringing that chin down, right? I've seen that in a lot of different tutorials. They'll be like, "Don't forget to bring the chin down." However, I do that a lot, but you can create kind of a different look with a slight adjustment up or down. Remember, yesterday, I said there's no such thing as a magic wand. There's no thing that works every single time. There's no lighting technique. There's no posing technique that's gonna work 100% of the time, and anybody who tells you so is trying to sell you something, all right? So you have to have as many skills as possible to be able to deal with any situation that could come your way, and every once in a while, you're gonna get something that you don't know how to deal with, and you're gonna screw it up, and then you're gonna learn from it, and then you won't screw it up the next time, and that's okay. Remember, more than anything else, it's totally okay to fail because you're never gonna get better unless you fail. If you think that you've never failed, then you're kind of probably a jerk. I just want you to put that out there. If you never fail, you're never learning anything. If you get to the point with your photographic career and with your art and with your craft where you don't think you need anything else and you're there, if you think you're there, you should quit because there's so much out there. Every day, almost, I see something online, a photographer's work, that makes me want to put my camera in the trash and light it on fire, okay? You should feel like that at least once a week or you're not growing. I really want to challenge you to do that, so don't expect so much from yourself that you should never fail 'cause I screw stuff up all the time. Now let's move forward. All right, Oscar, looking good. So let's talk about the chin position, all right? So at the waist, I want you to bend forward towards me a little bit. Perfect. So that's bringing that head closer to the camera. We're gonna tilt a little this way. Okay, and I want you to lift your chin slightly. Right there. Okay, cool. Let's look at that. Boom. (camera clicks) Okay, now I want you to lower your chin. Keep going. Keep going. Boom. All right, there you go. (camera clicks) And so if we could put those two images on the screen, I want to talk about the intricacies of chin position if we could do that. All right. Somebody, if you have an opinion, let's go ahead, and those numbers would be, guys, 7425 and 7424 please. 425 and 424. Because I want you to realize that in a headshot, it's a microcosm of a lot of other types of portraiture, which means that instead of working a whole body and a scene and a background, you're basically on somebody's head and shoulders, which means that the subtlety of what you're trying to say with the image has to come from very, very minor changes in the image, a squint of the eyes, a lift or a drop of the chin, a tilt of the head, and these are all things that you have control over, and you have to learn to be able to control these things to say something about the image. So look at these two images and just the chin position, slightly up and slightly down. Is one bad and one good? No, those are both good positions for him, but they say something different. He lifts the chin and to me, in this particular instance, it seems like he's listening, right? So if you were gonna do the type of person who is in a business where they want to look like they're interested in what you're saying, that might be a better shot, the one on the left. The one on the right, his chin is down, his head is leaning in. It almost looks like he knows what he's talking about. He knows the answer. One says, "I'm listening to you." One says, "I already know what I'm talking about," and those are two totally different feelings that you can get from just that one tiny shift in the image. That's the coolest thing because for a while, headshot photographers like me have been like the red-headed stepchildren of the photography world, and it used to be, way back in the day, if you were a wedding photographer, you were looked down on by commercial and portrait photographers, and now wedding photographers are all rock stars, and headshot photographers are gonna have their day. I'm telling ya, we're coming for ya, wedding photographers. We're coming. (audience laughs) It's very exciting. So all of these things that you have control over will say something different about the image, so don't think of it as just a headshot. Your responsibility is someone's image or their brand, sometimes even how they feel about themself. It's a really, really cool thing to realize that even with these minor changes, you have those controls. You with me on that? Okay, cool. All right. Oscar, you're doing a fantastic job. So let's try to pair the expression with the position, so what I want to do is have you tilt a little bit. Relax those shoulders for me. There you go. Perfect. Lean in towards me, bend. If you say "bend" rather than "lean," men almost always, if you say "lean," shift the weight to the front foot, which we don't want. So if you say, "Bend at the waist," they will do it correctly. That's what we want. We want the weight on the back foot, and we want them to bend forward a little bit. Cool. And now what I want to do is turn your head this way just a little bit. I want you to raise your chin ever so slightly, and we're gonna go for a little more open and pleasant expression like, "Hey, how you doing, buddy? I'm your pal." Lift that chin a little bit. I want you to relax those eyes, and there you go. Super friendly. That's awesome. Let's do two of those. Cool. Good, and now I want to do the same thing but lower that chin. There. Okay, good. Give me that same small, friendly, nice, open approachability and eyes. Good. (camera clicks) Okay, now I want you to harden your expression. We're a little more serious. You gotta get stuff done. Perfect. Boom. (camera clicks) And now I want you to raise your chin again up high a little bit. Right there, and now we're hard-faced. We're gonna get stuff done. Nice. Bring me a little more brow in there. Yeah, there you go. (camera clicks) Yeah, perfect. Okay, that's killer. Everything you change is gonna have a slightly different connotation. Expression can totally negate that position or mixing those two. It's a really cool thing to play around with. I would encourage you, more than anything else, to practice a lot, and so practice on your friends, and if you don't want to waste a whole lot of time, practice on your professional friends. So if you happen to accidentally give them a really great headshot, then they have something that other people will want, and that can generate business for you. Is everybody cool with that? Okay, cool. I'm really digging this look, man. I might give you some of these. Is that cool? (laughs) All right, so let's do this. I wanna get out of the traditional portrait, 45 degree thing that we're in, and let's work on a couple of other things. So we're gonna start posing from the ground up, and we're gonna do things a little bit different, and then I'm gonna bring Charnee over here too. Okay, I want you to, Oscar, face me straight on just like so. Cool. All right, and now I want you to shift your weight to this foot. Good. Perfect, and point the other foot kind of out a little bit. Good, and now I want you to put your thumbs in those pockets, nice and relaxed. Good. Okay, loosen up the shoulders a little bit. Now we're doing straight on. This a totally kind of a different thing that we've done but I want to play with a little bit just so you don't get 500 shots of the exact same pose. Okay, I'm gonna tilt just slightly this way and chin down a touch. Good. Now we're gonna bring that reflector back in just like so. 'Cause you can shoot straight on. It is doable. I do recommend it. The cool thing about shooting headshots is you can get like 50 looks in 10 minutes just by adjusting a few things, you know? You don't have to walk to a different location or even change outfits, and if you're gonna have a model for your business where you're doing sales after the fact, it's really easy to give somebody a few more options so that you can sell them more stuff. All right. Let's do a couple of these. When you typically shoot 45 or turn one way or the other, when you switch to a straight on, it can have a very startling effect. Did you have a question? I did. Just wondering, you moved the angle of the camera up a little bit more. Yes. Or you moved your tripod up, and some folks have been asking again about the angle of your lens itself. Ah, yes. Relative to his face, his eyes. Can you talk a little bit about that again? Absolutely. If I'm shooting a 3/4 or full-length portrait, my lens is typically gonna start at about chest level, and what's that's gonna do is you want to make sure that the plane of the subject and the plane of the lens are the same because if you shoot tilted down or tilted up, you're gonna change the perspective of the image. You could have somebody with a very tiny head and very big feet or vice-versa if you shoot this way, so chest level is really good full-length, medium-length. When I get into headshots, I'm typically gonna be shooting with my lens right about at mouth level, but I want to look at my subject and I say if I want to create a certain look, like if I want to slim them down a little bit, I'll take a slightly higher angle, okay? Or if somebody, for example, is having trouble engaging the camera, like I can't quite get them to lean in enough, I'll come a little higher, and that will facilitate the sort of same finished effect. If I want somebody to look a little bigger and a little more imposing, I will take a, I'm talking two or three inches, lower angle, and let's go ahead, and I'll show you the difference right now. Why not? That's a good idea. All right, 'cause straight on is a great way to do this. All right. All right, perfect, Oscar. That's great, man. And so let's keep it a nice, neutral expression 'cause I'm just trying to demonstrate camera angle right now. So this is gonna be pretty much dead on with his face. (camera clicks) Good, and then we'll go a little bit lower. It's gonna be a subtle difference, and I hope we can see it. Gonna go two. (camera clicks) Good. And three. (camera clicks) Okay, so those last three images, let me give you the numbers so we can put them up. Those are gonna be 34, 33, and 32. You guys getting a lot out of this? I really hope so. I'm trying. I'm giving you all I got. (audience chuckles) Okay, so 34, 33, and 32 as soon as possible. There we go. Okay, perfect. So here we go is dead on, right? That's about putting the lens at lip level, and this is slightly low going up. There's a tiny shift in perspective, but put your mental hand over that left image, and look at the extreme end of it, slightly low angle, slightly high angle. In this one, doesn't he look a little more imposing? And in this one, you're looking down on him ever so slightly, and it just changes the feel of the image. As you develop more and more in this type of work, and in photography in general, everything you do, from taking a step to the left or the right to standing on something or getting down a little bit lower, is gonna change how the image feels, and the more you do it, the more you will shoot intentionally. If it's a groom on his wedding day, and you want to make him look large and in charge, take that slightly low angle and give him that. Give him that presence, you know? If you've got a guy who is kind of large, and you want to make him look a little smaller so that he's a little happier, take a slightly higher angle. You can totally change how your image feels just by moving a little bit, all right? But I would not change a lot. Sometimes I'm dealing with the lighting, and if I go up and shoot down a little bit, I know that I'm gonna have to bring his chin up a little bit to get his face back into the best part of that light, so keep that in mind, but every angle that you choose, every light, every lens, everything that you do is going to change how the image feels. There's a great example of it. So there's where I would go for something like this. I would go straight on because what I don't want to do is I don't want big nostrils if you go too low, and I don't want him to look small, but I'm not trying to make him look too imposing in this one. I just want a straight, dead level.
Class Materials
Bonus Materials with Purchase
Ratings and Reviews
Melville McLean
Gary Hughes is possibly the best teacher I have seen here and that is a very high compliment. His business analysis is simple and to the point. His set ups and techniques are simple and straight forward, no easy task in itself. His interactions with his models/clients are finely developed and reduced into the fewest but most important key exchanges. He teaches by example how to interact and direct. If you are a high volume photography with brief time per sitter, you might especially appreciate his tips. It is extraordinarily difficult to keep a tight, well structured class going live for so long at a time. His intelligence, wit and personality are all in his favor but it is the content itself that is most impressive. I am not a portrait photographer but I have 30 years of commercial studio experience. He knows what is most important, leaves out the rest and has organized the material in anticipation of most difficulties that arise so that it rests in a seamless, smooth, coherent learning experience. All of his practical advice is excellent. Just understand that his work is about doing a relatively large number of shots in the most efficient way rather than a lot of time spent on a few clients for a completely different format [presentation like very large prints. In fact he is especially pragmatic. He emphasizes that you do not have to own the most expensive equipment but you absolutely do have to know how to use the equipment that you already have. And I am telling you this as someone he makes fun of in his course with fancy cameras and Profoto lighting gear. He is an advocate of all thought out approaches as well as relying on skills and knowledge. You will understand how and why to make all of his key, conventional light and posing set ups. He makes everything sound simple and doable -- and with his help -- it is. What you have to appreciate is that it is up to each individual to acquire the specialized skills to make our work compelling enough to be competitive. The unspoken truth that we all face is that talent plays a key role as well and that it takes time to become every accomplished. But I have also seen concentration, commitment and hard work result in developing innate talents that blossom in very successful careers. Mr Hughes reduces every step into the clearest, most essential components. He is self effacing both as a photographer and post process retoucher but he is very good indeed and does not waste time overdoing images that cannot benefit from a larger format presentation. Everything is appropriate and practical. He has already removed everything that does not matter for his purposes for us that would only interfere with the concise, clarity of his presentation.
Roan
I am so glad that I had the opportunity to watch this course. It has not only provided valuable lighting set-ups, but also great basics for posing.!. The Photoshop extraction technique Gary demonstrated was icing on the cake. Gary did a great job teaching and I greatly admired the technique in which he taught. Thanks for a great class!
aodeal
This was an excellent class! The class covered so much information and great tips and ideas. Gary is funny and has an easy going approach, which makes the class that much more enjoyable. As a struggling pet photographer, I have been trying to find something to supplement my business with that does not involve children/babies, or shooting weddings again and headshots seemed to be a great option. After watching this class, I feel confident building up a headshot component to my business. Definitely recommend this class!
Student Work
Related Classes
Portrait Photography