Lesson Info
4. Lighting For Flower Photography
Lessons
Introduction: Why Take Pictures Of Flowers
02:28 2Lenses For Flower Photography
16:13 3Accessories For Flower Photography
12:09 4Lighting For Flower Photography
18:10 5Exposure And Aperture Choice
18:33 6Figuring Out Where To Focus
20:27 7Flower Photography Composition
13:16 8Flower Photography Black Background
19:10Learning To See Your Subject
09:52 10Shooting Flower Life Stages And The Flower Dance
09:04 11Add Textures To Photos In Post Processing
09:19 12Tips For Choosing Flowers For Photography
10:12 13Flower Photography Tips
03:54 14Botanical Gardens Flower Photo Shoot
18:59 15Photo Critiques
48:42 16Clip Art Everyday
01:17Lesson Info
Lighting For Flower Photography
Okay, let's talk about lighting. I wrote three quotes for you about light. Light makes photography. Embrace light. Admire it. Love it. But above all, know light. Know it for all your worth and you will know the key to photography. It's the first thing you need to look at is light. And the second quote is there's no bad light. There's spectacular light and difficult light and it's up to you to use the light you have by Jay Maisel. And the last quote is wherever there's light, one can photograph by Alfred Stieglitz. And I so believe that. There really isn't anything as bad light. There's light that you're gonna have to work around and you can do it. You can shoot flowers in any light. Granted if it's a diffused, a day with clouds diffusing the light, nice bright cloudy day, it's fabulous, but you can work around it. I'm gonna show you how. The best lighting for flowers. The best light for flowers would be the cloudy day I talked about or open shade or diffused light and then you don't ha...
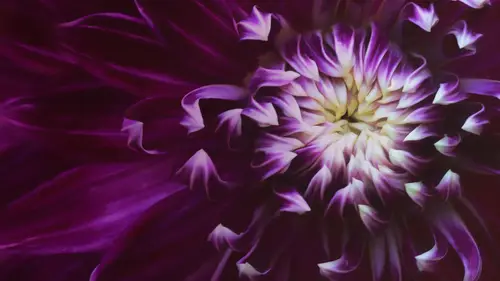
ve to modify the light in any way. You can just celebrate it. But sometimes the light is harsh. I'm not gonna call it bad light, I'm gonna call it harsh light. So how do you work around that? Because flowers are about line, color, and texture and shape, you don't want to introduce dark shadows. Because shadows have line they're going to interrupt the shape, they're gonna remove the texture, and they're gonna remove the color. So I don't, there will be exceptions we'll be talking about, but generally speaking I like soft light for flowers. Here's the same flower with diffused light. No lines. The only lines that show are the true lines of the flower and that's what I wanna capture. The shot on the left is without my diffuser and the shot on the right is the diffuser. You can see the added lines, you can see the lack of color, how I've lost petal texture as well. This is a pitcher plant and even look at the difference that it made in the background. Softening the light and all I did was hold a diffuser between the light source and the flower. Here, too, the most important aspect of this tulip on the left for me was that stripe of green so the last thing I want is a shadow cutting that line. And a diffuser took care of that. There's no processing on either of these shots. That's just without a diffuser and when I diffused the light. That's all I had to do. Here, too, a dogwood in bright light. The petal texture is completely washed out. And in soft light. This is a peony that caught my eye because of that lower petal that was just sort of leaning down. Look at that messy background and the harsh light is creating contrasts of dark and light in the background which is just horrible. So I switched to a vertical to eliminate some of it and softened the light with a diffuser and so that's the same flower with nothing else done to it. Here is how I use a diffuser with the flower pod. I just pull those telescoping legs out to the length that I need and attach the diffuser. I was shooting bleeding hearts and there's the shot that I got. You can also use a white umbrella. That's my assistant, Calla Lily, on the fence though she's not a very helpful assistant because she likes to, I'll be have a shot all set up and her tail comes in and the flower goes like this, but she does like to be involved. Anyway, that's a great diffuser to use and it's small, can go in your bag, and if you get caught out in the rain you have an umbrella. But I would only use a white one because you don't wanna add a color cast to your flowers. And here are the flowers that I was shooting. As you can see the light is just soft and beautiful. I wanna show you the diffusers that I use. This is the umbrella. See it folds up very smalL. It can go in my bag. And, generally, I like these small sizes, diffusers and reflectors, because one, they fit in my bag, and two, I don't really want them catching the wind and, if they were large, and if they're large I'm not gonna get them to stay in my flower pod or the other holders that I have. Just about this size is usually big enough because I'm not doing a whole field of flowers. Just one flower. About that size, weighs nothing. And the reflector that I use. And the sizes of these will also be in the info that I send. If I want warm light there's the gold side. Cool light. Even wearing a white t-shirt, if you're close to your subject, is going to bounce some light so think about that. Don't wear bright orange or anything that will create a color cast. And then if I'm working with students or I'm doing a larger group of flowers like in a meadow, a field, I do sometimes use a larger diffuser that has a handle. If I'm working with students it's excellent because I'm not in their way and can reach out and diffuse, but because it has sort of a flat bottom, I can also lean it against things. I can lean it against a tripod to help soften the light. And if you don't have a reflector, tin foil works great. Can't get more inexpensive than that. But so when I'm, some flowers need light added. A deeper flower will need it, a flower with petals shadowing it because what I want is even light across the flower. Cosmos generally need a little light bounced underneath to show the detail there. And you have to be careful when you're using a reflector because you can create harsh light with this reflector. You know, if you, it depends on the angle, I don't wanna blind you guys. (laughs) Depending on the angle that you're using to bounce the light. So what I would suggest if you're just learning to use a reflector, is put your camera down and pick a subject and start bouncing light and just watch, just watch what it does to the flower and see if you choose an angle that it's too much, if you just change the angle a little bit, what you wanna do is feather the light. You just wanna bounce a little bit of light because you can create some very strong, harsh light also. And that's not your goal. It's just to add a little bit. The flowers are deep and the affect here is very light, but you can see that the flower on the right I just bounced just a little bit of light. I wanted a glow in there that I just didn't have in the other image. And here a little light underneath because that would've been in shadow. I just wanted that to be even because that's my focal point. That's where I'm trying to draw your eye and if it's in shadow I'm drawing your eye to something you can't see and that makes no sense. Again, a deep flower needs a little light bounced into it and this, this is a back lit flower and you also will need to bounce light back into the front if the light's coming from the back so think about that as well. Flowers that hang down, they're challenging to shoot as well because you're underneath them, but they almost always need some light bounced back into the center because that's the area of the detail. That's where you're trying to, that's what you're trying to highlight and show people and if you're gonna draw someone's eye to something, they need to be able to see it. Flowers with dark centers especially need light added because if you don't you end up with a donut effect. So you've got this dark circle surrounded by petals and it's not pleasing so you've got to, and that's where the detail is so you need to light up that center. And the coneflower as well. I needed you to be able to see where those petals come out. That's where I wanted to draw your eye. And just a little reflected light took care of that. This is a workshop I taught on the Adirondacks and the light was particularly harsh and we were shooting near a bog and these are pitcher plants and they're fabulous, but they're very, everything around them is very busy so we moved the foliage aside a little bit and diffused the strong light coming in from one side, but yet bounced some back which creates a beautiful wrap of light around a flower and here's the finished image. So, yeah, I was very happy with that, but combining diffuser and reflector, sometimes you're gonna use them separately, sometimes you'll use them together. Here, again, a back-lit peony. It's beautiful, but I want you to see the center and you're not gonna see it back-lit. But if I bounce some light there, you see what I want you to see. And here's the tinfoil. Now that flower that I put the tinfoil on was a spent flower. There were no flowers harmed in the making of that shot. But I just couldn't get a reflector to stay where I wanted it and I had the tinfoil in my bag. I just spread it out and it bounced light perfectly into the dahlia, so I always have tinfoil in my bag, too. Here's an important tip that you need to remember: The best light needs to be on the area in focus. The eye is going to be drawn to areas of contrast, so you don't want an area of contrast here and an area of contrast there. You don't want the light here and the focus there. The picture is going to be stronger if the best light is on the best area in focus. Very important. When I shoot inside, here's my fancy studio which is also my living room. (laughs) I do shoot flowers inside and I have to. I live in Maine and if I'm gonna be a flower photographer in Maine, I can't not shoot from November until, let me see, May? Probably in May. So I have to be able to shoot and one of the best things about flowers is the subject is that you can buy them year round and you can buy them everywhere, from the grocery store, you can go to florists, the grocery store, hardware stores even have especially around holidays, lots and lots of plants. And I try and buy myself flowers once a week. I'm worth it and I need to shoot. If I go more than a couple days without shooting I get kind of itchy and I need to shoot something which my husband freaks out a little when I say that, but I don't mean him. So I shot this calla lily and I have a glass door here so beautiful soft light coming in and you can see I just used tinfoil to get the stem to stay where I wanted it. It wasn't successful. You can see the first tinfoil went in the vase, but that's okay. And I just used my larger silver reflector to bounce some more light and that's the shot. When you're shooting inside with a white background, you need to be sure that you're getting enough light on the background to make it a true white and you also have to be sure that the flower is not so close to it that you add a shadow. So you just, really, when you're setting it up just watch for those things. You don't want that white to be gray and you don't want a shadow because this is all about line. You don't want to add lines. Also, in my studio, calla lilies. And I did the same thing. I just bounced some light up and I had enough light so that I didn't have to use my tripod that day and I was shooting at a pretty large aperture for selective focus. High key you can do the same way. Just a piece of white foam board. This is an old shot from when I first started, but I still love it. And that's just reflected light inside. Nothing fancy. Other backgrounds that you can use. When I was beta testing the Lensbaby Velvet 56, it was March, I couldn't take the flower outside in Maine, so, but I didn't want a plain white background. I'd shot some with a plain white background by then. I grabbed a scarf and placed it behind it and it's far enough away so that I just got some beautiful pastel colors and there's my clothespin again. I'm telling you, you need clothespins in your bag at all times. It holds the stem straight. Same thing here. I shot at a bit of a smaller aperture for more detail so you can see a little more pattern in the scarf, but... And you can use textured papers that they have for scrap booking. Make really beautiful backgrounds. Scarves. I know students who have used oil paintings from their walls and just put them far enough back so that just the colors of the painting created a background. Go to the fabric store, see what catches your eye. If you want a natural look try and find a soft green pattern or, I mean, I wasn't going for a natural look. I wanted something that went with the colors of my flowers. You can use a pillowcase, foam core. We'll talk a little bit more about backgrounds later on too. And though I am mostly going for soft light, sometimes the way the light that is hitting your flower is your subject. That's what catches your eye. It's your subject so I wouldn't diffuse that because that's... It's dancing in the light for me and that's how I saw it and that's how I wanted to capture it and I didn't wanna take that away. This image too. And of course it was the curves that (laughs) that got me for this one, but I didn't wanna create even light, but then again it's bright light, but there are not dark shadows. There are no lines. If I'm shooting in bright light it's going to be early or late in the day. I don't want overhead light. Tulips you can shoot with overhead light, but the brighter light is what I saw. This is Magnolia Gardens in Charleston and there was one flower that was in the light and the rest of the foliage was hiding the others and so I didn't wanna diffuse that and would I prefer not to have the shine on the leaves? Yeah, but I loved the effect that it was just, you know, look at me. It was it's time to shine. Here, too. Three examples of times I shot in brighter light because the light is what caught my eye because I'm always looking for light and I didn't wanna alter it. But again no dark shadows. No lines. I still have texture and color. Some flowers are just dancing in that light. Poppies are one and there's no way that I would wanna diffuse that light. Here, too. Light's just dancing across. So think about that, but you really need to start to learn to see before you decide what you're going to do, too. Poppies. Poppies look great in bright light because they're a deep cup type flower and you get light inside. If you shoot poppies without bright light, they don't glow and that's one of the best things about a poppy is the glow. And again I'll do them early in the morning or in the evening when the light is low and coming across. Same with this one. One of the daisies was in shade and one was just in the bright light and I saw a story here and I loved the contrast between those two. So it was like this one was being bashful and this one was like, "Hey, here I am." So I thought that was a, a neat combination. Cup shaped flowers like tulips are gonna need some stronger lighting if you want to catch the glow in a tulip. On here and here. If you, this was a day that I shot recently in the gardens and I was with a group and I was trying to teach that concept of, you know, it's okay, let's not diffuse. Wait for the light. It was a cloudy day and we'd shot the tulips first and then the sun came out and the woman I was working with was (gasps loudly) 'cause she just couldn't believe the difference. And the glow is what she wanted and hadn't ever thought of that. And sometimes I'll diffuse just my main subject and let the bright light stay behind. This is just grass, but the light on it was so bright and it was early morning and it created a yellow background. And here I only wanted light on the foreground petal so I was very careful with the direction. I used a very small reflector and just wanted light on that very section. Do you have questions for me? So I'm curious, with the reflectors, the gold and the silver, are there certain tones of flowers and certain color range that you use the gold tone reflector for versus the silver? Right, yeah I use gold, silver, and white because sometimes I don't wanna alter the color at all. And if it's a, if I want, it depends on the light that I want. If I think that it needs warming up then I'll use the warmer. So there's not a general only with orange use this and I really think that that's also a matter of personal taste that you need to try both and see which you prefer. So there's not, there's not a rule on that, but with some it can be, you'll look at it and go "oh" you know? But I don't ever think, "Okay, this color "this flower's this color and so it needs to be that." I don't. And sometimes you're warming up the foliage, too, and the leaves may be a little yellow so you wouldn't warm them. You might wanna use the silver for that. So it really depends on the subject.
Class Materials
Bonus Materials with Purchase
Ratings and Reviews
user-934e3d
What a fantastic class! Kathleen Clemons' presentation was well-organized and offered exceptional how-to advice along with actual gear and beautiful slides which demonstrated her points. I felt as though she were talking to me personally and truly wanting me to be successful. Her explanations of technique, accompanied with video of her in the gardens using the camera was very helpful. In addition, I found her critiques most enlightening, and I learned a great deal about how to improve my own images from them. In short--this was an exceptional class, and Kathleen Clemons is an amazing teacher. I have watched the class twice and plan to purchase it for continued review and reflection. Anyone who wants to photograph flowers artistically needs this class. Thank you, CreativeLive, for this wonderful presentation by Kathleen Clemons.
Julianne Carlson
Thank you Kathleen for taking the time to share your wonderful knowledge and technique's with us through this 5 star course. Your breathtaking ethereal images are a true inspiration and I can't wait to get out there and practice with my new Lensbaby velvet. Not only was this course a wonderful tutorial for photographing flower subject but much of your instruction can be used when photographing all of nature. This is the best Creative Live class I have taken yet!
a Creativelive Student
Kathleen Clemons is a wonderful teacher who communicates a powerful passion for flower photography. I learned so much from her about how to see and capture the beauty of a flower using macro lenses. As I launched into this new area of photography, I felt equipped and free to experiment and learn and grow. As I looked through the viewfinder of my camera, it's almost as though Kathleen was right there with me - I saw how to focus in on one area of the flower, then another, and change aperture settings to impact the depth of field, and experiencing the intricate beauty of God's creation. The ultimate moments for me were the images captured as a result of everything I learned. I highly recommend Kathleen Clemons as a teacher and this amazing class, The Art Of Flower Photography. Review by Catherine Martin