Lesson Info
7. Flower Photography Composition
Lessons
Introduction: Why Take Pictures Of Flowers
02:28 2Lenses For Flower Photography
16:13 3Accessories For Flower Photography
12:09 4Lighting For Flower Photography
18:10 5Exposure And Aperture Choice
18:33 6Figuring Out Where To Focus
20:27 7Flower Photography Composition
13:16 8Flower Photography Black Background
19:10Learning To See Your Subject
09:52 10Shooting Flower Life Stages And The Flower Dance
09:04 11Add Textures To Photos In Post Processing
09:19 12Tips For Choosing Flowers For Photography
10:12 13Flower Photography Tips
03:54 14Botanical Gardens Flower Photo Shoot
18:59 15Photo Critiques
48:42 16Clip Art Everyday
01:17Lesson Info
Flower Photography Composition
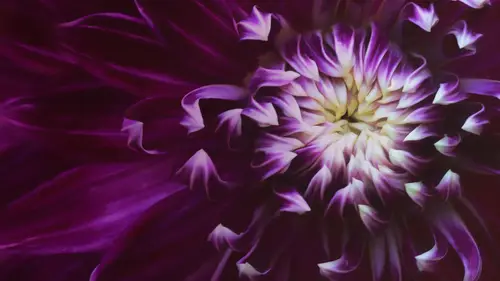
All right, let's talk about composition. And when people talk about composition, they usually talk about compositional rules. I hate rules. (laughs) The older I get, the less I want to be told what to do, and I think compositional rules can really limit your vision for an image. So let's talk about how I compose flowers. My guidelines for subject placement are what I want to talk to you about first. It's okay to put a flower in the center if there's symmetry in the flower and it's large enough in the frame to carry the image. It has to be large enough in visual weight for that to work. This flower much smaller in the frame would not work in a centered composition, but this is pretty symmetrical and it's definitely, there's enough interest in the center, it's strong enough for a centered composition, and I know there are people who never, they call it a bullseye, never want to put a flower in the center, but that's not always the case. Here too, that's pretty centered, you know, up and ...
down, straight across. But there's enough visual weight, and it's definitely large enough in the frame to hold that. Not a problem for me. More often than not, rather than putting things way over on a side, I'm slightly off center when I'm filling the frame with an image. Here I am with my radical petals. (laughs) I always like the ones that don't follow the rules. And it's just slightly off center, and I have filled most of the frame with the flower. So, just a little up a little higher and a little to the right, and I was careful not to cut the petals on the far right. We'll be talking about border patrol in this section also. Here the center is just a little, the center of the flower is just a little bit above center, and I did that because I really wanted to include those petals at the bottom because the curves were just beautiful, and I didn't want to cut that off. So raising the center, I didn't need to see the top petals, it was just enough of the bottom. Here I'm just a little to the right. Just a little off center, and you can see that I added some tulle with this one, that's why you have a really soft pink background. I shot through and my focus, it was on the center, on those petal edges, because that's what I needed to have sharp. Here again, just a little bit off center. Not much, just a little bit, and pretty wide open to let the background fade off to really soft blur. Again, (laughs) a beautiful little curl, and I loved the pattern in the center. And I could have put this one in the middle, but I also wanted to show some length to the petals, the petal lines of this and not make it only about the center, so moving it just a little bit to the left worked. Just a little below center. Here all I wanted was the center, this is with the Lensbaby soft focus pretty wide open. Yeah, just a little below center, just a little off to the side. I mean, that flower edge is certainly not at the rule of thirds. It's okay, it's okay. It's enough off center, and I just wanted it to look like it was reaching for the light. So I though the placement worked perfectly. Here's the grid for the rule of thirds if you're not familiar with it. This rule wants you to place your area of interest where the lines intersect, those four areas. And here it is on this flower. I did pretty well with this. (laughs) But I don't think of that when I'm shooting. You know, I'm looking through my viewfinder and looking for a composition that pleases me, and I'm not thinking, "Oh, it needs to go in the rule of thirds!" And I was with a group of photographers one week who had done a workshop with an instructor the week before, and they came back from the workshop saying, "It's all about the lower right third. "That's it!" And that's all, that's how they shot on their whole time with me, and it's not all about any area of the frame, you know? Sometimes that lower right is wonderful, but don't get so hung up on rules. And I've seen that a lot at photography judging where people say, "Oh, it's not in the third!" It's okay, it's okay. You know, no laws are broken, these are guidelines, not rules. I mean, it does look really nice in that location, but I think it would have been pretty nice just a little bit off center too, and I think this one would have been strong enough to center, so, something else that you can do by working your subjects is shoot it in the center, shoot it off to the side, do that wonderful lower right, try the lower left. Experiment, work your subjects. And there's another morning glory. I love diagonal angles in my shots. And that's a Lensbaby photo where it is probably up in the upper third. Here too. Just up and slightly off center. Something else to think about when you are placing a flower off center, should you place it toward the left, should you place it toward the right? Well the best thing to do is shoot it and then in Photoshop, flip it, and find out. Some images, this can make a really, really big difference, some work both ways. I get these sent to me from students a lot saying, "Which one do you prefer?" You know, in this case, there's enough interest going off to the right so that I don't think it's a problem placing it on the left. If this was a flower that didn't have curves that led your eye into the rest of the image, if it was sort of straight there, then I might think that would be a better placement, but it works this way too because you have that curve in focus that leads you through the image. So sometimes it works both ways, but definitely try a horizontal flip. Here I'm just a little bit to the upper left in both of these, and that works perfectly well, just a little off center. Down at the bottom, pretty much in the middle. Experiment. Try different compositions, work your subjects. This is a screenshot of when I was doing beta testing for the Velvet for Lensbaby. You can see I work my subjects. I never take just one picture of any subject, and I'm playing, I'm varying apertures, especially when I'm beta testing because I need to learn what the lens can do, but I'm also changing backgrounds, I'm changing angles, I'm working my subjects. Do you want the flower to be vertical or horizontal? Well, first thing that you want to do is look at the lines. A flower with long vertical lines is probably going to look best in a vertical orientation. Not always. And you can place that flower to the right, you can put it in the center, or for even a little more visual tension, you can put it on the left edge, but if you do that, there really needs to be something of interest further on beyond it, otherwise the eye is just going to come as far as that orange flower and not go further in the frame, so I think the lines in the background add enough interest there for that to work, so I didn't flip that one. Flowers with long petal lines are generally going to look better in a horizontal format, and you don't have to include the whole flower. If your emphasis is on that petal line, you don't maybe need the top of it. Another cosmos. And here I wanted the emphasis on the base of the flower. There's some beautiful texture there and I used a reflector, silver, 'cause I didn't want to warm it up here because the background wasn't warm. And a wide flower, you know what, and you don't have to include all of the flower. We're going to talk about cropping a little bit, but this one would not work as a vertical. So if it has long, wide lines, you definitely, but that doesn't mean you have to shoot those lines straight. See how I've added a little diagonal, adds a little more interest. And some flowers you can shoot both ways. This worked really well as a horizontal, but it also works as a vertical, and Bryan Peterson taught me to always think, you know, when's the best time to shoot a vertical? Right after the horizontal. So, keep that in mind, and I follow that. Here's my vertical. Here's my horizontal. So, it's valuable information. You need to be looking at your subject from all angles. Good thing about flowers as opposed to a landscape is you can do that. (laughs) You can get low, you can get high, you can shoot from the front, from the side. If you haven't looked at your subject from all angles, then how do you know what its best side is? How do you know where the area of interest is? How do you know where the light is? So put your camera down, and look at your subject. Sometimes the backside of the flower is the most interesting and is the most beautiful. As it was for me with all of these. I caught this one dancing, and if I shot that from up above, you wouldn't have been able to see the dance, so I had to be low to see the curved petals and I wanted a very small amount in focus. Sometimes you want to be just right at the same height and angle, shooting straight across. Sometimes you want to shoot down. If you shoot down, you have to remember that it's going to flatten your subject, so I don't do that very often. But getting down eye level works really well. One word about cropping, don't. (laughs) And I know sometimes people feel like they have to or they couldn't get close enough, but I think not cropping and composing in camera is going to make you a better photographer. It's gonna make you slow down, it's gonna make you really look at your subjects and know, "Gosh, I can't just crop in here. "I need to get this in camera," as much as you can. If you crop a lot, it's also limiting what you can do with your photos afterwards. You won't, if you take a tiny section of a large photo, you can't enlarge it much, you can't sell it. My images go to stock agencies, and I need all my pixels, so I don't crop. And that was the reasoning when I started, but I think doing that makes me a more careful composer because I know I'm not going to be able to, "I'll just crop that off." Or I can't get, I know I'm close enough. So also, starting off with just one lens for a year I think helped my development as a photographer because I had to use my feet to compose. I couldn't just switch lenses. So all of that is going to help. So, when you are cropping petals, in camera, I don't mean in Photoshop, try not to crop just the tip of a petal 'cause that looks like a mistake. If you're going to crop, commit. Do more of a crop, not just the tip, and don't, be sure that the tip of your petal doesn't merge with the edge of the frame. You want a little breathing room there or you want more of a major crop. That's a couple of rules. And the right side of this flower is cropped off but not just at the edges. My husband actually saw this shot for me. I have been known to place flowers different places, but I did not do this. We were in Florida this winter and I was shooting in this garden, and he said, "Oh, did you see that?" He has a good eye. "No!" But I did not need all of that flower to tell the story, so I chose to crop the petals off and put that main subject almost just below center, so you don't have to always get the whole flower.
Class Materials
Bonus Materials with Purchase
Ratings and Reviews
user-934e3d
What a fantastic class! Kathleen Clemons' presentation was well-organized and offered exceptional how-to advice along with actual gear and beautiful slides which demonstrated her points. I felt as though she were talking to me personally and truly wanting me to be successful. Her explanations of technique, accompanied with video of her in the gardens using the camera was very helpful. In addition, I found her critiques most enlightening, and I learned a great deal about how to improve my own images from them. In short--this was an exceptional class, and Kathleen Clemons is an amazing teacher. I have watched the class twice and plan to purchase it for continued review and reflection. Anyone who wants to photograph flowers artistically needs this class. Thank you, CreativeLive, for this wonderful presentation by Kathleen Clemons.
Julianne Carlson
Thank you Kathleen for taking the time to share your wonderful knowledge and technique's with us through this 5 star course. Your breathtaking ethereal images are a true inspiration and I can't wait to get out there and practice with my new Lensbaby velvet. Not only was this course a wonderful tutorial for photographing flower subject but much of your instruction can be used when photographing all of nature. This is the best Creative Live class I have taken yet!
Cheryl Tarr
I love the way Kathleen sees flowers and captures their essence. I watched a free Creative Live course that Kathleen taught and became an instant fan, and when I saw this course advertised I knew right away I wanted to have it in my course collection. She has so many tips and tricks for capturing soft, artistic renderings of flowers and I appreciate that she is so willing to share these with others. She is very clear in explaining what she does - an excellent teacher as well as an outstanding and original photographer. I highly recommend this for anyone who wants to explore flower photography.