Lesson Info
39. Your First Studio Lighting
Lessons
Day 1
1Studio Essentials: Shutter Speed
15:50 2Studio Essentials: Flash Exposure
22:26 3Studio Essentials: White Balance
21:15 4Light Principles: Inverse Square Law
26:46 5Lighting Patterns
15:29 6Shoot: Demo Lighting Patterns
28:06 7Quality of Light and Modifiers
09:59Shoot: Choosing a Modifier - Diffusion and Grid
13:40 9Shoot: Choosing a Modifier - Umbrellas
31:01 10Shoot: Choosing a Modifier - Softboxes
21:08 11Shoot: Choosing a Modifier - Extra Stuff
28:10 1210 One Light Set-ups: 1 and 2
17:07 1310 One Light Set-ups: 3 to 5
18:16 1410 One Light Set-ups: 6 to 10
15:57 15One Light Set-ups: Pop Quiz
21:21Day 2
16FAQ for Purchasing Studio Light Part 1
31:00 17FAQ for Purchasing Studio Light Part 2
25:36 18FAQ for Purchasing Studio Light Part 3
43:53 1910 Two Light Set-Ups: 1 and 2
24:29 2010 Two Light Set-Ups: 3 to 6
25:24 2110 Two Light Set-Ups: 7 to 10
22:30 225 Two Light Set-Ups: 1 & 2
13:27 235 Two Light Set-Ups: 3 to 5
33:37 245 Basic Three Light Set-Ups: 1 & 2
21:05 255 Basic Three Light Set-Ups: 3 to 5
25:52 265 Intermediate Three Light Set-Ups: 1 to 3
17:14 275 Intermediate Three Light Set-Ups: 4 & 5
12:58 2810 Common Lighting Mistakes
16:46Day 3
29Solving 12 Common Problems of Studio Lighting: 1
39:29 30Solving 12 Common Problems of Studio Lighting: 2 to 6
37:25 31Solving 12 Common Problems of Studio Lighting: 7
15:50 32Solving 12 Common Problems of Studio Lighting: 8
25:51 33Solving 12 Common Problems of Studio Lighting: 9
16:19 34Solving 12 Common Problems of Studio Lighting: 10 to 12
26:11 35Portrait Lighting: 1, 2, and 3 Lights
14:51 36Beauty Lighting: 1, 2, and 3 Lights
18:06 37Lighting Groups: 1, 2, and 3 Lights
15:53 38Lighting for Drama: 1, 2, and 3 Lights
24:19 39Your First Studio Lighting
38:46Lesson Info
Your First Studio Lighting
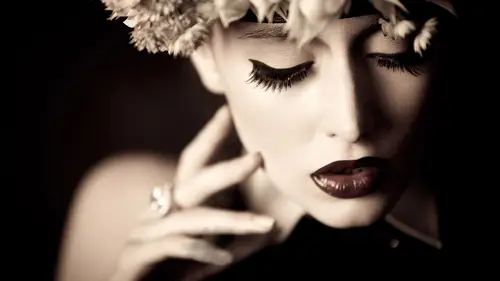
All right, see, watch this class and you're ready. You watch the segment about all the things to think about when you're buying lighting, you have a little bit of an idea of the type of photography view the looks you want, so let's talk about some ways to save money, and then the gear that I suggest and how I will end out the very, very end of the segment is to show you just a couple of the images that I have created that use the knowledge and lighting that we've covered here. But it's, my style typically all the demos shots were trying it was trying to use were not stylized models with hair and makeup and wardrobe, but just educational shot, so I want to end with you could do this with a beautiful model hair, makeup of more drum and how lighting is all part of the equation. Let's take a look at five kids for studio lighting on a budget. One tip that I've picked up along the way is to buy refurbished gear or used here, especially when you're first starting off. My very first studio was...
all lighting that what I purchase from a photographer that was retiring, I know that it feels nice to have shiny new gear, but most the time it absolutely isn't necessary and so you can buy refurbished all the like a a whole bunch of the pro photo lights that I had a really one and pro photo lights I wanted to invest but because I wanted to completely switch over to pro photo that there was a big investment to change all my gear over so I ended up buying refurbished gear used modifiers so that it wouldn't be such a big jump and then since I bought some newer gear but that was a really good way for me to start and what you want to check out depending on where you get this gear is depends on who you buy from but there could be a manufacturer's or store warranty on it and so for example, I know that some camera stores in new york if you buy it there might be a warranty on it for three months you can test it out make sure that the gear is working of course if you're buying it on ebay you don't ever quite know so buyer beware and related to saving money on this do you have a student I d if you can take a college course in an evening and they could even be short courses if you can prove that you're taking of course many of these lighting manufacturers we'll give ten and sometimes even twenty percent off of the price just because you have a suit ninety and it doesn't need to be a fully matriculated student at a university so I would look into this. There are a lot of students programs that save you a big chunk of money, some of them are just off of the strobe. Some of them are off the modifiers as well, I know policy buff has done in the past in a pro photo did or mac group before now, some pro photo anymore, they had a student discount, so I would do a little bit of research, especially if you have access to a soon I'd even just taking, of course, could actually pay for itself for several times over. The next thing is to buy lower wattage strobes. Where do you really need to start off? You know it, you might think, well, ok, maybe all light a room eventually, so I want to get more wattage, but it's, probably not useful to you. A lot of the less expensive studio shows if you're shooting in a small space, it's a good way to save money, and it probably makes it easier for you that's a little bit less math to figure out how to get the power down in the ratio. So I recommend shooting smaller, not as high. What if you're in a small studio space if you're not shooting huge groups or shooting and big locations, five hundred want we're almost everybody is more than enough unless you're doing big productions most people around two hundred west is probably going to do the job and you can get those very, very inexpensively in the scheme of photography. Of course. All right, my next tip is to use one light if you watch this class and like all but I really like that film you are set. She did in the end with the two barn doors on the grid. Yeah, sure, it has its use and it is a cool, stylized look, but there is a lot you can achieve with just one light. And in the beginning, I saw that you showed you those ten light set up with one light that was just with an octo box. So maybe you start with one light and you try a few different modifiers to understand how the modifiers work before adding more lights and making it more complicated. Aa lot of the times my shoots are one light with a reflector, so you don't need to feel like after this course. You need to go by three or four lights, you definitely could buy just one. So these are all images I created with just one like now I wanted to introduce our showing a little bit of my work towards in here and how I will finish this out is that blading is this part of the equation? And of course, having beautiful models and beautiful styling makes a big difference. So I'll tell you what some of these are lit with as we go through, for example, this is just a beauty dish, but really nice styling on the hair and having a background the background wasn't let's. This is just one light with the light from the beauty dish kicking on the background, which was a beige background but it's the toning that helps create the beautiful image and it's the beautiful model and it's a beautiful hair, the lighting is just a single light or this picture over here the light on her face is created by a parabolic umbrella, and I wanted to bring this up for those of you who may be checked in on the one a one class because you thought you wanted to get a refresher, but maybe a little more advanced and that this would be a modified I would not tell you guys to check out. I love parabolic umbrellas. Parabolic umbrellas are deep umbrellas that they're kind of a giant soft box slash beauty dish there, eh beep umbrella that give you glowing light with dramatic falloff sharp edges to the light it's beautiful and so this is one of those parabolic umbrellas high up to the right and then a silver reflector in that back angle, like we said opposite that light on the shadow side to catch a highlight on her jaw, so it za one light set up in the parable umbrella that I'm using here is a westcott zeppelin forty seven inch comes in a bunch of different sizes if you want to try out a really crazy one brown color makes one called a pair of eighty eight that one is more like five thousand dollars westcott zeppelin forty seven inches more than five hundred dollars range I use the parabolic umbrella all the time and if you were looking for one modifier that has a wide, wide variation of use of wide right of use a pair of powerball camilla really does a ton, but the reason I didn't recommend it to one o one is they're very bulky and they're not portable whatsoever and they're difficult to set up and they have like a yoke that you put the light in and it's it's hard to it's the difficulty of use but the quality of light is fantastic, so that might be something if you have a chance to play with, I definitely would have put that on your list as well. The picture on the left ok there's photo shop on the for the flowers but it's a beauty dish above silver reflector below the picture on the right just a beauty dish so most of the time, a lot of the images that I get so much feedback from and social media or from client meetings it is just one light it's not anything complicated, but of course, there's styling and there's concept in something a little bit more, the next thing I wanted to recommend would be do it yourself for modifiers and creating bigger sets and there's definitely ways to save money. And so I want to point everybody to another creative live class by kevin cambodia he did a whole class, it'd one that photo weaken the needed a three day class is well about do it yourself modifiers and living and all of that stuff. And if you find yourself to be more of the christie individual that's something that you feel attracted to or you have, you want to try out a light without purchasing it, definitely check out one of his classes. I know he checked out. He covers a ton of stuff, tio yeah, because you think you know, crafty and build stuff. Yeah, I think so. I just wanted to tell you a couple things that are very commonly used and I'm going to hold this up very commonly used as do it yourself. I got little ones, but for example, this is my my mini version. If you get big versions of these big cake pans, cake plate I mean it's a reflector, right? So if you decided well, I own one reflector, but that one lighting setup that lindsay has has three reflectors. Okay, well, if you want white, go grab phone corps for two dollars in ninety nine cents or three dollars ninety nine cents at a craft store, box them in with foam core instead of buying three white reflectors or, if you want to try three silver reflectors, take your ones over reflector below news a cake pan to the left and right or I've seen people take pieces of cardboard and wrapped them in tin foil. It's light is light and you're just trying to get some reflections you could be creative with that literally just be cake pan barn doors we talked about I like barn doors, but they're not as versatile as a strip light I mean strictly tend to be more practice for portrait photographers, so you sent a foil to make barn doors. I've seen people make beauty dishes of salad bowls and to give them a similar quality of light snoot out of sin if oil can wraps in a foil around the end of the light and focus the light that way or you can use bed sheets and you would get something senator than this but pretty good you could use a bed sheet like this I actually did this in my the sixty studio lighting setup guide that I have for sale in my store. I ended up using a bed sheet as a scrim for one of the setups for two of the setups, and they had it hanging from two light fans, and what you can do is you can use one or more lights to point into this bed sheet, so let's say that you don't want to buy a huge soft box because you're usually in a small space. You don't think that you would use it that much. Well, this is basically like a piece of diffusion material in the front of the soft box, and you can use your studio strobes to illuminate this and turn it into a broad, soft light source, and this is called the scrim typically screams one that I would check out by westcott is called a scrim. Jim and the scrim jim, you could get in different sizes, but they're just six by six foot frame and john cornyn tell it actually has one for me. In other words, this is going to be this is the d I y version of this, and I'll explain how it works thanks, john scrim is a pretty versatile tool that you can use right right away to change and create different lighting setup. Because the closer you bring the light into the scrim the bucket of water it doesn't have much room to spread so becomes a more contrast the light source with the further away that I pull it it fills out that scream it becomes a broader, wider light source and filled out the screaming jim is really nice because it sets up easily and you can also change out the diffusion material I can put a silver reflector on this but with a thinner bedsheet you could also create a similar effect and have a small diffused light source a big diffused light source back it up and have multiple lights and so you would see this used a lot in products photography, but I have absolutely used it for beauty photography as well when I want a really wide, broad and wrapping light source case is called the scrim thank you and then my last tip of this section would just be to not be a gear snob per se. You know, for example, just because you have a a red circle around your lens doesn't mean that it's a better lens you just might have paid double or triple for it for example, you just have to be aware of what are the things you're looking for in gear and that's? Why I recommend you take a look in the beginning of our beginning of day two when I talked about asking yourself, what do you really need in gear? What is actually important to you? What are you shooting? Do you need fast recycle times or don't you? If you're not shooting action, it doesn't matter, but if you d'oh take a look and see which beer has better recycle times, how much wattage do you need on dso, for example like I shoot pro photo I love pro photo there's certain reasons that I like to use that care, but there are also reasons why you might not need it for specifically what you're shooting at. You have to do your research so let's take a look here these are some third party lighting systems that I recommend you take a look at and the ones that seem that I started off with alien bees and white lightning's and they have their downsides. I talk to about things like recycle time and color consistency, but at the same time it can create beautiful, beautiful images with more affordable modifiers and at least gets you started shooting in studio lighting instead of having to take a risk invested a ton of money and then regret it later on so gets you kind of started there, so one of the things you might check out thie faux ticks in drove five hundred is a portable studio lighting a studio light also with a battery pack so it's dual purpose in case you wanted to have a studio and location the alien beings would be a really good place to start for like you're very very first light and then the I'm signs are a better quality better output, more controlled, better variability versions of the same company you can create beautiful light with them and I have many images that were in my portfolio for a long time created with those lights. The next one is to look for discount lighting modifiers and buy discounted it's mean it's not the one produced by that company it doesn't mean that they're, uh not nice so one that's really cool photo ticks makes a faux ticks luna beauty dish and it's a pop up beauty to should actually collapse is not like an umbrella, but these little joints collapse on itself and it can fold down so makes a portable and it's like sixty or seventy dollars for a beauty addition, they make different adapters to fit the different types of light you have so have one for bones and so on or then we were talking about the faux ticks extra large umbrella the big the big silver umbrella with diffusion panel were also the faux text one which is they're both around this price range for a really big light source. Neither of these air brand names mean in the name of the actual strobe but there's still great, I would look also at westcott. Westcott has a lot of really nice modifiers, and so one of them that I recommended was that three foot octo box the rapid box because you don't have to set it up, it just pops open into place soft boxes range drastically in price and we did actually touch on a couple reasons why someone be more expensive than the other s. So I wanted to talk about your first studio and what I recommend. All right, so if I had five hundred dollars to spend currently, what would I spend it on? I'll tell you the core and then say, ok, if you have a little bit more here's, a couple of their little things to add, if I had five hundred dollars, I would start with one stroke you only need one strobe to get started to make beautiful like, and so I would probably start with an alien bb eight hundred remember that's, not eight hundred watt seconds? I think it's like three, twenty or less or one sixty it's it's much smaller wanted you don't need that much and I would get there thirty five and dr box like a three foot doctor box we're going to be able to make nice portrait, nice beauty shots starting there and of course, a light stand they have light stands that are cheaper, but these ones with the air shock so it just if you're not used to working with light stands, it helps you not dropped them and break it. So it would be a very nice a good starting point for under five hundred dollars. Okay, let's, jump on fifteen hundred dollars. He had a little bit more money to invest. I would recommend to strobes. And the reason I chose the einstein's is because you have more wattage to work with and they have more variability of output so I can dial them down really far if I want to shoot really, really wide open. But they also have six hundred forty watt second output, which means I can take it on location with two of these and really light a room if I want. And now I have to stroke is one for the main light, one for hair light, one for the mainland, one for the background. Like, for example, I can still shoot high key because they could put it on a soft blocks behind this subject and use that as a white background, for example. So I would get two of those if you look on their site, by the way, they do sell some kits that discount everything so I wouldn't take a look at that as well. If I would get a modified still start with that octo box for the first modifier and then I would do a small strip soft about soft box strip box as my second modifier, and I'm assuming this is for beginners that air trying to light portrait well, and then I would get two of those light stands in my morning segment of yesterday I talked about my opinions for people purchasing gear based on the type of photography dio if you shoot groups, if you shoot newborns official portrait so some of this might very but if this is if you don't show anything, you just want to try studio lighting and you want to give it a little test, so these would be some things that I would look at. So what next? What? What happens once you get that first light and that first modifier they tested out, we're starting to feel confident about it. But what else do you want to try? Of course, if you watch this class, you'd have an idea of what lighting setup to you like and so what modifiers it took to make those lighting set ups, but I wanted to give you an idea of what I would work with next, of course, you always work with what you have so granted, if I'm telling you, oh yeah, go ahead and use a soft box if you have an umbrella with the diffuser an umbrella will this be the diffuser will work fine so don't look at this and think ok the gear I have doesn't work it definitely does new sauce use in day one umbrellas you can do a lot with umbrella shoot through umbrellas diffusion it doesn't have to be expensive gear doesn't solve the problems you do they're just tools that that you can then use for different effects I said one, two, three or four modifiers and what order would I buy? All right, so for my very, very first modifier I had to pick one modifier I would get a soft box, an umbrella or knocked the box now if somebody has an umbrella for you for free which often they do get their proliferation of umbrellas take the free umbrella and music if you're going to use an umbrella though get a bigger one so you can get a little bit broader light source and then also the bigger it is closer gets your subject and get a little bit softer if I had to choose I would like an umbrella with the diffusion panel so I can turn into a soft box if I want so then it kind of dual purposes I'm also if I were shooting maybe children I might go in the more of the sox but soft box realm three by four foot or knocked the box? It just depends on what catch like you like. The octo box wraps around a little bit more. The three by four rectangle is easier to feathers. You saw how we've kind of feather off of the background. If you're in a small space, maybe that would work well because you can feather the light and you can turn it sideways to wrap around a group more and you have a little bit more flexibility so I would start with my main light. That's what the first light is and then the second light are the this modifier. The second model firewood by would be a strip light or barn doors. One of the two most portrait photographers. Probably the strip box will work better, but in a small space, maybe barn doors would be a little bit better if you travel a lot because it is pretty compact just to be first modifier. Second lot of far right, I'm getting ready to buy my third modifier. I need to get another strip box if I had three lights so I could have that, you know, three point lighting that I said I tze really an important part of my business or another set of barn doors, and then I might say, ok. I've been doing this a while what's the next thing I liked my soft box but it's small maybe I bought the octo box first. Do you have a smaller octo box? Maybe you want a bigger light source sex, so that might be the big umbrella, the seventy two inch umbrella with the diffuser because I want a larger light source or it could be a four by six foot off box kind of depends after you've already worked with these first two what have been feeling you've been missing? Did you need a bigger light source? What did you want? Something with a little bit more control in the shadows. Like what? Based on your shooting do you feel you've been missing so that's where I started to decide this third one and in the fourth, I would say, ok, if you're a four modifiers now and you've got some money to invest in, it may be a different type of soft box we started off with your big saw a small soft box maybe you need a bigger one on dh, then I would start getting into the fun stuff. Maybe you want to get a grid for the beauty dish or grid for your strip light or maybe you want to get just those individual grids or maybe at this point you want to try out a beauty dish so you start with what's practical start off with the soft boxes get the second light for separation from the background what do you feel you're missing and then have fun that's kind of how I'd recommend that you build it. So what can you create with what you have learned? I'm going to put up some images that I have and I wanted to describe how they were lit I do not have the lighting set ups up there I'm going to give you an idea of how I let them, but based on all the gear we've covered, these are all things that you would be able to create all right, so here's two pictures the picture on the left is her face illuminated by a grid. It was a five degree grid on her face, really tight and centered and how you can tell that is you can tell and I know that for those of you who were watching because it's lower resolution he won't fail to see the catch lights, but when you're watching in a higher resolution, you may be able to see this hasn't been a point. I can see one point soy sauce source of light in her eye above usually a point source of light is either a grid or a silver dish, but the reason I think it's a great because I have this fall off on the side where it turns to shadow at the sides of her face. And so you get that effect with the grid. And then I see that these shadows are totally black. And if I just had one grid on her face, it should just be a highlight. And then everything else falls to shadow. So I know I did something to fill in those shadows, and the answer is, in the catch life I see one more catch like, which is a point source. So I knew I used another grid or north, another silver dish to just fill in the shadows, and I know that it probably had to be turned down because otherwise it would just wipe out that shape. This is more complicated is probably the most complicated of of what you would be able to do but it's all information you learned you learned about grids and you learned about filling in the shadows and you learned about clamshell. So this would be maybe taking your one on one knowledge to two at one picture over here on the right is nothing more than a beauty dish, but what I was aware of is that correct white balance isn't always of white balance I want when shooting this image, I warmed up the white balance on that color checker. There's those neutral great points you can click and each one could warm up the image more. I think the warmest so I could get that really warm and glowing. Look so it's. Nothing more than a beauty dish. It was basically just a high and off to the side here. But I had her role, her head back. That was that. No grid, nothing else. Something like this. It's a little bit more difficult to tell how it was lit because there aren't any catch life. Yes. Color balance in photo shop using camera. Wrong. You can definitely do that. Both would be totally fine. I was kind of going for had my color checker there. And each one I would click. I go. Does that look better? Does that look better? That's great. Oh, that was too warm. Well, back it off. But you could absolutely just go in. And if you don't have a color checker no problem. Just drive the white balance warmer or cooler could absolutely do that. Ok, so the next one the picture on the left you can definitely dio shooting on a black background. You can see right in the catch. Life there is a square soft box it didn't have to be squares could have been an octo boxes could have been a rectangle and it's more or less centered in front of her face but it's a little bit to the right and you can tell that because the catch lights a little bit to the right of her pupil and then you see the highlight underneath her eye and this means that you can see that it's kind of a rectangle it means that there's some sort of reflector from beneath and I know that based on the angle of this reflector whether it was silver or white as I know that it's basically got rid of shadows I mean look they're hardly any shadows underneath her nose there aren't really any other shadows underneath her jaw so for this it is an angle that I filled in the shadows and I brought that reflector nice and close so you'd be able to duplicate something like this and this is using ah large square silver reflector this picture over here cost me seven dollars to make because I went to a fabric store and bought the fabric in the bargain bin tied part of it around her chest the other part around her head and this was just my friends flapping on either side to get some movement a little bit of action but this is a one light set up this is a beauty dish and if you didn't know how you would be able to tell is there is some crispness to the shadows if this were a soft box that shadow on her chin on her nose would trail off a little bit more, it would go from highlight to shadow over a longer distance a little bit more smoothly but it's a little bit more brought but it's not harsh as if you picked a silver dish you would be much more hard, so all this is this is a beauty dish high up into the left hand side of this frame, but it is a matter that it's one light it's because it has high impact because of the color. All right, so these are lighting set up, so we absolutely covered picture on the left soft box behind the three five, four foot soft box behind my subject and then I could peek in and look at the catch like to tell me what the rest of it is so I can tell that right there in the top of her eye is a beauty dish and then I see another catch light below, which tells me there's something at the points or something is filling in those shadows can't be sure what it is it could be a silver reflector dish could be a grid but something to fill in the shadows underneath, but it's not turned up so high that it flattens it out completely and I can also tell the way she's turned her head I have loop lighting so the beauty dish was a little bit off to the side and she has her head turned some looking for the shadows in the highlights all right and then on this one what creates this type of focus light grids do agree doris knew we didn't use newt's too much this week so have really limited use but I know there's a it would be a grid and the smaller the number of the grid, the tighter it is and so this would be something you would test out you can't tell by the catch late to the light on the face what degree it is but maybe it's a ten degree grid a little further back and I also know from these long shadows it's probably a little bit higher up because if it were lower it wouldn't cast his long shows it's higher up it's close it's focused on her face but with a grid we know that that light falls off really fast so the background would probably be black so I know because of that information there's got to be some type of little bit of spotlight on the background and it spread out pretty far so maybe it's a silver dish turned down really low maybe it's a grid twenty degree grid pulled far from the background turned downright low and that's what gives you this separation there? Okay all of these are lit by a beauty dish picture on the left to the beauty dish higher up into the right and that's what gives you the rembrandt light here and you know that it's higher up for two reasons you have a really small catch light in her eye which means it's very high up and then also you can tell how long that shadow is from her nose that light is really high up on that stretches out that shadow so this is a rembrandt light from a single beauty dish this picture is a beauty dish and you can kind of see a shadow right underneath her nose it's high up in just a little bit to the left picture on the right it's a beauty dish to the right and then a grid on the background that gives you that little halo of light it's not as focused as we had when we had it in really really far and focused on the background it's pulled back further a wider grid and just gets a little bit of glow because otherwise all of this black would just blend in and my guess is if I were looking at this image the reason I would say it's a beauty dishes because you still have that glow on her face it's not really really harsh as a crisp shadow. But you know what? It gets really dark down here. I'm going to guess it's a grid, because if there wasn't a great on the beauty dish, this would all probably a lot lighter. So by adding a grid of some sort, the light falls off more dramatically. So all of these things are things that you know, this lighting set up over here. This is the type of images I'll be making on my body. Beautiful tour around the u s fine art nude images using to barn doors, and I have those barn doors closed down as narrow as they go, just a sliver of light. And instead of having the barn doors on either side of my subject, I pulled them back toe further angle behind my subject and that's. What gives me the tiny slivers of light picture on the left? I wanted to show you this is what the plexi glass looks like when it's on black and so I have a soft blocks or in this case, is actually that parabolic umbrella, but acting like a soft box, you could do the exact same thing with a soft box high up, and you can tell that because of the shadows underneath her stomach and underneath her legs. And so I can see that shape so I know the lights high it's not low and that also gives you this nice crisp reflection so that's why I buy the clear plexiglass instead because it's multi purpose so all of those images are made with lighting that we've covered in one way or another one light to lights, barn doors, beauty dishes, grids and it's all kind of how you mix it together, so when you look at these pictures, hopefully you think that they're lovely, but what I wanted to encourage you to realize is part of what makes these images some of these images wow is not just the lighting, the lighting is one part of the lighting is really nice, but if she didn't have the styling or the hair and makeup, that would be a totally different image. And so I want to encourage you to realize that lighting is just a part of the equation as photographers because you have posing any of camera angle and lynch choice you have hair and makeup, you have wardrobe and so a lot of times what I do is I start with an idea kind of the feel that I want and I pick the clothes or the model or the hair and makeup that fit that feel and I start moving that all in one direction, so when that subject sits in front of me I go in my head, ok? I was going for a dramatic image, I want crisp shadows, so I'm going to pick whatever modifier and I know that I wanted to be dramatic, so I'm going to move it off to the side because I want a lot of shadows because dramatic is what I like and looking at this hell. But you know what? She's blending into the background with that pose, I need to put a light on the background. So for many of you, I don't think about this as thirty five lighting set ups or sixty lighting set ups, I think of it as let me build an idea, and then what lights help me express that idea and that's, what I want you to try to get away from is sure I definitely want you to look at the leading steps you can say, you know what? I like this one, I want to try it so I can learn, but if it doesn't look identical, that's okay, what did you do differently? You don't have to know the race shows you don't have to know exactly what f stop I'm shooting at, you have to know, how did I get that feel, and then how can you re create it with what you already have? So I want you to keep that in mind and that's why lighting shouldn't be scary it doesn't have to be a formula it doesn't have to be a grid has to be you feel it and it becomes part of the whole shoot so what I want to encourage it is keep learning all the rest of it because this is just one pretty big part which is nice because that's a posing intimidates you well you've got the lighting down because you practice and now he can focus on that posing and then you get the posing down then you're not worried about the lighting or the posing you're worried about the expression and that's where I feel that I am I'm to the point now that when I'm shooting I barely need to think about the light I barely need to think about the pose and I'm just trying to get the best out of my subject or figure out what's the way that I can communicate my concept so next step that I want you to do is I want you to go practice and if you wantto drop me a line on facebook you know if you send me a facebook message with a photo now feel free to come say hi and I can take a look at that because when you practice that's how you learn I did not have any any formal training in lighting that I particularly found useful because I had to learn diagrams and set ups and distances and ratios where I learned was because my senior year of college I realized I wanted to be a photographer but I wanted to be a studio lighting photographer had already been a photographer for a while, but all of a sudden I'm like ok, I want to do fashion I want to do studio and I don't know enough and so I spent four hours a four hour segment four to five days a week in the studio my entire senior year and I just would grab images in magazines and try to recreate it and what I would do is I grab a fellow student and say, listen, I have this concept that want to try I'll give you a nice head shot first and if you took this class you know, nice headshot lighting you create the soft box with a reflector below you give them a nice head shot maybe a room light to separate them from the background so they've got that photo and then you take that photo or those five or six voters from a magazine and try to recreate and figure out what lighting modifiers in the ratios and so I spent sixteen to twenty hours a week for a whole year making mistakes and not a single one of those photos I created is in my portfolio today and I don't cry about it because everything I know is in my portfolio today, it's all that information I got from testing and making mistakes and looking back, I'm horrified by most of those images how bad they were. But the knowledge is what helps me be a better photographer. So if you guys want to keep in contact, this is these are some ways to do so. If you go to my blogged I have got my studio lighting diagrams there. If you sign up for my email list, I do teach around the u s and then also around the world with intensive workshops. So maybe some of you can come say hi, those. I have some people here that have come see me at intensive workshops. I am very active on facebook in the easiest way, if you do have a question, and for me after this class would be a facebook message so quick facebook message would definitely be a good way to reach me. And then if you want to just see some behind the scenes at creative live or follow around my travels, instagram is good place to do that as well.
Class Materials
bonus material with purchase
Ratings and Reviews
BolesMA
If you're on the fence about this class I can easily answer your concerns. BUY IT. Lindsay provides top notch professional education while keeping things interesting. Her words are precise and direct. I actually felt GOOD just watching and learning. I mean, like someone surprised me with a cupcake kinda GOOD. After the class I could immediately see improvements in my photography. The best part is that I learned enough to see the wrong in my setups. Knowing what's wrong is just as important as knowing what's right. She is funny, easy going, energetic and filled with knowledge. I would also highly recommend her Posing 101 class as a must have addition to this course. I feel like I have learned more than I could possibly use. I will be going through this course over and over again just to make sure it all sinks in. There's THAT MUCH she offers that you will always learn more with each time you watch. I hope this helps someone make the decision to up their game. That is exactly what it did for me.
Jason Ashley
I loved this course! Lindsay spent so much time with explaining each set-up in-depth that anyone picking up a camera could understand how to accomplish their lighting goals. This course covered so many unique (but, most likely to come across scenarios) and how one would approach the challenge and how to successfully accomplish with incredible results, not average-sub-standard or basic results, but above entry-level standards, high-level, money-generating lighting expertise! ZERO laziness in her explanations to the point where she is constantly refining her course in the middle of the 3 days. Her passion gleams throughout each days lessons with so much energy. You know she really wants her students both in-person and through the screen to be successful in whatever type of lighting they choose to dabble in. I am so happy, I have bookmarked, and i'm so happy and fortunate to have this course to reference for hopefully –everrrr. Thanks!
Beatrice Palma
Hi, I am Beatrice from Italy. I think this class is superb. I finally understood what are the guide lines to follow, I tried for years but never found such a good explanation. Lindsay is a wonderful teacher, she explains in a simple way, she shares a lot of knowledge and she shows in practice what are the results of every single choice. Thank you so much, it was really amazing and super interesting!!!!
Student Work
Related Classes
Lighting