5 Intermediate Three Light Set-Ups: 1 to 3
Lesson 26 from: Studio Lighting 101Lindsay Adler
5 Intermediate Three Light Set-Ups: 1 to 3
Lesson 26 from: Studio Lighting 101Lindsay Adler
Lesson Info
26. 5 Intermediate Three Light Set-Ups: 1 to 3
Lessons
Day 1
1Studio Essentials: Shutter Speed
15:50 2Studio Essentials: Flash Exposure
22:26 3Studio Essentials: White Balance
21:15 4Light Principles: Inverse Square Law
26:46 5Lighting Patterns
15:29 6Shoot: Demo Lighting Patterns
28:06 7Quality of Light and Modifiers
09:59Shoot: Choosing a Modifier - Diffusion and Grid
13:40 9Shoot: Choosing a Modifier - Umbrellas
31:01 10Shoot: Choosing a Modifier - Softboxes
21:08 11Shoot: Choosing a Modifier - Extra Stuff
28:10 1210 One Light Set-ups: 1 and 2
17:07 1310 One Light Set-ups: 3 to 5
18:16 1410 One Light Set-ups: 6 to 10
15:57 15One Light Set-ups: Pop Quiz
21:21Day 2
16FAQ for Purchasing Studio Light Part 1
31:00 17FAQ for Purchasing Studio Light Part 2
25:36 18FAQ for Purchasing Studio Light Part 3
43:53 1910 Two Light Set-Ups: 1 and 2
24:29 2010 Two Light Set-Ups: 3 to 6
25:24 2110 Two Light Set-Ups: 7 to 10
22:30 225 Two Light Set-Ups: 1 & 2
13:27 235 Two Light Set-Ups: 3 to 5
33:37 245 Basic Three Light Set-Ups: 1 & 2
21:05 255 Basic Three Light Set-Ups: 3 to 5
25:52 265 Intermediate Three Light Set-Ups: 1 to 3
17:14 275 Intermediate Three Light Set-Ups: 4 & 5
12:58 2810 Common Lighting Mistakes
16:46Day 3
29Solving 12 Common Problems of Studio Lighting: 1
39:29 30Solving 12 Common Problems of Studio Lighting: 2 to 6
37:25 31Solving 12 Common Problems of Studio Lighting: 7
15:50 32Solving 12 Common Problems of Studio Lighting: 8
25:51 33Solving 12 Common Problems of Studio Lighting: 9
16:19 34Solving 12 Common Problems of Studio Lighting: 10 to 12
26:11 35Portrait Lighting: 1, 2, and 3 Lights
14:51 36Beauty Lighting: 1, 2, and 3 Lights
18:06 37Lighting Groups: 1, 2, and 3 Lights
15:53 38Lighting for Drama: 1, 2, and 3 Lights
24:19 39Your First Studio Lighting
38:46Lesson Info
5 Intermediate Three Light Set-Ups: 1 to 3
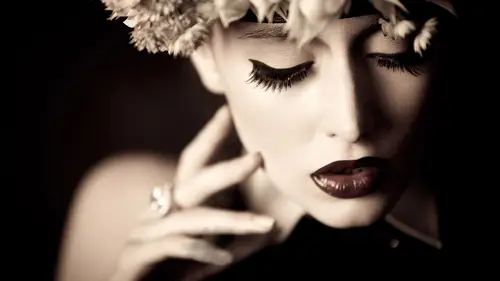
We're going to go, teo, this is intermediate, so we're getting a little fans here, ok? A little bit fancy, or for three point light set ups or how we would use it and we're going to dio a beauty edition, a grid and to barn doors so the beauty dish is going to give me more crisp shadows in the soft box or octo box would give me I add the grid in and it's going to give me nice, tight drama, and I shoot this a lot in fashion when I am looking for curves of a woman here's, why so she's wearing like the bright red dress that I shot that I said, you and john shot man, the other day cases beautiful, bright red dress and what happens if you have a soft box so which is evenly let head to toe everything's kind of distracting and just looking at the whole dress. When you take the grid on the beauty dish, it just focuses you here. So you're focusing at the subject's face and at their chest and kind of like the key parts of a woman here, but then you don't want everything else to be completely gone...
, so the barn doors, what it does is it gives you rim lights. So that you see curve on the hips and the rest of the body so it's really, really good for dramatic fashion image and I shoot this a lot for musicians that comes to me and they want promotional images you're still looking at their face but they've still got some interest in the bottom of their body for whatever if they're moving or if they're an address this I use often let me see if I can help build this do you have another set of born doors dio I might have a peek I brought tio you know what the barn doors look like ok, I did bring another set and they're there somewhere um well could be underneath I'll work on the beauty dish part because I can do that part okay, good and I'm going to show you again the beauty dish with them without a grid so you can see the difference it would make here great thank you. All right, so I'm going to bring you forward a few steps great beauty disparate is in this case perfect and it doesn't really matter I'm going to do it kind of lou pish position take one half step this great making sure that center of the beauty dishes pointed at her face and let's take a quick reading precedents off that's not you all right so right now what did that easy? Easy thank you so I'm gonna take one shot I'm going to go to about knee length, okay? With the shots I'm gonna back up, you get down lower for this. All right? Take a half step to say so fit you on the background right now. Good. All right, so and I can talk tomorrow about small spaces so the subject doesn't fit off of the back around, doesn't fall off of the background and also for small spaces for lighting. All right, so ok, so right now you see that the light hits from her face, maybe down to her knees, you can see it on the floor a little bit, but when I add a grid, the light is going to get significantly more dramatic, okay? Because I'm really short you have tell me. Okay, thank you. Okay, I think we got it. All right, good. So same exact thing savings. I think you put your hand on your hip again. Watch the light changes didn't change a single and that's how much it focuses the light so that's well, use a grid, because right now, now you're not distracted by whatever jeans, she's wearing whatever shoes she's wearing, you're really focusing on her face, but then I don't really want her to blend in the background kind of glass me she just blends in so what we're going to dio is we're going tio turn on the part of doors you're ok now we're gonna turn his barn doors on and this is the setup that I it is most often this one's for you know, it takes going up about five point cool and I usually turn off my main light so that I could make sure that I have the room lights set where I want so let me show you what that looks like. Perfect. So notice I think it draws attention to the curves of a woman, especially if your hands not flat your side can I talk this way over? I might do a little bit more curve perfect and then just put that hand leg your neck will try one like that for right now. Justice break someone look a curve and then I popped that light on perfect and turn your hand towards your neck on like in towards it the other way. Like flip big get like perfect good and I'd do one more a little bit greater. Mom, are you taking head towards the light a little bit more good and then head back towards me so it just creates for like very dramatic shots and these are bright highlights if you think they are too bright and distracting, then you turn and down this tends to be what when I shoot for, like reality tv people they want they want those really bright highlights makes him pop from whatever background there on for portrait I wouldn't do that strong, I'd probably dial it down a full stop. No make it significantly more subtle, so that would be my dramatic three point lighting and to make it even more dramatic, you know, the rules pull the lead off to the side, add more shadow perfect and shut down a little great and big eyes for me from it. And then we had more shadow. Ok, so let's go on to the next one after that pops up more shadow moving off to the side. Okay, three point lighting setup number two this is kind of in the more dramatic realm, same exact thing, but we change this one out for a grid. This is film you are, this is what I shoot from, and there are other modifiers for those of you out there that maybe you've heard of her nails, their focus double lenses. There are other things for film you are, but whenever I'm doing some new are shot. This is what I used a tight, good on the safe to really, really bright highlights created by barn doors wait five the other thing that I'll do this should be shot in black and white because it's film noir and I tend tio over exposed a little bit on the face because that's kind of how it how it looks and if you go to my website if you go to the hair portfolio I did a couple of shots that were hair themed with film noir and so it would be just dramatic tight light on the face and then kind of a wave in the hair bright red and kind of from the hotel and its look all right, you look nice for from nor right now we need, like, dramatic eyebrows and red lips. You just look nice, okay? No, next time. What? Tomorrow? Okay, all right, so great here. All right, so I've got super crisp highlights on either side of her face in her dolling created by the barn doors. If I move them to the sides more spread out more. So have them kind of in the back forty five and I've got this nice tight grid spot on her face it's going to be very, very dramatic and I'll give it a test right right in the center keep going more than middle of her face right on news well, that's pretty close to where we are perfect, all right, so I'm gonna take a head shot first and big eyes ah a little hot and it's a little bit brighter on her forehead always turned down a little okay so should have just a little bit good big eyes oh and I want to switch just the black and white so you can see I do over exposed on purpose because it looks better for the film you are look let me just pop it overto black and white good okay looking dramatic next shot with a watch what it looks like a full length put your hand back to neck one more time perfect and I should get the ricin up just a little bit more so I mean it's on ly a spotlight on her face and then the curves of her body I'm a fashion photographer so for me part of the reason that I do what I do is I know that everything works together so you heard me saying oh man I want different makeup and now I'm thinking man I'd want different clothing so the light looks dramatic but now put it all together with like a sultry sparkly dress and dramatic maybe a finger curl in the hair and that's it kind of all works together it's not just relating it all of it so that's why I do what I do all right let's see your next one it was a film you are summarizing five degree grade in the front to barn doors in the back I tend to shoot this in black and white because in color the color shifts a little bit and it's all about the film you are look which would be black and white anyway all right, so next one this is going to be high key and dramatic price you want to flip those to our conflict flip into the background okay so you can get drama on a black background obviously it's low key but you could also get a dramatic shot on a white background you still just have to use shadow and I think a lot of times and people think of white backgrounds they think glowing high key no shadows but it can be really, really dramatic and I think of a couple shots by albert watson he's a photographer that I studied his lighting not under him I wish but I looked at his lighting and books and in magazines I loved it and that's part of what influence me and he could create intense drama on a white background you just have to shadow so that's what I'm going to do now we're going to put this back to a white background and he's going to flip these around and for time's sake I'm not going to take off the barn doors I'm just going to open up the barn doors because it's like they're not on anyway so open all the way up perfect that's come over here and for this I want to make sure that I am not lighting her on the side so I so I come over here and I tryto there's a little bit of film and that was from those late so I'm trying to make sure none of those lights are hitting her because what I'm trying to dio is I'm trying to get close to a silhouette I would if there's any light that's hitting her like I see some from this white wall we'll talk about this tomorrow I'd do something to make that black all right let's just see right now no other lights are on we just have the two back room lights okay? No mainly so what I want to make sure I'm getting something kind of silhouette ish I want to shift over just a little bit I was for no reason other than the cameras of shooting off the background with you in the middle ok and I'm going to shoot this in black and white again so I want that background to be white I'm going to shoot again like I was before checking my history ram perfect all right click this and I am getting a lot of white this is good although right now I'm shooting her head and notice the top of that background is not white we'll talk about tomorrow how to even that out but right now I kind of felt that crossing up all right, so you'll understand this in depth tomorrow, so I've pointed the light a little bit higher up and feathering across remember how we talked about feathering, so I wouldn't just get a hot spot on the right like I was getting, I pointed it. I'm both of them future in that late a little bit more feathered? Yeah, just so that I'm going to get a little bit more even spread, and I'm not getting the far left hand side anyway, so let's, see if I can get a little bit better wait background and that on my history, graham, this if I can show you on that, I'm a history. It was looking pretty good. I should have the black on the far left created by her silhouette, and then I should have a heavy accumulation of the white pixels on the far right. It looks pretty decent, all right? So we've got that I wanted to have this silhouette. She is pretty, pretty black silhouette there. If you had a lot of phil, you'd want to use black phil cards, these black cards around her to try to block out all the light that's filling in, but it's working right now, we're gonna leave it, and now we're going to add in the beauty dish. And you want to have a beauty ish with a grid for this set up? And I think this looks like hollywood glam as well, because it's going to be a bright background but high contrast, black and white with a spotlight around the subject's face. So I picture this with ah, long gown with a lot of curves, you seal of that curve, and then you have the focus on her face. So, really, this is the same setup is before, with those two barn doors on the black background to switch like no, this is the white version of it where the focus is on the face and then the silhouette. You could do that by separating them out, but putting him on a white background or on the black background, you separate them out with barn doors. Like depends on how you're thinking about it. All right? And I have you bring it closer to her and more to the front. Just a little bit. Okay, so, let's, get a test on this. Thank you. Easy. All right, perfect. Really nice. Okay, this perfect. And I'm gonna back up just a little bit so I can show you for a fuller length, what it looks like. So imagine for a full length shot or hear that it kind of just falls to shadow and you pop that contrast a little bit more, make her skin just a little bit brighter. Am I open up like a tad just so you can see it. It looks very dramatic and elegant. Okay, yeah, I just opened up a little bit so her face would look brighter. There will be a dramatic shot if I want the light even more focus that can bring it even closer. You just have to worry about. Then if you're doing a full length shots in your shot, or you could use a grid, same idea. All right. I'm going to keep going on the list. You won't go for it again. What angle of grade you used on that one? Yeah. Most beauty dishes have, but usually one grid science. This one is a twenty five degree grid that comes with the pro photos. Thank you. And there are ones that are forty degrees and quickly. Yeah. What if you wanted to like her body? Just a little bit? Not a lot. How would you do that? Another light. So the question was, if I wanted to light her body full length, what would I do? This would be an instance where what I would do is I'd have that really tight light on her face. And then octo box below turned way, way down and it's, just a kiss of light, and I'll do this. For example, I've done this with. I have addressed here that it's all sparkles, but I want it to be really tight and dramatic. But I just want to pick up a couple of the speckles on the dress, so I will do that by adding another light.
Class Materials
bonus material with purchase
Ratings and Reviews
BolesMA
If you're on the fence about this class I can easily answer your concerns. BUY IT. Lindsay provides top notch professional education while keeping things interesting. Her words are precise and direct. I actually felt GOOD just watching and learning. I mean, like someone surprised me with a cupcake kinda GOOD. After the class I could immediately see improvements in my photography. The best part is that I learned enough to see the wrong in my setups. Knowing what's wrong is just as important as knowing what's right. She is funny, easy going, energetic and filled with knowledge. I would also highly recommend her Posing 101 class as a must have addition to this course. I feel like I have learned more than I could possibly use. I will be going through this course over and over again just to make sure it all sinks in. There's THAT MUCH she offers that you will always learn more with each time you watch. I hope this helps someone make the decision to up their game. That is exactly what it did for me.
Jason Ashley
I loved this course! Lindsay spent so much time with explaining each set-up in-depth that anyone picking up a camera could understand how to accomplish their lighting goals. This course covered so many unique (but, most likely to come across scenarios) and how one would approach the challenge and how to successfully accomplish with incredible results, not average-sub-standard or basic results, but above entry-level standards, high-level, money-generating lighting expertise! ZERO laziness in her explanations to the point where she is constantly refining her course in the middle of the 3 days. Her passion gleams throughout each days lessons with so much energy. You know she really wants her students both in-person and through the screen to be successful in whatever type of lighting they choose to dabble in. I am so happy, I have bookmarked, and i'm so happy and fortunate to have this course to reference for hopefully –everrrr. Thanks!
Beatrice Palma
Hi, I am Beatrice from Italy. I think this class is superb. I finally understood what are the guide lines to follow, I tried for years but never found such a good explanation. Lindsay is a wonderful teacher, she explains in a simple way, she shares a lot of knowledge and she shows in practice what are the results of every single choice. Thank you so much, it was really amazing and super interesting!!!!
Student Work
Related Classes
Lighting