10 Two Light Set-Ups: 1 and 2
Lesson 19 from: Studio Lighting 101Lindsay Adler
10 Two Light Set-Ups: 1 and 2
Lesson 19 from: Studio Lighting 101Lindsay Adler
Lesson Info
19. 10 Two Light Set-Ups: 1 and 2
Lessons
Day 1
1Studio Essentials: Shutter Speed
15:50 2Studio Essentials: Flash Exposure
22:26 3Studio Essentials: White Balance
21:15 4Light Principles: Inverse Square Law
26:46 5Lighting Patterns
15:29 6Shoot: Demo Lighting Patterns
28:06 7Quality of Light and Modifiers
09:59Shoot: Choosing a Modifier - Diffusion and Grid
13:40 9Shoot: Choosing a Modifier - Umbrellas
31:01 10Shoot: Choosing a Modifier - Softboxes
21:08 11Shoot: Choosing a Modifier - Extra Stuff
28:10 1210 One Light Set-ups: 1 and 2
17:07 1310 One Light Set-ups: 3 to 5
18:16 1410 One Light Set-ups: 6 to 10
15:57 15One Light Set-ups: Pop Quiz
21:21Day 2
16FAQ for Purchasing Studio Light Part 1
31:00 17FAQ for Purchasing Studio Light Part 2
25:36 18FAQ for Purchasing Studio Light Part 3
43:53 1910 Two Light Set-Ups: 1 and 2
24:29 2010 Two Light Set-Ups: 3 to 6
25:24 2110 Two Light Set-Ups: 7 to 10
22:30 225 Two Light Set-Ups: 1 & 2
13:27 235 Two Light Set-Ups: 3 to 5
33:37 245 Basic Three Light Set-Ups: 1 & 2
21:05 255 Basic Three Light Set-Ups: 3 to 5
25:52 265 Intermediate Three Light Set-Ups: 1 to 3
17:14 275 Intermediate Three Light Set-Ups: 4 & 5
12:58 2810 Common Lighting Mistakes
16:46Day 3
29Solving 12 Common Problems of Studio Lighting: 1
39:29 30Solving 12 Common Problems of Studio Lighting: 2 to 6
37:25 31Solving 12 Common Problems of Studio Lighting: 7
15:50 32Solving 12 Common Problems of Studio Lighting: 8
25:51 33Solving 12 Common Problems of Studio Lighting: 9
16:19 34Solving 12 Common Problems of Studio Lighting: 10 to 12
26:11 35Portrait Lighting: 1, 2, and 3 Lights
14:51 36Beauty Lighting: 1, 2, and 3 Lights
18:06 37Lighting Groups: 1, 2, and 3 Lights
15:53 38Lighting for Drama: 1, 2, and 3 Lights
24:19 39Your First Studio Lighting
38:46Lesson Info
10 Two Light Set-Ups: 1 and 2
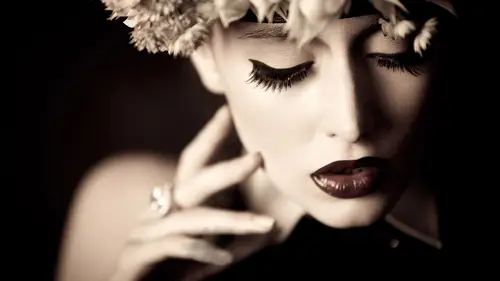
We're going to start with ten to light set ups and then later we're going to dio five a little bit more complicated ones by complicated I mean like where the latest book we'll use the modifiers that maybe aren't as common for a photographer just starting in the studio so with that what I'm going to do isn't good each of these set ups remember that these are going to be included the description and then the end photograph in a pdf for anyone that purchases so just so you can kind of keep track of all of that and I am going to tell you about the placement of light in the height of the light in the modifier choice and I keep it pretty simple and pretty essential for these two lights so I bring my lovely model out here to start with let me grab my holster I think they're here right great all right so let's go to lighting set up number one a soft box and a strict boxes you like the two essential lighting set ups for our lightning modifiers for a portrait photographer and we're going to see ...
if I'm going to get in the way here maybe like a half scoot back you want to mess anything up all right so let's first set the soft box and I'm going to attempt to do this by myself we'll see meaning that all these cords of here watching out for not going over expensive tv is, you know, that kind of stuff all right, so perfect where you place the light for a basic portia like this is I wouldn't recommend if it's supposed to be like an upbeat or traditional portrait, I wouldn't recommend going super dramatic for rembrandt light or short, like as soon as he takes that light off behind your subject start as soon as you start creating too much shadow, then it starts to be a little bit too dramatic. We're going to take an upbeat portrait here, so I'm going to put the light roughly in like a loop position and what that means they'll see a little loop created by the shadow on this side. And can I said that? So can I use that strip? Thank you that's why? I don't wanna block anybody. They can get wed in front of her. Okay, always very little worry about me. Okay, so perfect. So I get that set up as faras the height of the light we talked about yesterday that we want to have the light approximately maybe nine most sixteen inches above the head and that's a guideline what's a good place to start, especially with larger soft boxes. This is a four a three by four foot soft box you don't wanna have the head of the center of the head even with her face things what happens is some of this soft box gets too low and it fills in from underneath and then she gets kind of bottom line it flattens out her face and isn't flattering so you want it slightly from above and for everyone watching that backlight over there on the left hand side that's not being used that's for the next set up so we're just going to use these two lights here so I've got my soft blocks keeping in mind depending on what size you have that sort of the softer you want the light, the larger that light source needs to be relative to the subject meaning I I've got to make it look larger issues I've gotta have it pretty close if I wanted to be soft if I back this up over to the stairs over there if I back it up maybe ten or fifteen feet not really that big compared to her anymore so we keep it nice and close I'm using modeling lights on her face so I can see the little loop of the shadow on her nose and I'm gonna have you can you turn that one offs all show I'll build it so gonna build first we have our soft box in loop and let's talk about our camera settings all right? The camera settings let's get everybody on the same page here we want to be at our sink speed or around our sink speed so for me, my cameras think speed the fastest shutter speed I can shoot without getting those bars is going to be one to hundreds of the second or somewhere close to that one one sixty if you don't want to go to a really slow shutter speed because then you start to pick up ambience, so I'm out one one sixty two the second I am so one hundred because I'm in the studio I can control I want to get rid of noise so I've got eyes so one hundred perfect my white balance I have on flash because I know already from my own personal testing that that's what I like best out of these d ones. If this was a portrait session, I would use a color checker or great card to give myself a neutral reference point so I could use later on to make sure I have the right white balance and the last part of the equation is the aperture I can change the power output of my strobe to decide how later dark it is or it can change my aperture what aiken d'oh and I can guess which I can do I mean, I could go like all right, let's, take a look here really good at guessing I mean I can guess and then she adopt adapt from there or you can use a light meter and light meter gives you the correct opportune you're supposed to be at for a good exposure and so you set the same things shutter speed one two hundredth of a second the s o one, one hundred and then she's going to point this just on that side of her face towards the light right there's good perfect and give it a little test it'll flash and give me the aperture six point three and I was shooting at seven point one like a third of a stop difference I was really close from I guess that was kind of lucky perfect so I'm looking at her there she's got that nice shadow from her nose not true dramatic but perhaps something that I notice is she's got a gorgeous jaw line I love it and and also someone has dark hair she doesn't have dark hair but someone like me what'll happen is if you take my portrait in this situation my hair blends into the background I am one with the background there's no separation so what you want to dio is you want to add either of reflector from the back to try to light the hair or another light for her because she had light hair you could probably get away with a reflector to separate a little but you usually can't kick that much light and to get that much separation so really if someone with a dark hair or in a situation like this was a really dark background, you're going to need to add a second light, so what we're adding in this case is a strip box and a strip boxes along narrow soft box it's going to give me a nice even highlight to separate her out from the background and here's a couple things you are thinking about where you're placing that light notice what john did by default because he's smart he raised the light up a little higher so it's not sitting on the ground. The reason is, is this the latest too low? It doesn't actually light from a downward angle that would give me a nice highlight on the shoulder on the jaw line if it's too low, it just kind of kicks up at the jaw it's not it's, not really the right angle, so you usually want the center of that head about equal with the shoulder or slightly above you're doing a full length that'll still you could maybe make it a little bit lower and you'll still get head to toe separation in the background. So saying that I said yesterday our description was ru shadows to sculpt I have shadows in this image that we just created to sculpt your faith give it a little bit of death highlights separate highlights differentiate your subject from the background so that's how I'm thinking of these things so when have england back towards her a little bit and what I'm watching for is a couple of things I'll show you the good picture and then I'll show you the bad picture we'll start off with how you're correct how you're supposed to be setting it correctly right now it's the right height it's perfect it's illuminating her shoulder it's illuminating her jaw line separating her from the background and we'll talk about exposure as well. Let's give this a quick test all right? So when it pops up, what you'll see is now that shadow side of her face and if she had dark hair it wouldn't just blend into the background there's a nice little highlight for separation what is the correct exposure that correct output for that back? Like I get asked that all the time and the thing is it's a little bit to taste like a recipe, you know you can add a little bit more kick we're calling this a kicker light we learned that yesterday it's kicking her out from the background where I generally start if you use a light meter is I start like at a similar exposure, so if this was let's say seven point one that's what the meter told me I usually start with the background the kicker light here around the same but I can make it much brighter if I want like I can go much brighter I could make it more defined there's not really a right or wrong strength for that light the wrong strength we're going to talk to you about at the end of the day which is basically just way too bright and it becomes one solid bright white overexposed highlight so let's take a look at what this actually reads right now I'm getting a reading on this perfect pop it for me hey, one more time pointing in the wrong direction mmmmmmmmm trading it's not reading it and you're gonna get okay so right now I'm getting something kind of in between it's actually a lot lower initially that highlight right now is like to stop slower instead of seven point one it's like four point oh or three point five I'm gonna have you pump it up a little bit more give myself a little bit more definition of this. Okay, this is also still finds you guys watch the next change it's getting a little bit brighter. Okay? Pump it way up. I'll show you what's wrong. Okay, so we're going for incorrect on this next one so everybody knows here we go so this next one would be incorrect for that like it is an overexposed highlight and a rule of photography is your eye goes to the brightest part of photograph no ideally what you want to do is you want to connect with the viewer's eyes or the subject's eyes and in that highlight should just separate them from the background here that's all I see that's all I'm looking at the whole measurement of what it should be at it kind of depends kind of depends on the look you want to go for so it is to taste me do one more thing wrong can you put it back down to the previous setting if you can kind of shift the cameras can see spatially the distances we have here it's kind of a back forty five ish even a little bit further behind the reason that that's good is it's hitting kind of the back of her head and her jaw line and it gives you that separation but one if we pull it way out this way bring it this way what happens as we do this the light wraps around more and start wrapping around her face and so when we get to hear doesn't look too bad but I'll show you what you don't want okay and actually pump it up a little bit more for power so you can see it a little more clearly only do one more all right this next one is perfect okay so what you start getting instead of the highlight just on the jaw line is I'm actually getting a highly that like her whole jaw, the whole side of her face and that's going to make her face look wider also it's drawing attention away from the center for face where I want to be looking and this is not good this highlight on her nose on the right hand side you can see a highlight there it will make someone's nose look wider and again you're drawing the attention to the lightest parts of the photo and that should not be one side of her nose. So part of this whole equation of adding an extra room lie adding a strip play or hair light is how far it is from the background and what it's doing to the face so I usually go somewhere in that back forty five degree or if you're seeing here it's basically straight across. Another thing is the reason I have this light not totally paramount paramount we talked about is going to be flat let nice front and center when I add a hair light or a rim light or kicker light like this if there's not much shadow, it doesn't really show up but putting the light off to the side a little bit I create shadow on this side of the face which gives me darkness gives me contrast and now that room like gives you a little bit of pop and adds more dimension and a little bit more sculpting effect to the photo so although that was a kind of extended description, I wanted to make sure I talked about what I'm thinking about when I place from lights so to describe what this is we've got a three way four foot soft box raised above the subject's head between nine and sixteen inches you want to still make sure it's close so it's soft and I placed it slightly off to the side to be approximately at a loop position for a little bit of shadow and sculpting to the face and then exactly opposite of that I have a strict box and that strip box I have place to highlight her jaw separate her from the background which is really important with people with dark hair yes on the opposite side is the strip light can it be on the same side as the mainland? Sure and I've done can you try that? Will that reach that mark? What ends up happening is there not really much shadow so you don't feel quite cut there's really not much shadows so you won't really notice it now it doesn't mean you can't it's just not as defined so the other part of this equation is that whole shadow side still has no definition now and I don't know if you can see that it's in the way but there is still a nice highlight on that side of her jaw but if you only have to life you're probably better off using it so that she doesn't blend in the background when we get to three light set ups own three, three different learning said I would put a light over there, and then I could have both highlights on the jaw and have this wherever I want, but they only had two it would be across to separate the subject in the background. Okay, all right, john, you can put it back now. Thank you. I'm going to move this and we'll take a look at the next one. Transit. I saw his lighting setup number one, and we're going to jump back to the keynote, please, and I just call that basic portrait like, by the way, if the shadow on this side of the face was too dark, like we talked about could add a white reflector, you don't need another light to fill, and he does that. Another reflected a philippine let's. Go to number two and lindsay, before you do that, we have a lot of people have been talking all day about ratios and lighting ratios. Is that something you're concerned with? Are you going to talk about this in our one o one class or that something for more and intermediate class, in my opinion, it's for okay, how do I say this is about people, in my opinion? It's not really necessary once you understand light and what ratios would mean is if I metered this side of her face would be two times as bright as the right hand side of her face or a third brighter and so you're defining how light or dark the shadows are and the more dramatic the ratio, the higher contrast, the image, the more dramatic the shadows, the highlight our what you can dio to fill in the shadows and less in that race, which they're closer together is you add a field light or you add a reflector actually knowing ratios doesn't do anything you don't you don't need to know ratio is the reason I needed to know them originally is a shot film, so I couldn't quite tell with that light that I had feeling in what was it going to do and was going to get the image I wanted so I had to know what those different ratios were you can see it and if the shadow is too light you back off the phil light or turn it down and if the shadow is still too dark on the dark side, you bring the reflector in or you turn the phil light up so ratios would be something that I think if you are a newer to photography probably just complicates it probably just gives you another thing. You have to think about more numbers you think you have to have in your head, but you don't really need the numbers. You you're better off understanding what light looks like and how to achieve the mood you're going for. Then if you have the right numbers and I could just say all ratios, I have a little secret. I took a studio lighting class, college my sophomore year and I did really bad. Well, I got a bad grade in the class because I didn't like writing down ratios because I'm like no light is about feeling and it's about it's, about achieving the look, and I was having to go like, five six to a scribble it down, you know what I mean? So so that's part of the reason that I don't I don't love them, it doesn't fit my personality either. All right, thank you. Perfect. Ok, letting set up number two is basic clamshell so soft box in the same position and we talked about clamshell yesterday means one light above and a second still below. Generally you want the softbook boomed out or a little bit more centered, you want less shadow created when you're creating clamshell light, the subject's head is a pearl in a clam one light above one light below what? Your light can be a reflector. Do we have reflected here? Perfect. Okay, so I am going to have her hold a silver reflector below. I'm going to put the soft box in rupe or paramount position or maybe jon and then separating her out from the background as well. You could use a strip box for a highlight so we can do this pretty basic, pretty set up, and I will just have to hold this over reflector yes, you're doing that. Could you remind everybody what you're actually shooting with? What linz and everything like that? Perfect. Okay, so all the gear that I have, I'll go over the light and the camera, so I've got a three by four foot soft box. You could use an octo box know that the settings, the setups that I'm giving you you modify however you want, switching whatever modifiers you want, but the light modifier that I recommended most was a soft box that's what we're going to use that the heads that I'm using a prophet of de ones five hundred why I've got my air remote the camera amusing is the cannon five d mark three and I'm using a signal twenty four to one o five for olin's. I've got a spider holster on my hip so that I can actually move in adjust light without having to have a strap around my neck or having to put the camera down on the ground all right fix of what we're going to do is so that I don't have to guess we're going to take a meter reading what we get roughly okay perfect so I am starting off with an aperture of five six and we have this light in a paramount position which means there's not really going to be shadows so lester right it's going to be basically straight overhead in front of her and could be a little bit off to the side if you have a boom arm you khun booming out so the stand is really far but I know a fire the way that I know most of us don't have that so just get it as close as possible you can shoot with your lens like right next to the stand just because you're paramount isn't perfectly centered it's ok like no one's it'll look good still so the on ly life is going to fire right now is just this main light test no but don't look at this don't look at it look at it that way don't look at it, we'll start again that was just be off we're building okay and a little straighter perfect all right now I said is a general rule of thumb that you want your asses general rule of thumb you want to have your main light between nine and sixteen inches above her head? This is significantly higher and what it will do is it'll give you those type of shadows. Okay, but let me let me show you some tweaks that you can make to this. The reason that these are not ideal shadows is because there's no light in her eyes I mean there's a little bit. I got a tiny bit of catch lights, but you want more sparkle and you want more life now I can't help myself out and add more light and sparkle by adding a reflector soda pop the reflector underneath and it's I still think I would have to change this a bit, but what I can do is add this reflector it's going to capture the light from the soft box and kick it back up into her eyes. So what we're looking for is you can actually see it somewhere around there, perhaps to try all right now watch the drastic difference just by adding a silver reflector underneath her chin and it really pops it up and really opens out the shadows opens up the shadows that's another term it just means fills him in so not so dark and heavy opens them up to light now what it will do is carve out her cheekbones when you have that light up really high but it's a balance because if the lights too high there's too much shadows in the isis too much shadow underneath the cheekbone and jaw line so you can meet in the middle and I can also back this up a little bit that will help me a tiny bit and then just a little bit lower and I write a little bit more right there's good so I've given myself a little bit more like to work with the reason that I had we backed up the soft box is if you're really close with it really high it kind of passes over when I back up a little bit the light has time to spread out and so it'll fill in the eyes a little bit more versus right here not quite reaching her all right let me have been a little bit ok and so now everything gets a lot brighter I opened up a little bit and I probably should stay that they were seeing opportunities and just one more okay so now everything is really what we call flat lit and it's kind of higher key lighting but we have a dark background so it's going to be a flat lit image not much dimension to it she's got the sparkle in her eyes should be looked really serious like really man was really super serious anyway, so that's going to be flattering light on her face? This would be fine for one light set up but if you want a little bit more production we're going to add a back light and can you drop that power? Ok, so here's what we're dropping the power is from the last set up I was shooting for that to be correct when I was shooting an aperture seven point one or six point three we're you know, whatever somewhere around that range and it looks good, but as I move things back for the main light I had open up my africa now I'm shooting it five point six or five point o and so when I open up that hole for more light for more water, everything will get brighter. So now that background that would be too bright if I didn't change it so I had him drop it down just a little bit we're going to give it there we go out so much happier good, perfect so this will give us and see you'll build expression changes nice too. So this gives us a nice clean highlight that makes it feel like a brighter, higher key happier image just that highlight helps along with the lighting, so this would be letting sort of number two basic clamshell we have are mainly and loop or paramount probably paramount would give you more of the traditional clam shells, like front and center, not too high to put dark shadows in the eyes. I still want to see catch lights. It's been a silver reflector underneath to catch that light, bounce it in, flatten out the shadows a little bit and then a strip bank back forty five to her, just to give us a nice little kick of like, a little bit of definition.
Class Materials
bonus material with purchase
Ratings and Reviews
BolesMA
If you're on the fence about this class I can easily answer your concerns. BUY IT. Lindsay provides top notch professional education while keeping things interesting. Her words are precise and direct. I actually felt GOOD just watching and learning. I mean, like someone surprised me with a cupcake kinda GOOD. After the class I could immediately see improvements in my photography. The best part is that I learned enough to see the wrong in my setups. Knowing what's wrong is just as important as knowing what's right. She is funny, easy going, energetic and filled with knowledge. I would also highly recommend her Posing 101 class as a must have addition to this course. I feel like I have learned more than I could possibly use. I will be going through this course over and over again just to make sure it all sinks in. There's THAT MUCH she offers that you will always learn more with each time you watch. I hope this helps someone make the decision to up their game. That is exactly what it did for me.
Jason Ashley
I loved this course! Lindsay spent so much time with explaining each set-up in-depth that anyone picking up a camera could understand how to accomplish their lighting goals. This course covered so many unique (but, most likely to come across scenarios) and how one would approach the challenge and how to successfully accomplish with incredible results, not average-sub-standard or basic results, but above entry-level standards, high-level, money-generating lighting expertise! ZERO laziness in her explanations to the point where she is constantly refining her course in the middle of the 3 days. Her passion gleams throughout each days lessons with so much energy. You know she really wants her students both in-person and through the screen to be successful in whatever type of lighting they choose to dabble in. I am so happy, I have bookmarked, and i'm so happy and fortunate to have this course to reference for hopefully –everrrr. Thanks!
Beatrice Palma
Hi, I am Beatrice from Italy. I think this class is superb. I finally understood what are the guide lines to follow, I tried for years but never found such a good explanation. Lindsay is a wonderful teacher, she explains in a simple way, she shares a lot of knowledge and she shows in practice what are the results of every single choice. Thank you so much, it was really amazing and super interesting!!!!
Student Work
Related Classes
Lighting