Lesson Info
25. Shoot: Set-up the Gear for Portrait
Lessons
Class Introduction
06:48 2Develop your Artistic Vision
20:22 3Learn Strobe Basics
19:21 4Which Strobe Is Best For You?
17:36 5Strobe Questions Answered
15:33 6Balance Strobes with Ambient Light
14:27 7The Sunny 16 Rule
16:12 8Choose the Right Modifier for Strobes
28:02On Location Shoot: Overpower Sunlight with Strobes
24:01 10Create Shallow Depth of Field Using Strobes Outdoors
23:49 11On Location Shoot: Portrait in the Shade with ND Filter
21:19 12On Location Shoot: Portrait with Sun on the Shoulder with ND Filter
17:48 13On Location Shoot: Portrait Using Strobes & Wide Angle Lens
14:41 14Shoot: Use Strobes with Props
17:07 15Shoot: Shooting into Sun with Strobes
22:27 16Shoot: Increase Strobe Power while Shooting in Sunlight
10:46 17Understand 32 Bit Depth
20:03 18HDR Bit Depth with Strobes
16:36 19How to Use the CamRanger for HDR Portraits
33:35 20On Location Shoot: Setting Up the Lights in Boxing Gym
13:55 21On Location Shoot: 3 Light Edge Portrait with Strobes
21:45 22On Location Shoot: Portrait Using Top Light with Strobes
18:10 23On Location Shoot: Create a Dramatic Portrait with Strobes
19:26 24Strobes & Textured Background for Character Portraits
09:44 25Shoot: Set-up the Gear for Portrait
16:07 26Shoot: One Strobe Portrait with Gray Backdrop
26:30 27Shoot: One Strobe Portrait with Textured Background
13:32 28Shoot: Using HDR for One Strobe Portrait
08:55 29Setting up Post Production Workflow
16:02 30Photoshop® Workflow: HDR Boxing Gym Portrait Shoot
14:35 31Photoshop® Workflow: HDR Portrait with Stitching
37:51Lesson Info
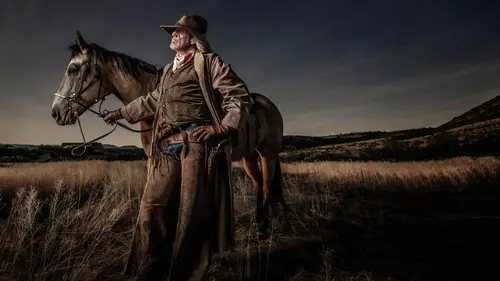
Shoot: Set-up the Gear for Portrait
John, we're gonna set this up, so I'm gonna move from my laptop. And actually what's gonna happen here is I'm gonna probably have John trigger my CamRanger since it's all hooked up to my laptop. Normally I use my iPhone which they took away from me or my iPad to trigger my camera, usually don't use my laptop. So let's set this up, this actually comes apart like this and folds up into a little case and it's a travel, right? And so this is made by Westcott or Westcott distributes this and that's really kind of like one of those displays that you see it like the trade shows and stuff, I don't know where they got it. What I'm gonna do here you slide it in to lock into place. So let's do this. This takes a lot of skill to put this up. (laughter) so we're going here and then you can you just kinda like slide these things up here and latch them. Whoops it came out in the middle here. And Wescott gives you, I think they do a green screen, I have a also black all black and all white. But the gr...
ay is gonna allow me to go and knock out, cut out, go that one all the way up. It is. It is all the way up, okay. So we wanna get it smooth in the front here. So you have a little bit of wrinkle right here, so undo the middle one just a little bit, slide it down. That's pretty good. We want a smooth surface. Now this gray is designed to end up 50% gray. There's a way a little bit of a secret that I thought about laying in bed at 3:00 the morning, that I can test this to see if it's gonna be producing a mid gray and I can use my histogram. So I can snap a picture with nobody in it and then if that spike falls toward the middle of your histogram, doesn't be dead center but that means you're getting a good mid gray. So you could take a white sweep and then set your lights up so that it turns into a gray, a mid gray and you go am I there? And then just take a histogram find out where your spike is. So let's do this, let's get our light here and put gee! The Joel Grimes beauty dish (laughter). This thing just keeps popping up. And so we're gonna pop this on here (metal clattering) and we wanna make sure that when you set your light up the Joel Grimes beauty dish, that the logo is right there (laughter) so that everybody can see, that's important. (laughter) So let's get it up a little bit, we're gonna get right over the camera, all right! So let me explain what I'm doing here. I have the really right stuff, system here. This is their L bracket or slider, no so here's the L bracket there's the slider, to get your nodal point and so I've got a plate that goes on the bottom and on the side here. Normally, what I do (metal clicking) I'm going to hand this to you John, is that let's go and put this like this. You saw me clip this into here, like this. So that's my normal kind of horizontal and then I just do this and I go into the vertical right here. So I have a little bit of a midpoint that I line up to match so I stay in the dead center. So that's kinda how I do my overhead or when I switch. So I shot medium format the Mamiya RB and then RZ so I have really thirty years of shooting medium format. That had a rotating back so the client said give me a vertical, (imitates camera shutter) gimme horizontal (imitates camera shutter), I just rotated it. I got used to that. So when digital came along and I had to put the Old RB in the closet or Z in the closet, I was like, "I gotta find a solution "that allows me to keep my lens dead center "over the top of my tripod, like this." So when a client tells me to go horizontal or vertical, I'm not having to move up, down, check you know all that kinda stuff. And then I found the really right stuff, website and purchase their first L-bracket with their ball head. Actually I ended up with the bigger one, they have three ball, well they have... I know at least three ball heads, might be a tiny small one but, this is the mid one, right? I had the big one, Cliff you bought the big one too. Big ones is a little much sturdier. And for this tripod the big one would be great and then right after that, wasn't long after that, I discovered this thing called nodal point, getting the nodal point for panoramas. And I can't remember what year this was but around the time that I was shooting those outdoor strobe cactus things that I ended up having Arizona Highways run on their cover and whatever. So I bought the slider here and what that does is if you, lets say do it this way, if you set it up like this, on this part you set it here, instead of your lens rotating straight over here if you go and move click, click, click, click, click, your parallax is gonna be off. And so when I first started there were no programs for a Mac to stitch something together. They had a PC version of some kind of stitching thing, PTGui I think it was. So I did all that cactus stuff that I did that ran in Arizona Highways, that was stitched by hand, all in Photoshop. So I'd take the five and I would go in there and warp and you know put them all together myself. But I did learn that the wider your lens, the harder it is to get your nodal point. You have to really be right on with your nodal point. So nodal point is designed so that when you spin your camera, that there's no parallax. It sounds complicated, it's not complicated at all. And in fact if you go to really write stuff of their website they have tutorials on how to do it. And I have been teaching this for a long time so it's not rocket science. But basically what it is is, let's do this with John, let's just go here. I'm gonna do it horizontal and I'm gonna show you how quickly I can find the nodal point. So what I do is I lock it down, I got to make sure you're dead centered on your two little lines here. So there's two little lines that tell me I'm perfectly centered, okay? And then I take a second light stand. (john mumbles) Yeah! So basically what happens is, when I turn the camera to the furthest on the left on the frame, right now, if I don't have the nodal point, so let's go to the non-nodal point right there. If I am dead center like you would normally mount on a camera to plate, when I move, his hand goes (imitates crossing) across the frame. When I move it, he's holding it still, I usually just take a light stand, I even take a twig out in the middle of nowhere and I go, "Oh I forgot to get my nodal point write it down." I just take a little twig or something, stick it up, look at another tree and just move it and all I gotta do is, okay, I'm gonna just go wide angle here and I just slide it back, until the light stand, the twig or whatever, lines up, so right now it's lined up in the middle but when I go over here it moves. So all you have to do is slide it until that twig or that whatever lines up whatever my anchor point in the distance is. And then I go and I write it on this little plate. So for every lens that you have, like I got a zoom lens here, so my 24 focal length is gonna be different than my 70. So I have on here, I have a 24 millimeter which is 4.0, that's the rail. I set that at 4.0 on L-mark here, there's my nodal point, I've already predetermined that. I got 35 millimeters 5. at 50 millimeters 5.5, at 70 millimeters 7.1. So I know that I've been at the 50 millimeter, we're going to be that here in a minute, that I set my rail at 5.5 and I had my nodal point. So when I do my stitching, it's like pretty much easy-peasy for the program to do it. Now I do most of my stitching in Photoshop under Photomerge. And that comes with your Photoshop, it's already there with Photoshop. So I have all my lenses on there. I got a couple of tilt shift lenses, I've got my new 11 to 24 millimeter that only Canon has, full frame it's a ultra wide lens. So I have all that stuff on there, my new 35 1.4 is on there, so I know where all my nodal points are. It's not rocket science. Yes Cliff, you got a question. Obviously every lens if you have your 7200, you got it, you have to run through (coughs) excuse me. Do you have to run it through every focal length that you're using? The standard, yes. So the 7200 has a middle mount and you can almost get away with just mounting that on your tripod and doing your your... cause the longer your lens the less the nodal point factors in, right? My boys do it by hand. They take their 70, you're gonna go (imitates camera shooting) right across, they do like three rows and then stitch it all together, with the long lens. I have on here my and it's all over the board. 70 millimeter was at 4.0 on the rail, 100 millimeter went to 8.0. So there's a big difference. But because it's a longer lens, it's not as critical. You get into a 35, 24, 20, 16 millimeter, eleven, boy you've gotta have your nodal point right on the money. I would say this, that if you have not done this and you wanna test it out, you could probably use a long lens and sneak by and get it get away with it. But if you wanna go wide angle, you gotta have your nodal point. (coughs) So what I'm gonna do today though, is I'm gonna go stitch up to down. To do that, really right stuff has a panorama to access mount. That would allow me to mount this in here and go up and down really easily. I'm cheating just a little bit, by going to this system, which is I go to the side, now I'm going up and down this way. And now that's not as sturdy because I'm off centered on my access on my tripod here, but because I have a really right stuff tripod, which is really sturdy, I'm pretty good to go. I'm in a studio environment right now anyways. What I'm gonna to do is I'm gonna snap from here to here, here to here, here to here. I'm gonna cross over a little bit, I'm gonna go (imitates shooting). So I don't have to do that today, I could just shoot one click and we'd be happy, we could do it, but I wanna show you this process. We're kind of building on what we've already done before. So now we're adding a stitching, HDR, (imitates camera clicking) a lot of clicks, right? And so you say is, "How can you do that with a portrait? "Is it possible? "What about movement?" What you do is you put them in a refrigerator, freeze them up (laughter) and then bring them out and they're like frozen, no. It works, it works, I do it all the time. So people will say, "How did you figure that out?" Well, just one day I thought, what would happen if I did that? And I just now start doing the stitching. So we have our CamRanger on, by the way Melissa at CamRanger was watching because I gave her heads up and she said there is a setting in the CamRanger that I can go and let the ISO go back to my anchor point. Oh! (claps) I'm so happy. I didn't know that existed. So I'm gonna go try that later, we won't do it right now, cause I don't wanna spend time figuring out in there. So basically that's good news because I would have called them on and said, "Hey can you please fix this." Someone already did, I'm sure said, "We've got an issue." And they're wonderful people to kinda get you to use their their CamRanger for all the needs that you have. Alright so, we have to turn our light on here, I'm gonna see if I can get my radio poppers to work, every time you guys turn these cameras on with all the wireless stuff, things start happening. Let me ask you a question, if you were paying attention, this is a this is a little quiz. If I have a 24 inch modifier over the top of my lens how far do I put that from my subject? 24 inches. Yes (claps). (laughing) Okay, you guys aren't sleeping, I thought you were sleeping. So that's kind of what I'm gonna do, is I'm gonna have this. Let me slide this up just a little bit more here, hold on. I can adjust the angle of this thing, so it's straight up and down, there we go. And there's a little hook back there if you wanna put a little sandbag or something on it and so John go that way just a little bit. And so then I'm gonna take my beauty dish and put it about 24 inches, roughly. And then I'm gonna lower it until I just clear my lens, somewhere around there. Now I'm going to set my focal length on my lens at about 50 millimeter. I know that's cause I've done this a couple times, that covers from shoulder to shoulder, gives me a little room and then I'll go (imitates camera shooting) up and down. So I've got my nodal point set at 5.5, my scale, that's what it says here, I did my test earlier and wrote it down here. And so what I'm gonna do now, is I just get my positioning right about there. You wanna bring the model in? Yeah, we'll get to Ryan, Ryan let's get the real deal. Not that John's not the real deal, Yeah, but I get it. But John does have a beard, right? (light laughter) you know? So--
Class Materials
Free Download
Bonus Materials with Purchase
Ratings and Reviews
Christopher Langford
I love Joel, even though I'm not a big fan of his style. He's a great teacher, really down to earth, and best of all, humble. He's a true professional and knows the business. Even if you're a seasoned photographer, I believe you will pick up some great tips throughout this course. What I enjoyed most from this course was learning Joel's thought processes and how he takes on challenges.
Gilbert Wu
I did enjoy the class despite not being used to the American product placement culture. The British say “the proof is in the pudding”, Joel’s pictures are fantastic and create drama. He has the eye. I like his very down to earth approach which is far better than many youtube photographic charlatans. Apart from the techniques he shared, one very important thing I learned from this class is “Be an artist and not a technician”. If you want to learn from people who can take better pictures and more confident and experienced in his/her work than you, Joel is one of those people.
Dana Niemeier
After seeing Joel at Shutterfest 2016, I am a fan. He is intense, but that is inspiring. I especially like the segment using ND filters as I live in Florida where bright sun can be an issue! His teaching method sets the student at ease. You see him make mistakes and then figure them out! Makes us believe there is HOPE for us in the learning process! I also bought his commercial photography class as an add on. Great to see him work and think on his feet. Thanks CreativeLive for giving artists this platform that reaches out to artists around the globe.